Introduction
The Guitar Index Page has everything you need about how components work, amplifiers, free music, lessons, warrm-ups, tuning tecniques, taking care of both your gear and body, the science of the guitar, and more. The Music Index is a growing list of chord and scale progressions, 12 bar blues, jazz, music, and more. Music is continually being added.
Technology Behind the Air Guitar
We can all be great! So, when you are frustrated with your guitar work you may want to take a breather and have a little fun playing the air guitar. Here is a quick guide to help you get started.
Stick Man!
Congratulations to Neil Haverstick who is listed as one of the 101 "Forgotten Greats and Unsung Heroes" in the February issue of Guitar Player magazine for his striking microtonal playing. Neil has been featured here since our inception and we also have some samples of his playing.
Great Learning Resources
Here is a great site to learn Jazz Theory and Improvisation. Pete Thomas is a sax player, but he provides the basics in such a way that a guitarist that knows his/her chords can easily participate in the lessons. By far one of the best jazz learning sources around.
Hi-Tech Guitar Pickup 
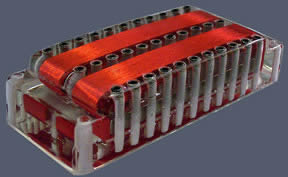
The application of acoustic technology in the area of musical instruments and sound reproducing equipment also promotes synergism i.e. cooperative action of discrete components such that the total effect is greater than the sum of the two or more effects taken independently. In order for this phenomenon to manifest itself, however, an instrument’s formants i.e. subsidiary resonance ranges that accompany the fundamental frequency, must sound consonant-that is, having a well aligned geometry of musical related harmonics and their intensities. Electrically, the harmonic curves determine the shape of the saw-tooth- wave-form and,thus, the quality of the sound; this conversion can be fine-tuned by a Q-tuner’s mechanical means. Read more...
All About...Power Tubes
By Josh Workman | November 2006
Unlike transistors—which are all made to very exact specs by computers and robots—vacuum tubes are still hand-assembled in different countries with different metals, and under varying conditions that can drastically affect their sound. This is a boon to tone aficionados, because the organic nature of each tube’s sonic characteristics allows you to individualize the sound of your amp by simply swapping out its power tubes. In fact, according to tube guru Aspen Pittman of Groove Tubes, changing your tubes is the most basic modification you can have done to your amp, and, very often, you can get the sound you’re looking for without further effort.
 Of course, “have done” is a critical phrase in the modification process, because tube replacement can be a dangerous operation for both your lifespan (there’s often more than 400 volts DC running through those circuits) and your amp’s. This is not something you want to attempt if you don’t have the electronics chops, so be sure to call on a qualified amp technician to do the actual work.
As power tubes arguably affect your amp’s sound more decisively than preamp tubes, we’ll spotlight several power bottles and detail their basic tonal characteristics. Use these guidelines as a basic menu for finding the power tube(s) that might satisfy your personal concept of ideal amp tone.
The 6V6 is known for its sweet overdrive at low volumes, and it can be found in lower-wattage American amps such as the Fender Champ, Princeton, and Deluxe, as well as the Gibson GA6.
At the heart of the revered Vox AC30 is the EL84 (aka 6BQ5 and 7189), which possesses a rich, warm tone with tons of sustain and top-end chime.
A big part of the “American” sound, 6L6 tubes produce a “glassy” or “airy” sound at the top-end, and are found in a wide variety of amps from 40 watts on up—including most Fenders.
Designed in the early ’50s for heavy-duty audio applications such as P.A. systems, the 5881 shares some tonal characteristics with the 6L6, but it has a more bluesy sound, as favored by early rock and rollers and old-school blues players. (This is the tube that powered the early Fender 4x10 Bassman.) Vintage Tung-Sol 5881s are known for their distinctive, twangy “Texas” tone.
The Ampeg sound was often driven by 7027s, and, after being out of production for a while, these high-power tubes are back. If you own an Ampeg amp that uses 7027s, you can reportedly replace the bottle with any tube in the 6L6 family without a modification—as long as you check the bias adjustment.
A direct 6L6 drop-in (again, with a bias adjustment), the KT66 has a more buttery top end, a looser bottom, and is heralded for its role in Eric Clapton’s “Beano”-era Bluesbreakers tone. Hence, it’s perfect for vintage amps such as the the Marshall Bluesbreaker combo.
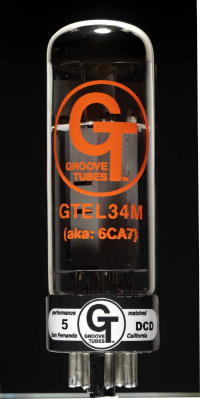
The EL34 (aka 6CA7) tube emphasizes the mids, and it is a huge part of the brawny “Brit Rock” sound of Marshall and Hiwatt amps.
The KT77 is a direct replacement for the EL34, but it can also be used in place of a 6L6 to get the “British” sound with nothing more than a bias adjust on your amp.
For a while in the 1980s, Marshall replaced its standard EL34s with 6550s for American export models. Soon after the switch, many hard-rock musicians—pleased with the stability, road-readiness, and bare-knuckles sound of 6550s—began modifying their old EL34-based Marshalls to take 6550s.
The KT88 is a direct replacement for the 6550, but it can handle higher plate voltages, and possibly yield a bit more power.
Special thanks to Trace Allen Davis at Voodoo Amps and Aspen Pittman at Groove Tubes for their immense help with this article.
Groove Tubes - the rating system and tube selection
Which tubes should I use? I get this question all the time. Tubes selection is something which is very much personal taste. The tubes discussed here are primarily Groove Tubes...an industry leader. There are good descriptions of each tube on the GT website:
Preamp tubes
Output tubes
Rectifiers
Bias tools etc.
THE GROOVE TUBES RATING SYSTEM

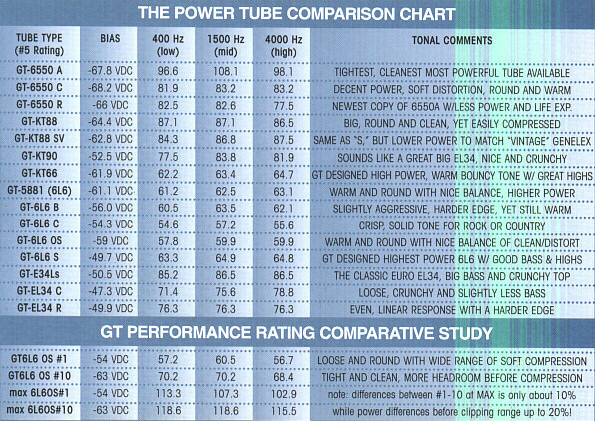
Hopefully this chart will help some folks understand the Groove Tubes rating system of 1-10.
This is the lower portion of the chart, the "comparative study".
The numbers here are WATTS at various frequencies. The numerically lower set of numbers is the clean wattage that was generated with the #1 and #10 set of the same tube. The "max" numbers below the OS numbers are then the maximum wattage developed with the same tubes. What this is showing, is that it is less a matter of power output and more a matter of distortion characteristics that their 1-10 numbers indicate. In the last example above, we see see than an OS #1 at max in one frequency range produces 113.3 watts in the amp (a Groove Tubes Solo 75 amp), and a OS # 10 produces 118.6 watts. Remember, it takes TWICE the power to give you 3db more of power. So the amount of power change here is very small across their 1-10 range, it is more of the point and manner in which the tube distorts.
In the upper part of the chart, you again see wattage at various frequencies with a number of the tubes that Groove Tubes offers. This is a nice study also.
The bottom line here is:
Lower numbers will start to distort at lower volume settings on your amp, and have more dynamic touch and feel. These are the GT 1-3 range, and the Fender "blue" painted tubes. Many Jazz or Blues players like this range, and they work well for recording where levels are going to be lower, or in smaller venues.
Medium numbers are the most versatile, will drop into most amps and be very close to most factories bias settings, and are the best general choice for most players wanting a versatile well rounded amp. These are the GT 4-7 range, and the Fender "white" painted tubes. The range of 4,5,6 are able to be used in Mesa Boogie fixed bias amps, and on the Mesa scale convert roughly to:
Mesa scale Red Groove Tubes scale 4
Mesa scale Yellow Groove Tubes scale 4
Mesa scale Green Groove Tubes scale 5
Mesa scale Gray Groove Tubes scale 5
Mesa scale Blue Groove Tubes scale 6
Mesa scale White Groove Tubes scale 6
The Fender tube scale is:
Blue = GT 1-3 range
White = GT 4-7 range
Red = GT 8-10 range
In a amp with a given bias, a higher GT rated tube will have a higher idle dissipation if no adjustments are made. This aspect can be used to fine tune amps such as older tweed era Fender amps, Mesa Boogie Amps, Hiwatt, Orange, etc. If you find as an example that a #5 tube has an idle of 26mA and you wish something closer to 30mA you may want to try a #7 rating. Groove Tubes also designs and builds their own line of amplifiers from their custom shop, the Soul-O Series. For more information
including downloadable owner's manuals CLICK HERE
For the Groove Tubes SFX systems, CLICK HERE
Basically, a #1 will distort sooner, and a #10 later. If, for example, with a mid range tube, say a #5, makes your amp start to break in the output section at a volume setting on the amp of "4", then with a lower number tube, like a #2, your amp would have a same sort of break into output distortion at say a volume setting of "3". With a higher tube, such as an #8, then you amp would stay clean to about perhaps "6" on the volume.
High rating numbers are not more or less powerful, they just distort later. These are preferred by heavy rocker that want maximum clean output, as they get their distortion and tone from effects or pedals. These are not as touch dynamic.
Low number tubes are very touch dynamic, and more suited for a lot of folks, for smaller venues and recording.
Most folks prefer the 4-7 range tubes, as they are the closest in character and touch to what the amplifier designer had in mind. They are also the most versatile.
Guitarists and Health
As important as it is to be in good physical condition to play guitar by stretching and preparing your muscles, you can't play well without being focused and relaxed either. The bottom line here is that playing guitar should be fun. You didn't pick up the instrument for it to add stress to your life, but remove it. And it won't be any fun if you are stressed out about the next note or chord, or worried about who might be hearing you.
Repetitive Strain Injury Prevention Guidelines*
The best way to prevent injury is through prevention.
-
Drink plenty of spring water or filtered water. Attempt to drink one 8 oz. glass of water per hour. The tissues of your body are composed mostly of water. Dehydration inhibits the healing process.
- Avoid caffeinated beverages and alcohol. These will dehydrate you. The stimulating affect of caffeine will also tense your muscles.
-
Before you begin your workday, stretch your muscles, and perform some light exercises to "wake them up." Avoid working with tight, unstretched arms and shoulders. This will lead to further injury.
-
Perform stretching exercises at your workplace at least once per hour. (Provided by a health care provider)
-
Take frequent breaks to rest muscles and to stretch. At least one 5 minute rest every 30 minutes is adequate to perform self-massage and stretching for the muscles.
-
Begin a daily log of your activities and symptoms. In the log, state the symptom and its severity, along with activities that may have brought on the complaint. This enables you to begin understanding why you have this injury. Other items to log are: water intake, medications taken per day, dietary intake, and other factors that may play a part in your condition, such as emotional factors and stress level.
- Watch your posture while working. If you have questions regarding specific work-related postures, ask the doctor.
- Old environments will worsen RSI conditions because of decreased blood flow to the tissues. If you find yourself in a cold environment, take steps to correct it. (i.e. wear gloves, buy a space heater, etc.)
-
Check with your local hardware or stationary store for rubberized materials that allow easier grasping of objects, such as around a commonly used pen, or pliers, etc.
-
Avoid hobbies that flare up the condition, such as sewing, and sports involving heavy shoulder and arm use (like racquetball).
-
Do not perform weight lifting exercises to your arms, hands, or shoulders when the condition is in an inflamed state. This will simply further the irritation and swelling.
-
Use ice, either via an ice pack or by using a Dixie cup ice massage to relieve swollen irritated tissues. When using an ice pack, always place a moist towel between your skin and the ice pack. Ask the doctor on the proper technique for ice massage. Ice should be used for no longer than 15 minutes at a time. Take a half-hour break before applying again.
-
If the muscles in your neck and back are sore and tense, moist heat may be affective in relieving the pain. As with ice, use heat for periods of 20 minutes at a time. Take the heat off for 20 to 30 minutes between sessions. If you feel worse after using heat, apply ice for 15 minutes. This will decrease the swelling present. Avoid heat if this is the case.
Top
Warm Up Exercises Use a metronome with all exercises, and use a clean tone. If at anytime your hands or forearms cramp up or hurt, STOP shake out your hands and arms, then try to relax and start again, if you continue playing with the pain, you will probably develop tendonitis or a similar problem...
CREATING/MODIFYING GUITARS FOR PEOPLE WITH DISABILITIES
Guitar Fitness 102 article on the Mining.Co. Guitar site: Physical problems can plague guitar players at all levels. But that is only half the story- what about emotions and stress levels? From beginners to advanced players, emotions and stress can affect any performance.
What does it mean when my hands start to hurt?*
Pain is your body's way of telling you you're doing something wrong. When your hands start to hurt, STOP PLAYING. I know, I tend to go overboard, myself. A couple of weeks ago a friend stopped by and we jammed for most of the day. The next day, my left wrist hurt so bad I could hardly bend it. Scared me enough that I didn't play for several days, and it got better. Your body wasn't designed to play for hours at a time, and you can permanently damage it by overdoing it. Before you play, stretch out your hands, fingers, and arms. Some people recommend washing your hands in warm water, first. Warm up slowly, take frequent breaks, and stop when it hurts. Also, pay attention to your playing position. Wearing your guitar too low is a big invitation to carpal tunnel syndrome. Try to keep your wrist as straight as possible when fretting.
Top
Guitar Exercises
Note: By increasing finger strength, the guitarist is less prone to injury. Many of these exercises are just the typical "running through the scales," but if done religiously then the strength is developed that will prevent future injury. You do need to be aware of practicing too much...the most common side effect is "trigger finger."
Lesson #1, 4/21/98-Chromatic Exercises I Three Chromatic exercises, great warm-ups
Lesson #2, 7/6/98-Steve Morse Pt.1 Eight examples taken from Steve's Exercise
Lesson #3, 7/7/98-Steve Morse Pt.2 Steve's full length Personal Picking Exercise
Lesson #4, 7/19/98 Economy Picking A study in Economy Picking
Lesson #5, 7/20/98 Chromatic Octave Exercise A great right hand exercise.
Lesson #6, 7/21/98 Chromatic Exercises II Four warm-up/stamina building exercises
Finger-Build Riffs some good riffs to develop speed and strength
Top