|
|
Home | Audio | DIY | Guitar | iPods | Music | Brain/Problem Solving | Links| Site Map
This work is licensed under a Creative Commons License.
By Jesse David Hollington
Contributing Editor
Published: Tuesday, December 9, 2008
Category: iPod 101 Tutorials
The single most common question we get from our readers by far is how to recover their content from their iPod back onto their computer. These questions are usually precipitated by users suddenly discovering that their iTunes library has become corrupted or erased, or that their computer has suddenly died on them.
Although we’ve covered the process of recovering your content from your iPod extensively in our tutorial on Copying Content from your iPod to your Computer, the reality is that this remains a somewhat cumbersome and imperfect recovery process. Further, if you have not been syncing your entire library to your iPod, then you’re not going to get all of your content back, since of course you can’t recover what isn’t there.
Of course, if your music library consists of content ripped from your own CDs, you can always go back to those as a source, but this will not only be a time-consuming process of re-importing all of your content, but you will also have lost any metadata about those tracks such as ratings, play counts, and playlist entries.
As for content you may have purchased from the iTunes Store? For that you’d pretty much be relying on Apple’s good graces to allow you to re-download it—an exception that they will sometimes make, but definitely not part of their normal policy. Apple tells you flat out the first time you use the iTunes Store that you are responsible to back up your iTunes purchases yourself.
As with anything in the world of computers, the bottom line is that you are always best to maintain a proactive backup strategy for your iTunes library. This way, when Murphy’s Law takes effect and the worst happens to your content, you can simply restore it from backup and be up and running again in no time.
The good news is that this process is not as onerous as it may seem, and in fact iTunes itself has provided tools in recent versions to make things even easier for many users with simple backup needs.
The iTunes Method: Back Up to Disc
iTunes 7 introduced a new built-in backup feature that allows you to backup your iTunes library to recordable CD or DVD media. Although users have always been able to burn data discs manually with iTunes to backup their content, the new backup feature handles this process more seamlessly for you, spanning discs as necessary and most importantly backing up some of your track information in the process as well.
To initiate a backup to CD/DVD in iTunes, simply choose File, Library, Back Up to Disc from the iTunes menu—note that if you’re still using iTunes 7, this option will be found directly on the File menu, rather than under the Library sub-menu. After selecting this option, an introductory screen appears briefly explaining the process and asking you what you would like to back up.
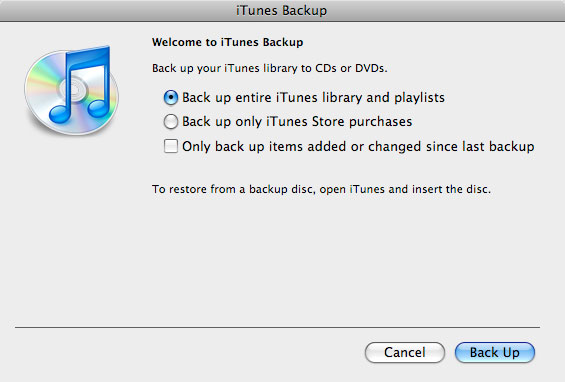
The first consideration is whether you want to back up your entire iTunes library, or only those items purchased from the iTunes Store. Since many users may have imported their non-iTunes-Store content from their own audio CDs, this provides the option of creating a smaller backup of only the critical purchased items. Despite this, however, we strongly recommend backing up everything, since it will make the recovery process much easier in the long run.
The option is also provided to only back up those items which have changed since the last backup. This allows for smaller “incremental” backups that you can run on a semi-regular basis, generally when you’ve added enough new content to your iTunes library to justify running another backup.
Once you’ve made your selection, you need simply click “Backup” and iTunes will prompt you to insert a blank CD or DVD disc if you have not already done so.

Cleverly, rather than worrying about asking you what type and size of medium you plan to use, iTunes simply looks at what you put in the drive and gives you an estimate of how many discs will be required based on that.
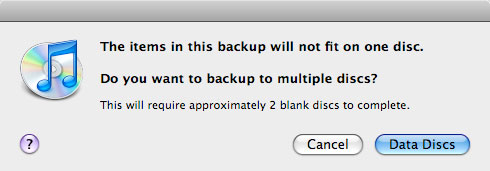
Should you find this number to be a bit higher than you expected, you can always cancel the backup process at this point and try again using a higher-capacity medium such as DVD-R or DVD-R DL.
Once you click OK, iTunes begins backing up your library. This backup includes all of your content: music, music videos, audiobooks, podcasts, movies, TV shows, and even Click Wheel iPod Games and iPod touch and iPhone applications. Library metadata such as playlists, ratings, and play counts are also backed up as part of this process. As iTunes fills each disc, it prompts you to insert the next one.

When finished, you’ll have a complete set of discs that represent your entire iTunes library. As iTunes indicates when your backup completes, restoring from these discs is simply a matter of inserting them into your computer. iTunes will detect a backup disc, and immediately offer you the opportunity to restore from it.
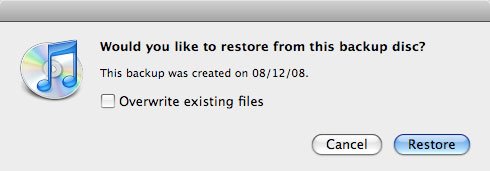
Note that you can also insert an individual backup disc and restore individual files or tracks from it. The backup disc will appear in your iTunes Devices listing, and you can browse the content of it and drag-and-drop individual tracks directly into your iTunes library.
Limitations of iTunes’ Back Up to Disc Feature
Although iTunes’ built-in backup feature is a handy way for users with small libraries to create quick and easy backups, it’s not without its limitations that you should be aware of:
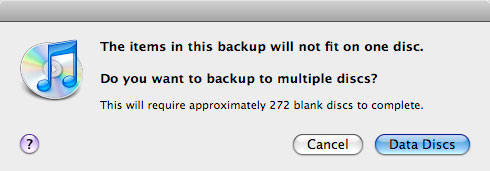
- The first and most obvious limitation is the size of your library. The highest-capacity recordable media commonly available are Dual-Layer DVD-R discs at approximately 8.5 GB per disc. For users with small libraries, only a few discs may be required, but for users capable of filling a 160GB iPod classic, there is going to be a lot of disc-shuffling involved.
- Only some of your metadata is backed up. Specifically, ratings, play counts, and playlists are backed up and restored by iTunes, but last played times, skip count, and last skipped time are not. Technically, the last played time is backed up, but for whatever reason iTunes does not restore this information.
- When dragging content in manually from your back up discs, only the rating is restored, not the play count.
- The “Date Added” for any restored content will be the date you actually restored it. The date the content was added to your original library is not backed up.
- Album artwork is only backed up if it has been embedded within the file itself. iTunes operates under the assumption that automatically downloaded artwork can be automatically downloaded again. Unfortunately, this is not always the case, as artwork can only be downloaded automatically for items that are present on the iTunes Store. Not only are items sometimes removed from the iTunes Store, but the tags on your music must match the tags in the iTunes Store catalogue for this to work, and it’s not uncommon for either you or iTunes to change these tags since you last downloaded album artwork.
- Played status and play count for podcasts is not preserved. All podcasts will be restored as new episodes.
- If you have listed Internet Radio stations in your playlists, this information is not backed up or restored.
- When doing a disaster-recovery restore of your entire iTunes library from an iTunes-created backup set, you are in essence creating a whole new library, and then restoring your content into it. The most significant issue with this is that any iPod, iPhone or Apple TV devices will see this as a different library and want to erase and re-sync all of your content. You shouldn’t lose anything in this process, since it should all have been restored from your backups, but you will be prompted to “Erase and Sync” the first time you conect your iPod and it will take time to perform this initial sync.
Using Third-Party Backup Tools
For users with larger iTunes libraries, the built-in backup procedure offered by iTunes is going to be inefficient at best.
Fortunately, your iTunes library is comprised of nothing more than a database and a collection of files, and can be backed up by any number of third-party backup utilities just like any other data on your computer.
Ideally, for users with sizable libraries, we strongly recommend using an external hard drive or network storage location that is at least large enough to contain your entire library, accounting for future growth. This will be far more efficient than trying to shuffle through a few dozen CD or DVD discs each time you want to back up your library. Further, you will be in a much better position to incrementally back up your iTunes library to a single complete backup, rather than dealing with multiple sets of media.
There are many different third-party backup applications available, and going into each of these is beyond the scope of this article. Instead, what we will do is discuss the files and folders you need to ensure you back up using whichever back up software you prefer, as well as some strategies for handling regular incremental backups of your iTunes library.
How the iTunes Folder is Organized
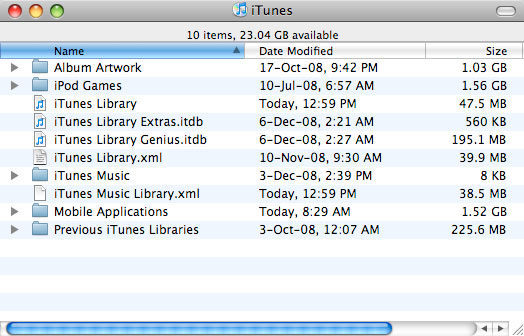
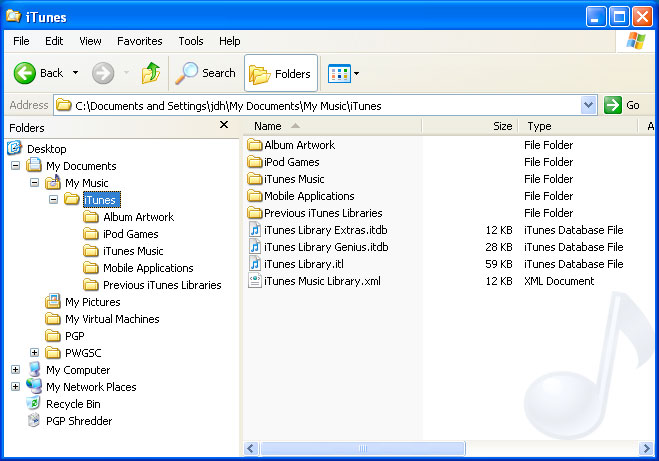
For most users, your entire iTunes library is contained in a folder named “iTunes” located within either your Windows “My Music” folder or your Mac’s “Music” folder in your home directory.
This folder is specific to your own user profile on your computer. If you have multiple user accounts on your computer and log in as another user, you will be creating a new iTunes library in that particular user’s “My Music” or “Music” folder.
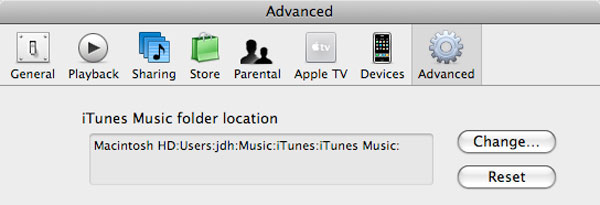
By default, this folder contains not only your iTunes library database, but also all of your iTunes media content. A sub-folder, named “iTunes Music” stores not only your music, but also music videos, audiobooks, podcasts, movies and TV shows. The location of this folder can be confirmed or changed in iTunes’ Advanced preferences:
More information on changing this location is discussed in our tutorial on Transferring your iTunes Library
The following are some other files and folders of interest that you will find in your main “iTunes” folder:
iTunes Library.itl (file)This is your actual iTunes library database. It contains just about all of the information about your iTunes library, including your playlists, your track metadata, ratings, play counts, file locations and much more. This file is absolutely critical to back up as part of any iTunes backup strategy, as it is basically the key to your entire iTunes world.
iTunes Music Library.xml (file)This is an XML-based version of the main iTunes library database. Although iTunes updates this file, it is not actually read by iTunes itself except in situations where the main database needs to be rebuilt. The primary purpose for this file is to allow third-party applications to easily read information stored in the iTunes database itself.
iTunes Library Genius.itdb (file)This is a database of the Genius information for iTunes 8. This file is not critical, as it can be easily recreated by re-running the Genius setup, but theres usually little reason to not back it up.
iTunes Library Extras.itdb (file)This is a SQLite database containing information related to CDs that you have previously imported and looked up on the CDDB service. Like the Genius database, this is not critical, but theres also usually little reason to not back it up.
Album Artwork (folder)This contains a cache of all album artwork, both that which has been downloaded from the iTunes Store as well as artwork from the tags within your actual files. For automatically downloaded artwork, this is the only place it is stored, although you can theoretically re-download the artwork again from the iTunes Store. Ideally, however, you should include this folder in your backups.
iPod Games (folder)This contains any Click Wheel iPod Games that you have purchased from the iTunes Store. Unlike the iTunes Music folder, this folder is always stored in this location and cannot be relocated through normal means.
Mobile Applications (folder)This folder contains any iPhone or iPod touch applications that you have purchased from the iTunes Store. Again, unlike the iTunes Music folder, this folder is always stored in this location and cannot be relocated through normal means. Note that as you download application updates from the iTunes Store, the old versions are still retained in this folder, so this may grow over time. If youre concerned about cleaning up this folder, its generally safe to delete the oldest versions of each application, but we generally don’t recommend that you try this unless you’re reasonably confident in what you’re doing.
Previous iTunes Libraries (folder)When you update iTunes to a newer version and there are database structural changes involved, a backup of your pre-upgrade database is kept in this folder with the date appended to the file name. Over time you may have several older versions of your iTunes database stored in here. These files are relatively small, but if youre concerned about space you can delete them as they are just backups and not actually used by iTunes itself.Backing up the iTunes Library Database
With the above in mind, the simplest solution for backing up the iTunes library database is to simply back up the “iTunes” folder and everything in it. This will include not only the iTunes database itself, but also any Click Wheel iPod Games, iPhone and iPod touch applications, and downloaded and cached album artwork.
This will ensure you have a backup of your iTunes library database and related files, but whether or not it includes your media content will depend on how and where you have chosen to store it…
Determining where your media content is actually stored
One very important thing to keep in mind when planning an all-encompassing backup strategy is where your media content is actually stored. For the average iTunes user, this content will likely in your “iTunes Music” folder located within your “iTunes” folder, but it’s important to know that this is not necessarily the case.
Obviously, knowing where your files actually are is important to being able to back them up. Within iTunes’ advanced preferences, there is a checkbox labelled Copy files to iTunes Music folder when adding to library. This setting controls whether tracks you import into iTunes are copied into your “iTunes Music” folder or whether they are referenced from their original locations.

Depending on the version of iTunes that you first used to set up your library, this option may have been enabled by default if you were using iTunes on a Mac, and may have been disabled by default if you were using iTunes on Windows.
If this option is UNchecked, then chances are that any content you’ve imported into iTunes has been left in its original location. If you had specifically set or left this option off because you wanted to pre-organize your content into a single folder or set of folders before importing it, then this is not too much of a problem, since you know where that content is and can easily just back up that set of folders in addition to your iTunes folder.
However, if you didn’t realize that this setting was disabled and have simply been importing content from various locations with this setting OFF, then you will very likely have your media content scattered around your computer’s hard drive, and it may be difficult to track it all down to back it up.
In this second case, your best option is to consolidate your content into the iTunes Music folder so that it all lives within a single folder and can be backed up from there. Note that this folder can be the default iTunes Music folder or any other folder you specify. Our tutorial on Transferring your iTunes Library describes how to use iTunes’ built-in “Consolidate Library” feature to accomplish this.
The bottom line is that you should ensure that all of your iTunes media content is stored in a known location so that you can easily point your backup software at it and be assured that it’s all going to be included.
Incremental Backups
For users with a large iTunes library full backups may take a relatively long time, such that it may not be practical to perform full backups on a regular basis.
Fortunately, most backup software provides the ability to perform “incremental” backups, essentially backing up only those files that have changed since the last backup. There are two basic ways that you can handle an incremental backup strategy.
The first method is to simply run an incremental “update” backup to a single iTunes backup folder, essentially mirroring your existing iTunes library in a single folder during each backup. This has the advantage of reducing the amount of space required to store your backups. Since you’re only keeping a single full copy of your iTunes library, you only need as much space as your iTunes library normally takes up on your computer. Further, restoring from a single iTunes backup folder is also much easier, as you’re basically just copying all of the data back in the other direction during a restore.
Note that if you do choose to use this method, you should ensure that your backup software performs a proper “mirror” type of update in that it should not only add and update any files that have changed, but also remove files from your backup that have been deleted from your iTunes library. Otherwise, your backup will continue to grow as old deleted files are left lying around.
The major disadvantages to the single-backup method are that you will not be able to go back to a previous version of your iTunes library as each time you perform a backup you’re getting only a current “snapshot” of your library. Further, you will not be able to effectively use this method with CD-R or DVD-R media as you cannot update your existing backups in this case.
The alternative strategy is to perform a single full backup of your iTunes library, and then perform incremental backups to a different folders or media. This ensures that you can go back to your iTunes library at any point in time that you had made a backup, which can be very useful if you don’t discover an accidentally-deleted file until a few weeks after it was deleted. However, it also has the disadvantage of potentially requiring a lot more storage space, since you may end up keeping multiple copies of files as they change.
Keep in mind that when editing track information iTunes updates not only its own database with the new tags, but also writes these changes into the media files themselves. This means that any incremental backup that looks for changed files is going to want to re-copy these files as well. This is not a bad thing, as it’s best for your backed up files to have the most up-to-date tag information, but it’s something you should be aware of, particularly when dealing with relatively large video files. Re-tagging a whole season of a TV series, for example, could easily add several gigabytes to your next incremental backup.
The other disadvantage of keeping separate incremental backups is that when it comes time to restore your iTunes library, you must individually restore each backup session to bring your iTunes library up to date, starting with the last “full” backup session and then updating that with each subsequent incremental session. This will increase the time it takes to restore your library, as well as running the risk of lost information due to a missing or corrupted incremental session.
Note that if you are concerned about preserving an incremental history of your iTunes database you may want to consider running a separate backup plan with only the iTunes library databases themselves selected, rather than your media content. Although this will not protect you against accidental deletion of a file, it will allow you to revert back to a previous version of your iTunes database in the event that you delete a playlist or experience database corruption. Since the iTunes database is relatively small in comparison to your actual media files, incremental backups of this data will not require nearly as much storage capacity.
A Word About Time Machine
If you’re a Mac OS X Leopard user, you can easily use Time Machine to handle incremental backups of your iTunes library on a regular basis. This process is almost transparent in terms of how the backups are kept, but there are some considerations related to restoring information.
The most important thing to keep in mind is that Time Machine is not integrated with iTunes. This means that unlike other applications like Mail and iPhoto, you cannot restore an individual item such as a track or playlist back into the iTunes database. The only way to restore iTunes data from Time Machine is to do so by restoring individual files.
This means that an iTunes database restore is an all-or-nothing deal. If you have lost a playlist that you wanted to recover, you would need to roll back the entire iTunes database to a prior time, losing any other changes you have made in the process. As a workaround, you could restore the iTunes database to an alternative location, point iTunes at it, and export the playlist, but this is still a largely manual process and Time Machine offers no real benefit in this regard.
Further, if you have lost an individual track or set of tracks that you want to restore from your Time Machine backup, this is certainly possible, but you will need to re-import those tracks manually after you restore the individual files, and these tracks will be treated as newly-imported tracks.
Conclusion
The bottom line to all of this is that the best way to recover from a lost, damaged, or corrupted iTunes library is to plan ahead by making a backup of it in the first place. However, you should also keep in mind that backups are useless without an actual restore plan in place. Don’t just blindly run a backup process and not monitor or check on it. In fact, ideally you should do a test restore to ensure that you have confirmed that you will be able to actually restore the backup in the event that the disaster occurs and you lose all of your data. There’s nothing worse than finding out that your backups are corrupted or incomplete after you’ve already lost the original data.
Performing restore testing is generally simple enough as long as you have adequate hard disk space on your computer, or at least on an external hard drive. The easiest method is generally to log on under a different user account and try restoring your library under that account—since iTunes keeps a separate library for each user account, this will simulate the process of creating a whole new iTunes library. If disk space is a problem and you cannot actually test a full restore, then in the very least you should perform regular verification of your backups to ensure that your data has been copied properly, and double-check to ensure that you are getting everything you need for a full restore.
In short: Don’t make a backup plan—make a restore plan.
Home | Audio | DIY | Guitar | iPods | Music | Links | Brain and Problem Solving | Site Map | Contact
![]()
