|
|
Home | Audio | DIY | Guitar | iPods | Music | Brain/Problem Solving | Links| Site Map
This work is licensed under a Creative Commons License.
By: Brian Edgin
Part 1: The Background
Start by creating a new document that is 420 by 220. Using the rectangle tool, create a rectangle that covers the entire background of the document. Give the rectangle the following attributes using the Property inspector:
- Fill Type: Solid
- Fill Color: #CCCCCC
- Fill Texture: Line-Horiz 3
- Fill Texture Amount: 100%
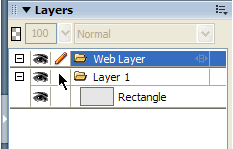
This will give you that striped OS X style background that the Aqua effect looks so good against. Now lock the layer the background is in (see Figure 1) and click the New/Duplicate Layer icon at the bottom of the Layers panel to create a new layer to work in.
Figure 1: Click here to lock the layer.Tip: Fireworks only allows you to specify a solid color for the background of any document. Of course, you can always use any object/s as your background by just working over the top of them. However, when you do this you should always put the background objects in their own folder and lock it. Now you can work on your design without worrying about accidentally selecting parts of your background.
Part 2: The Button Shape
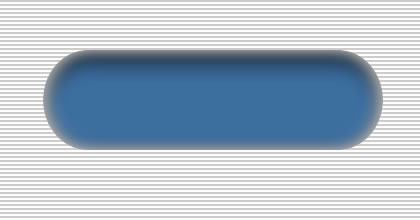
Using the rectangle tool again, draw a rectangle that is 340x100 and set its corner roundness to 100%. Give it a solid fill of #3C6EA0 and make sure the Edge is set to Anti-Alias. To give the button base its shading we will be adding 4 live effects to it. It is important that they be added (stacked) in the correct order. Here are the live effects and their attributes in the order they should be applied:
- Inner Glow - Width=4, Color=Black, Opacity=49%, Softness=13, Offset=0
- Inner Shadow - Distance=13, Color=#000000, Opacity=65%, Softness=23, Angle=270
- Inner Shadow - Distance=7, Color=#CCCCCC, Opacity=80%, Softness=15, Angle=0
- Inner Shadow - Distance=7, Color=#CCCCCC, Opacity=80%, Softness=15, Angle=180
When you are finished adding these live effects your document should look like Figure 2.
Figure 2 - The button shape after all live effects have been addedTip: If you ever need to change the order that live effects are applied to an object, you can do it by dragging the effect above or below other effects in the Property inspector.
Part 3: The Glow
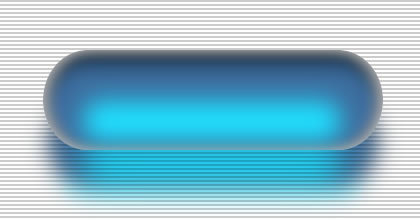
When you put a wine glass under a strong light source you will notice that there are places within the glass where the light seems to be focused, causing it to shine or glow. In the world of optics and 3D computer graphics this effect is called caustics. The inner blue glow of the button is meant to mimic this caustic effect.
Using the Rectangle tool, draw another box that is 258 by 40 pixels with 100% roundness, and position it as seen in Figure 3. This shape should contain a solid fill of the color #1FDFFF and the Edge Type should be set to Feather with a size of 26. Again, refer to Fig 3 to see how your document should look at this point.
Figure 3 - The glow shape
Part 4: The Shadow
The area under the button is only lit by light that passes through the button. To render this effect correctly, the shadow needs to be made up of the same colors as the button itself. In addition, the caustic effect should brighten an area of the shadow. The easiest way to do this is to use copies of the button and glow as a starting point.
First, select both the button and glow objects and make a copy of them by selecting Edit>Clone from the menu or pressing CTRL+Shift+D on the keyboard. Now group the two objects together by selecting Modify>Group from the menu or pressing CTRL+G on the keyboard. Move this group straight down about half the height of the button and then move it behind the button by selecting Modify>Arrange>Send To Back from the menu or pressing CTRL+Shift+Down on the keyboard. Now, in the Property inspector, add a Gaussian Blur live effect with a size of 10. Finally set the groups blend mode in the Property inspector to Multiply. This will add the color of the shadow to any object that happens to be underneath it. Figure 4 shows the completed shadow.
Figure 4 - The colored shadow under the button
Part 5: The Highlight
The highlight is a reflection of the light source on the surface of the button. If the light is white, as it is in our design, then the reflection will be white. If the light was yellow, the reflection would be yellow. To make this shape we will need to copy and manipulate the button shape.
Start by selecting the button shape and making a copy of it by selecting Edit>Clone from the menu or pressing CTRL+Shift+D on the keyboard. To make it easer to see the object, fill it with white and remove all the live effects from it. You will notice that the glow object is in front of the highlight object. Fix this by selecting Modify>Arrange>Send To Front from the menu or by pressing CTRL+Shift+Up on the keyboard. Now, using the Transform tool, size the object as shown in Figure 5.
Tip: In Fireworks MX 2004 you can constrain any transformation around the center of an object by holding down the ALT key while adjusting the object. This is very helpful when moving the left and right sides of the highlight object inward.
Figure 5 - The first step in constructing the highlight objectTo finish the highlight object we will need to convert it to regular vector shape so we can adjust its points. Do this by selecting Modify>Ungroup from the menu or by pressing CTRL+Shift+G on the keyboard. Next, using the Subselect tool, adjust points A and curve handles B as seen in Figure 6. Finally, change the fill to a linear gradient fill that is all white with 100% transparency on one side and none on the other. Lastly, adjust the fill handles on the highlight to match those seen in Figure 6.
Figure 6 - Points and Fill handles of the completed highlight object
Step 6: Transparency
This step may seem like overkill, but it's the details that really make all the difference in techniques like this. That being said, this is the 1st step to go when simplification is desired.
To construct the mask object draw a large rectangle with 100% rounded corners as seen in Figure 7. Set the fill properties of the mask object to contour gradient. The screen shot in Figure 7 shows the gradient settings and location of the fill handles required. The dotted red outline shows the relative position of the button object for reference. Once your mask object looks like this, cut it to the clipboard.
Figure 7 - Settings and location of the mask objectApply the mask by right clicking on the button object and selecting Edit>Paste As Mask from the context menu. It won't look right at first because by default all masks in Fireworks are set to Path Outline. In the Property inspector, change the Mask type to Grayscale Appearance. If you hide all the other objects in the document, the button with the mask applied should look like Figure 8. With all the objects visible your document should look like Figure 9.
Figure 8 - The button with the mask applied to it
Figure 9 - The button with the mask and all other objects visible.
Step 7: The Text
For the last step we need to add text with a subtle drop shadow to our button. The drop shadow should make it look like the text is casting its shadow on the inner contents of the translucent button.
I used the following settings to create my text object:
- Font: Arial Bold
- Size: 59
- Drop Shadow: Distance=7, Color=#000000, Opacity=65%, Softness=12, Angle=270
To really make the text look like a part of the button instead of text hovering over the button, you need to move it under the highlight object. You can do this by selecting Modify>Arrange>Send Back One or by pressing CTRL+Down on the keyboard.
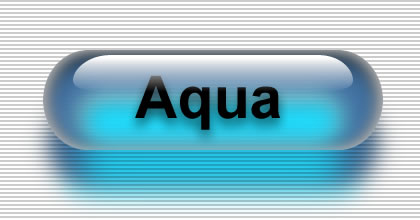
Figure 10 - The completed Aqua buttonThat's it! Here is an interesting thing you might notice. Now that you know how to create this button, it might not appear as realistic as it did before. Your brain now sees the individual elements that make up the button instead of just one cool looking button. To regain some of this ability to view the button as a single object, walk away from your computer for a few minutes and/or view it at different distances from your monitor.
The download below contains both a Fireworks MX and a Fireworks MX 2004 version of this Aqua button. Since Fireworks MX doesn't have the contour gradient used in the mask object, I've included a version of the file where the mask object has been flattened (converted into a bitmap) for users who don't have Fireworks MX 2004.
Home | Audio | DIY | Guitar | iPods | Music | Links | Site Map | Contact
![]()