|
|
Home | Audio | DIY | Guitar | iPods | Music | Brain/Problem Solving | Links| Site Map
This work is licensed under a Creative Commons License.
Creating Shadows
Add (Perspective) Shadow Command
I have to admit it: I really like this effect (see Figure 1). I equate it with the way I felt when Drop Shadow become an automated effect or filter, rather than a 10-step procedure. And no, I'm not talking about Fireworks in that situation.

Figure 1. What you can do with the new shadow effects
The motivation for the Add Shadow command, according to sources at Macromedia, was in response to a popular enhancement request to add "perspective shadow-like" capability to Fireworks. Solid Shadow was also a popular enhancement request.
The Add Shadow command works only on vectors and text objects. It works by creating a custom Auto Shape object based on the outline of the path or text. Just like other Auto Shapes, the shadow has control points so you can manipulate it.
Applying the shadow couldn't be much easier:
- Select your vector or text object.
- Select Commands > Creative > Add Shadow (see Figure 2).
You're done!
Figure 2. Add Shadow menu
Well, almost done. One characteristic of this command is that the shadow is inserted at the very top of the layer stack. If your original object is low in the stacking order of the layer, the shadow actually gets placed above it. The only way the command works as expected is if your selected object is already at the top of the layer's stacking order.
It's easy enough to put the shadow in its rightful place by dragging it lower in the Layers panel. I do find this to be a bit of a nuisance and not very workflow-centric at the moment.
There are two yellow control handles for the shadow auto shape: Direction and Perspective (see Figure 3).
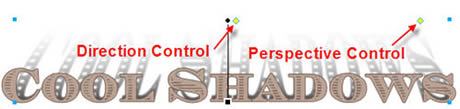
Figure 3. Perspective shadow's direction and perspective controls
The Direction control alters shadow height and shadow angle. You can Shift-drag the Direction control point to constrain its movement on a 45 degree angle. Clicking the Direction control handle resets the shadow—identical to the original shape. Control/Command-clicking the Direction control point resets the X-axis only. This means the height stays the same but the shadow direction becomes centered.
The Perspective control alters the skew angle of the shadow. Think of it as a Skew tool. Dragging the Perspective control handle increases or decrease the convergence angle of the shadow.
Clicking the Perspective control point resets the width of the shadow only.
Another important element to this command is the ability to alter the shadow's fade from solid to transparent. This fade helps give the shadow some realism. The fade is created automatically using a Linear gradient, so you have complete control over the fade in terms of color, transition, length, and gradient category (see Figure 4). By using the Pointer tool to select the shadow, you will have access to the gradient control arm on the canvas and the gradient attributes in the Property inspector.

Figure 4. Adding a linear gradient to alter the shadow's fade from solid to transparent
Note: Adding a small amount of Gaussian Blur adds some realism to the shadow, too. I also find that adding a thin soft stroke to your text improves definition and separation.
Solid Shadow Live Filter
If you haven't noticed already, Live Effects have been renamed Live Filters. The Solid Shadow Live Filter is interesting and, unlike the Add Shadow command, you can apply it to bitmaps as well as vectors. Use this feature to add a sense of three dimensions to an object. At first you might think, "Big deal," but the Solid Shadow Live Filter opens up a wide range of options if you think outside the box. You'll see some of these in the next section on using shadows creatively.
This Live Filter stamps the object it's applied to several times, creating an edge offset effect. Figure 5 shows a bitmap image after applying the effect. As you can see, you get an interesting result when it's applied to a bitmap.
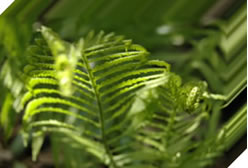
Figure 5. Solid Shadow applied to a bitmap
When you apply the effect to a vector or text object (see Figure 6), it's similar to the hard shadows created by programs like Microsoft Word.
Figure 6. Solid Shadow applied to a vector object
You can access the Live Filter from the Property inspector; you can't access it from the Filter menu:
- Select your object.
- In the Property inspector, select the Filters plus (+) button > Shadow and Glow > Solid Shadow (see Figure 7). The Solid Shadow dialog box appears.
Figure 7. Solid Shadow menu in Live Filters
- Set Distance, Angle, and whether you wish to use a solid color for the shadow or not.
- Choose not to preview the filter if you wish.
- Make sure the Solid Color option is not selected if you want to achieve a result similar to Figure 5.
In case you are wondering, Solid Shadow uses pixel information from a pattern-filled vector so long as the Solid Color box is not checked (see Figure 8).
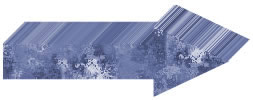
Figure 8. Solid Shadow applied to a vector object where the Solid Color option has been turned off
Although I find this Live Filter nifty, I'd love to see additional atributes for it, such as density control of the shadow (brightness/darkness) and the ability to fade the shadow to transparent. Yes, I'm demanding—in a nitpicky sort of way. There are ways to fake it, however. As you shall soon see.
Using Shadows Creatively
Many of these techniques are based on using the Solid Shadow command. I think that's because the Add Shadow command impressed me right from the start.
Technique #1: Use Both Shadows on Text
In my opinion, this adds a lot of drama to text. The solid shadow gives you dimension—or weight—to text and the perspective shadow adds depth to the text in relationship to the canvas (see Figure 9).

Figure 9. Text with both Solid and Perspective shadows applied
Because the two shadows are not both Live Filters, you do not need to worry about how they stack in the Filters menu in the Property inspector. They have no impact on each other.
When applying the Solid Shadow to a vector, I find it a bit more realistic to choose Solid Color from the dialog box, sample the color from the vector fill, and then adjust that color to something that is several shades darker than the fill color. The default black color does add drama, but using a darker shade of fill color gives the shape a more unified look.
Technique #2: Faking Density of the Solid Shadow
This requires two versions of the same bitmap object. The upper one has no Solid Shadow Filter applied, while the lower one does (see Figure 10):
- Select the top object and make it invisible by clicking the eye symbol in the Layers panel.
- Select the lower object and select Filters plus (+) > Adjust Color > Brightness/Contrast.
- Drag the Brightness slider to the right so the image becomes darker.
- Reduce the contrast to taste (this is all very subjective stuff).
- Make the top object visible again.
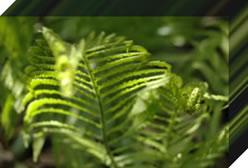
Figure 10. Faking the density of the Solid Shadow
Technique #3: Faux Zoom/Motion Blur/Depth of Field
I discovered this one completely by accident. Unlike the Zoom or Motion Blurs that are currently available in the Live Filters, this technique forces the blur to stay within the confines of the bitmap object's dimensions. As a professional photographer, I find this effect really cool. You only require one bitmap object for this one:
- Select the bitmap object and apply the solid shadow by selecting Filters plus (+) > Shadow and Glow > Solid Shadow.
- Set the Distance to 100 and the Angle to 60 in the Solid Shadow dialog box.
- Make sure the Solid Color option is not selected, and click OK.
- Select Commands > Creative > Fade Image.
- Choose the third thumbnail from the left on the top row and click OK.
Now for the fun part! You will already see a neat effect but if you select the mask and then use the Pointer tool and the linear gradient control arm to change the position and angle of the linear gradient used to create the fade, you can get some very dynamic images (see Figure 11).
Figure 11. Creating faux zoom, motion blurs, and depth of field with the Solid Shadow
Technique #4: Faking a Faded Solid Shadow
Again, you will need two duplicate objects for this technique:
- Hide the upper image.
- On the lower of the two objects:
- Darken the object by selecting Filters plus (+) > Adjust Color > Brightness Contrast.
- Apply the Solid Shadow by selecting Filters plus (+) > Shadow and Glow > Solid Shadow.
- Flatten the object by selecting Modify > Flatten Selection.
- Select Commands > Creative > Fade Image and select one of the linear fades.
- Use the Pointer tool to reposition the linear gradient control arm so that the image fades to transparent wherever you desire.
While this technique is not perfect, it does give you something a bit different (see Figure 12).
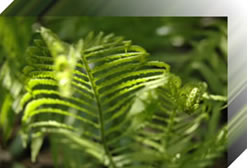
Figure 12. Faking a faded Solid Shado
Where to Go from Here
All I can really say is, "Have fun!" I discovered all the techniques outlined in this article by playing with the features. I'm sure there are many other possibilities beyond what I have outlined. So take charge of the new Fireworks 8 and go seek out those possibilities.
Home | Audio | DIY | Guitar | iPods | Music | Links | Site Map | Contact