|
|
Home | Audio | DIY | Guitar | iPods | Music | Brain/Problem Solving | Links| Site Map
This work is licensed under a Creative Commons License.
Photo Effects
Examples of the Orton Effect
The steps I describe will vary depending on your images, but that is at least half the fun and makes this a creative project for you. You decide what you like—how far to push the result. Uses for this effect include page design, header graphics, background images, and the like. Below are four examples of my finished experiments. You can try this out with the supplied images, or feel free to use your own.
| Original Image | Image with the Orton Effect applied |
|---|---|
 |
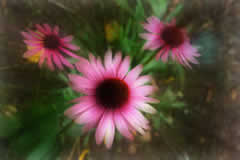 |
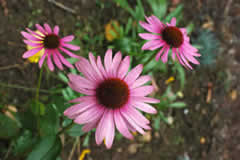
Figure 1. Daisies |
Figure 2. Daisies with the Orton Effect applied |
 |
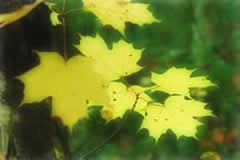 |
Figure 3. Yellow maple leaves |
Figure 4. Yellow maple leaves with the Orton Effect applied |
 |
 |
Figure 5. Lake |
Figure 6. Lake with the Orton Effect applied |
 |
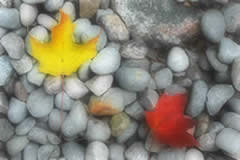 |
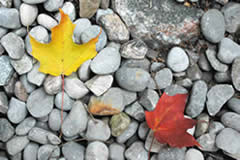
Figure 7. Maple leaves on rocks |
Figure 8. Maple leaves on rocks with the Orton Effect applied |
Applying the Orton Effect
As indicated, the Orton Effect requires two images—one sharply focused and the other one blurred. When shooting film, a photographer would have to shoot the subject twice—once sharply focused and once incredibly out of focus. Bracketed exposures might also give you more creative options. In the digital world, you just need a single sharply focused image from which you can create your duplicate, blurry counterpart.
Bracketing is an exposure technique, where you deliberately overexpose (add more light) or underexpose (take away light) your film to get results that are lighter or darker than normal.
Using Live Effects, and the Layer Blending Modes, you can make all the adjustments you need to create exactly what you want. I have found through experimentation, that you get more dramatic results with images that have a light background. You can get equally compelling–although more subtle–results with images that have a darker background.
- Begin by opening the fallen_birch.jpg file or one of your own.
- Set the canvas color to white by selecting Modify > Canvas > Canvas Color and then select the white option.
- In the Layers panel, rename the background layer to Blur Layer by double-clicking the background layer name.
- Create a duplicate of the layer by dragging it down to the New Layer icon in the Layers panel.
- Rename this layer Multiply Layer. This layer should be the topmost layer. If it's not, move it above the Blur layer.
- Hide the Multiply layer from view by clicking the eye icon next to the layer name.
- Select the Blur Layer and choose Effects (+) > Adjust Color > Levels. The Effects plus(+) button is in the Property inspector. If the Effects plus(+) button is not active, try selecting the other layer and then select the thumbnail image in the Blur Layer again.
- Set your input values as you see in Figure 9. Those values are, left to right, 31, 2.34, and 194.

Figure 9. Levels settings for the blurred image. Feel free to experiment with this.
- Click OK. In case you are wondering, the idea is to make this blur image lighter than normal. Your image should look similar to Figure 10.
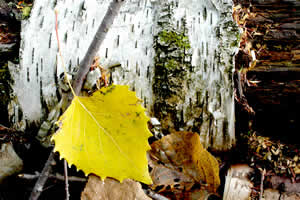
Figure 10. Slightly overexposed and higher in contrast, this image will change significantly when blurred.
- Add a second Live Effect by selecting Effects (+) > Blur > Gaussian Blur.
- Set the value of the blur to 20 and click OK. The image is now seriously out of focus. Just the way you want it.
- Make the Multiply layer visible again and select it.
- You need to alter the tonality of this image, but you'll do so using the Brightness/Contrast Live Effect, found in the Adjust Color menu (Effects (+) > Adjust Color > Brightness/Contrast).
- Set the Brightness to a value of 50. Adjust the Contrast—if necessary—so it stays around 0. Click OK. As bad as this looks right now, these changes are necessary so the blending mode works.
- With the top layer active, select the Blend Mode pop-up menu in the Property inspector and change the Blend Mode from Normal to Multiply. TA DAAAA! The blending of the two images through the Multiply Blend Mode gives you a soft, dreamy quality. To alter the effect slightly, adjust the Opacity of the top layer to about 80. The Opacity slider is next to the Blend Mode pop-up menu in the Property inspector.
- You will add one more step to this image and call it done. Select the Blur layer one more time, and select Effects(+) > Noise > Add Noise. Set a value of 10 or 12, and make sure the color option is deselected. This adds a gritty, film grain look to the image. Experiment with the Noise value until you have something you are happy with. The finished image should look like Figure 11 below.
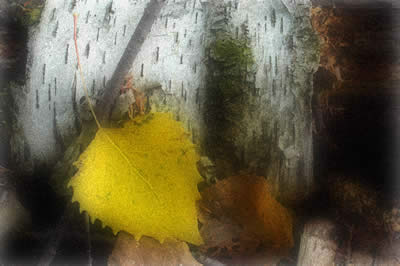
Figure 11. The final artwork.
This is only a starting point. Every image will react differently to this technique, and you have a multitude of ways to adjust any single image. Change the tint of the image by adjusting the Hue/Saturation Live Effect with the colorize option selected (see Figure 12). You could further combine this with some of the Fireworks Creative Commands (Commands > Creative), such as Convert to Grayscale, or Convert to Sepia Tone, or Fade Image (see Figure 13). You could apply a Bitmap Mask that only shows the leaf in the top layer, and hides the rest so the Gaussian Blur shows through. The possibilities are endless. And it's FUN!
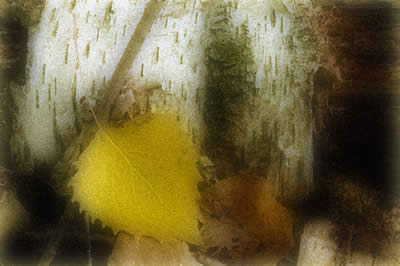
Figure 12. Adjusting the Hue/Saturation Live Effect with the colorize option checked.
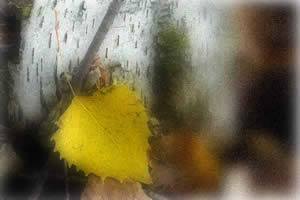
Figure 13. Adding the Fade Image Command to the top layer.
Examples of Multiple Exposure Effects
In this section, you're going to create multiple exposure effects. The traditional technique requires you to make several exposures on the same frame of film. The initial exposure reading is made, and then that exposure is divided between the number of multiple exposures you plan to make. Dividing the exposure reduces the risk of gross overexposure. Every time you make a new exposure, you move the camera, or zoom the lens, or alter the focus. The end result is an impressionist-style image (ironically, impressionism is one thing many early photographers were trying to avoid).
The digital equivalent only needs one image, but you will treat Fireworks much like a camera, creating your multiple exposures and altering the composition of each frame through movement, brightness, blur, and blending modes. I will also show you how far you can take this effect after it's done.
Below are some examples of my finished experiments, all from the same image. It is not the goal of this tutorial to demonstrate each and every technique; my goal is to get you excited about trying these ideas for yourself.
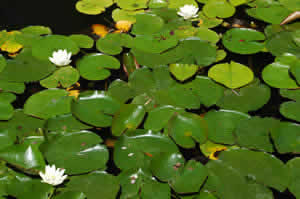
Figure 14. Original image

Figure 15. Multiple repositioned images with low opacity
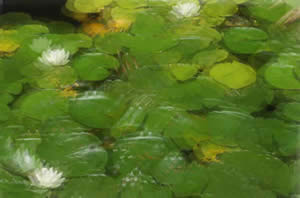
Figure 16. Multiple repositioned images with low opacity, a lighten Blend mode, with one bottom image, not repositioned, 100% opacity, and no blending
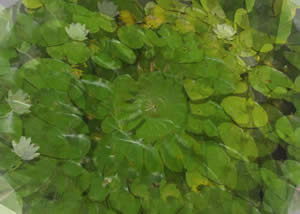
Figure 17. Nine objects, each rotated 30 degrees, low opacity
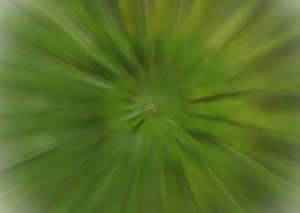
Figure 18. Nine objects, each rotated 30 degrees, low opacity, Zoom Blur added
Applying Multiple Exposure Effects
Open the image you wish to work on. lilipads.jpg is available in the sample files download (page 1). There is also another file included titled lanterns.jpg, which is the one I will use. To follow along, I suggest you use the lanterns.jpg image as shown in Figure 19.
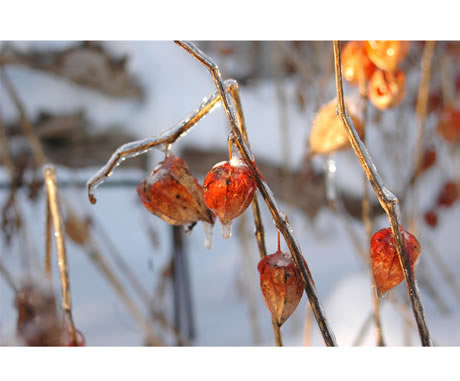
Figure 19. Chinese lanterns, after an ice storm
You can spend all day (or weeks, even) experimenting with this technique and never get the same result twice. So, before you begin, think about the result you want. Pre-visualize the final image. This will help you stay focused on the task at hand. There is no set number of multiples to use for your creation, however, I find that the more you use, the lower the opacity settings should be for each iteration. Let's begin.
- Open the lanterns.jpg file.
- Select the image and copy it to the clipboard (Edit > Copy).
- Lock and hide the original image (background layer).
- Select Layer 1 in the Layers panel and paste the copied image into the layer.
- Press Ctrl/Cmd+Shift+D or Edit > Clone to create a clone of the image. Do this 14 more times, for a total of 15 objects (not counting the original which is locked in the background layer).
- Shift+click to select the top four objects. Set their opacities to 20 using the opacity slider in the Property inspector.
- Shift+click to select the next lower four objects. Set their opacities to 30.
- Shift+click to select the next lower four objects. Set their opacities to 35.
- Shift+click to select the lowest three objects. Set their opacities to 45.
- Leave the uppermost object in its original position. Starting with the object second from the top, select it and then press Shift+Down Arrow to reposition it 5 pixels lower. Do the same with the next six lower images, incrementing the distance by a factor of one Shift+Down Arrow press.
- For the lowest seven images, do the same thing but in the opposite direction. Figure 20 shows my objects and names accordingly. I have renamed my objects. Unless you do, your object names will all be labelled Bitmap.

Figure 20. Each repositioned object is named
- Select Modify > Canvas > Fit Canvas to resize the canvas to hold all parts of the objects.
- The result of this positioning should look similar to Figure 21. We're getting a result similar to tilting a camera up and down, in small amounts, over a series of exposures.
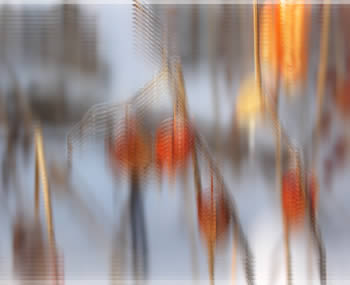
Figure 21. An effect similar to tilting a camera up and down, in small amounts, over a series of exposures
If you like this look, you can stop right here, but I want to play a bit more, and I hope you'll follow along. You will notice that you can clearly see a series of horizontal lines, indicating the edges of each moved image. It's kind of neat, but not what I want.
- Select ALL the images that you repositioned. A quick way to do this is to just click the layer name (Layer 1) and then Shift+click the uppermost object to deselect it (the one we didn't reposition).
- Now select Effects(+) > Blur > Gaussian Blur and set the value to 5. Out of all the Live Effects available, the Blur effects seem to tax the resources of Fireworks (and your system) the greatest. At best, expect a slight delay as Fireworks processes this change. At worst, see you after lunch.
- Deselect all the images. Your image should look similar to Figure 22. Notice that you still have a hard delineation for the top image. I don't want to apply a blur to this object, or everything will just look out of focus.
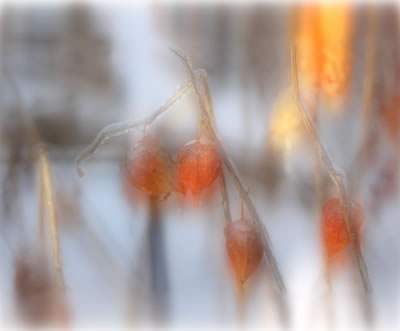
Figure 22. The completed multiple exposure.
- Hide the blurred objects from view by clicking their respective eye icons, so that you only see the topmost object.
- Select the Rectangle tool and set the fill color to white.
- Draw a box over the top the image. The box should extend past the canvas on the left and right but should not be as tall as the image behind it. In all, make the rectangle about 40 pixels shorter than the image.
- Center the rectangle vertically, so that there is an even amount of the image poking out of the top and bottom of the rectangle.
- Change the Edge Properties of the rectangle to Feather by selecting Feather from the Edge pop-up menu in the Property inspector. Give it a value of 10.
- Shift+click the edge of the image poking out from either the top or the bottom of the rectangle to select the image along with the rectangle, and then select Modify > Mask > Group As Mask. Make the other objects visible again. The hard edge of the top image is gone, and you have a very interesting, ghost-like effect. The subtleties of this effect are more noticeable at a larger size.
You can also position your multiple objects in different directions, or even distort them with the Transform tools (Modify > Transform). Try experimenting with the different Blend Modes and see what other cool examples you can get.
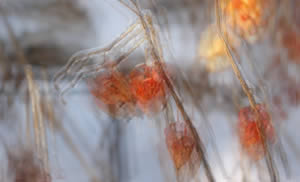
Figure 23. An example of moving the objects in different directions
More Photo Tricks
Back at the beginning of the Multiple Exposures section, I mentioned I would review ways to take this effect further. The main way is to stop thinking of your photograph as–well–as a photograph. Think all the way back to Figure 18. I created the final image using 9 clones, all rotated to make a 360 spin of the image. I set the opacity for all of them to 39. I applied a Zoom Blur to all nine objects as well. Figure 18 was a cropped version. Here's the original before cropping:
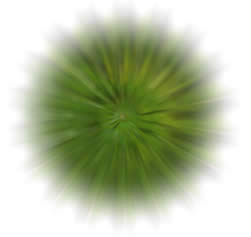
Figure 24. An uncropped version of Figure 18
I stared at this long enough that it got me thinking─what else does this look like? My first thought was an iris of a human eye. So, with a little masking and the addition of a couple paths and some vector shapes, *I* made an *eye* as shown in Figure 25.
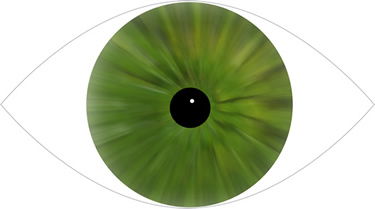
Figure 25. I've got my eye on you!
I kept thinking about other round things that might look like this, and the next one to enter my brain was no spare thought, by any means:

Figure 26. Strike out on your own and create some original designs
Spare. Get it? I kill me! The rest of you are no doubt too busy groaning to kill me. I masked the main image (as I did with the eye) to create the round shape. I added additional vector ellipses to create the finger holes, the highlight, and the perspective shadow.
Conclusion
While Fireworks may not have all the doo-dads and what-cha-ma-call-its that Photoshop has, I think you can still do some pretty neat things with photographs if you take some time and think about what you want to accomplish.
Home | Audio | DIY | Guitar | iPods | Music | Links | Site Map | Contact
![]()
