If you frequent the Macromedia Fireworks Online Forum, you know that bitmap retouching tools-such as Blur, Smudge, Sharpen, Dodge, and Burn-top the list of feature requests posted to the Fireworks wish list. The enhancements in Fireworks MX illustrate that Macromedia has been listening.
To introduce you to the new Blur, Smudge, Sharpen, Dodge and Burn tools in Fireworks MX, we'll demonstrate how we might use them to change a photo of a rose bud into an image with the look and feel of an aquatint.
|
Painting with light
Since 1839, when Louis Daguerre discovered a method for making a direct positive image on a silver plate, photographers have invented new techniques for correcting blemishes and faulty exposures in their pictures.
The bitmap retouching tools in Fireworks MX are modeled after traditional photo studio techniques. The Dodge tool, for example, brightens the pixels in the area of the image it is applied to and can be used to hide unwanted details. Conversely, the Burn tool is used to remove any undesirable natural lighting and to enhance details.
|
|
|
|
However, unlike their photo studio ancestors, the bitmap editing tools in Fireworks MX can be used to apply all sorts of creative effects beyond simple photo retouching. This article will guide you through the process of using the bitmap retouching tools to turn a a too-dark photograph of a white rose into to a dreamy watercolor-like vignette.
|
|
| |
|
|
Step 1: Creating the perfect flower
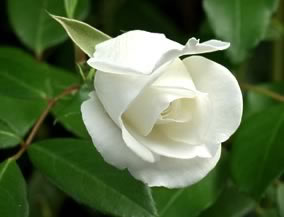
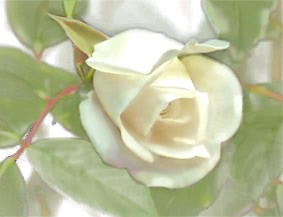
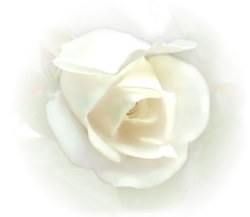
This gorgeous blossom with a creamy center and silvery white outer petals is the starting point for this exercise. Unfortunately, the bush was enveloped in shade when the photo was taken. We'll compensate for the flat lighting by utilizing Effects menu features.
|
|
First we'll adjust the contrast.
Click on the image to select it, and then locate the Effects buttons on the Property inspector. Click the Add Effects button [+] and scroll to the Adjust Color menu.
Select Brightness/Contrast. The Brightness/Contrast dialog box will open.
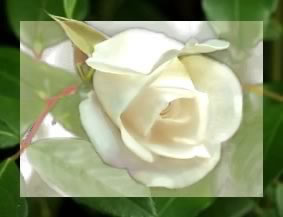
Move the Brightness Slider to 8. Move the Contrast slider to 20. Note that we are actually overcompensating at this point to prepare for some effects that we will add later. Click OK to accept the changes and close the dialog box.
To make up for the detail lost in both highlight and shadow when increasing the contrast, we'll boost the saturation. Click the Add Effects button and scroll to Adjust Color. Select Hue/Saturation. The Hue/Saturation dialog box will open. Move the Saturation slider to 7. Your adjusted image should look something like this.
|
|

|
The changes made to the image brightness and saturation are Fireworks Live Effects. Live Effects are always editable, so if you aren't completely satisfied with the way your rose looks, simply reopen the appropriate dialog box by double-clicking on the Effect name in the list of applied Effects in the Property inspector.
|
|
At this point, save a copy of your image (File > Save As > Rose_one).
Step 2: Emulating a drawing
Make two clones of the rose image by clicking on the image to select it and choosing Edit > Clone, and then Edit > Repeat Clone.
|
|
|
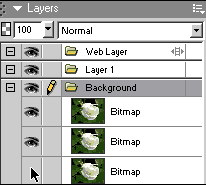
Open the Layers panel by selecting the arrow next to the panel name. You should see three instances of your rose image listed. Click the eye icon next to the bottom instance (the image the other two instances were cloned from) to hide it.
Click the top instance to select it, then select Modify > Flatten Selection. The Live Effects that you applied in step one are now a permanent part of the instance.
|
|
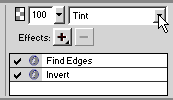
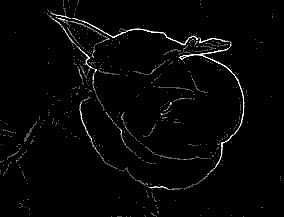
With the flattened image still selected, click the Add Effects button and select Other > Find Edges. The image will turn black, with the exception of a white outline.
Next, click the Add Effects button. Select Adjust Color > Invert. The resulting image will look a bit like a pencil sketch.
|
|
|
|
|
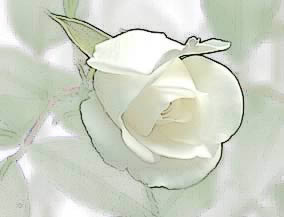
Here's where things get interesting. With the pencil sketch version of the rose still selected, locate the Blend Mode menu in the Property inspector. Choose the Tint blending mode.
|
|
The outline from the top instance is added to the rose in the image beneath it. While the pale colors in the flower are barely changed, the leaves are considerably lightened and grayed. The black background behind the leaves is the most affected, turning nearly white.
There is one last task to complete before we begin "painting." While holding down the Shift key, select both the pencil sketch instance and flower image instance beneath it in the Layers panel. Select Modify > Group, and then Modify > Flatten Selection. The two instances are instantly fused together. You should now see only two image thumbnails in the Layers panel.
Now save a backup copy of your image (File > Save As > Rose_two).
Step 3: Painting with the bitmap retouching tools
Although we want the outline to remain around the rosebud, it is darker than it needs to be. Select the Set Magnification button-located at the bottom of the canvas window-and choose the 200% or 400% setting.
|
|
|
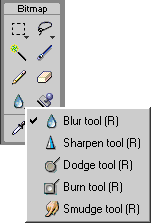
Click and hold down the Blur tool until the bitmap retouching tools fly out. Select the Smudge tool. In the Property inspector, set the Smudge tool size to 8, the Edge to 60, the Shape to round, and the Pressure to 30. If the Smudge color box is checked, uncheck it. |
|
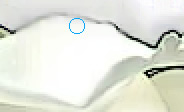
Begin carefully smudging the pixels of the flower petals into the dark outline. When necessary, smudge the pixels of the background into the outline as well. When you've smudged the outline all the way around the rose, return to the Toolbox and select the Burn tool.
The settings for the Burn are 10 for size, 100 for Edge, the round shape, Exposure 15, and choose Midtones for Range. Use the Burn tool to intensify the darker colors in the center of the rose where the petals are tightly wrapped together. Work outward and dodge the darker colors in the outer petals. Finally, dodge the stems and central veins in the leaves. If an area seems to have too much contrast, use the Blur tool to soften it.
You've probably noticed by now that none of the rose petals are truly white. The larger petals especially are blends of pale green, gold, blue, and violet. To achieve a more painted look, we'll exaggerate those areas with a color smudge.
|
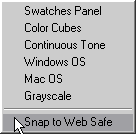
We don't need to limit ourselves to using Web safe colors because we will be exporting our final image as a JPEG. Select the Smudge tool and click the Smudge color box in the Property inspector. The smudge color palette will open. Click the right arrow button at the top right of the palette to open the palette menu. If the Snap to Web Safe menu item is checked, uncheck it.
|
|
|
|

|
|
Use the eyedropper of the smudge color palette to pick a color from the rose petals. Your choice will define the paint color when smudging.
Set the size to 10, the Edge to 60, the Shape to round, and the Pressure to 10 or 11.
Begin smudging the color around every instance of that particular color that you see in the rose petals.
|
|
We discovered that the best technique to use when smudging color is to quickly rock or wiggle the cursor. Try that approach, but don't be afraid to experiment with different kinds of stroking until you find the one that works best for you. When you are finished with one color, pick a new color and repeat the process. Use the Blur tool to soften any patches of color that become too broad or too saturated. Continue picking new colors and smudging with them until you are satisfied with the way the flower looks. If you like, try smudging the color of the leaves in the image too.
The last bit of painting involves brightening the lightest parts of the rose petals with the Dodge tool. The Settings are 8 for Size, 100 for Edge, round for Shape, 10 for Exposure, and for Range, choose Highlights. Go slowly and carefully with this process or you'll end up with holes in your image.
|
|
|
We decided that the overall image was too pale. A final sweep of the image with the Burn tool took care of that.
To warm the colors a bit, try making an adjustment to the red channel in the Levels tool of the Adjust Color menu.
|
|
Next. we'll explore some ideas for framing the image.
To save this version of the file, create another copy of your image (File > Save As > Rose_three).
Step 4: Framing your painting
You may be wondering why you created three instances of the rosebud image in Step 1. These instances will be used now. Drag out a rectangle and give it the same width and height as your painting. Add a white Fill and a black, 1-pixel hard Stroke.
|
Increase the width of the stroke to 40. While pressing the Shift key, select both the rectangle and painted image. Choose Modify > Mask > Group as Mask
In the Layers panel, make the invisible instance of the flower image visible again. This creates an instant picture frame.
An alternate way to finish the image involves using an old-fashioned vignette. This example is not actually a typical vignette, but more of a fade to white. We'll use a new feature introduced with Fireworks MX: the transparency gradient bitmap etch.
|
|
|
|
Before we start, undo the mask group you created for the framed image (Modify > Ungroup). Discard the extra rose image. Change the canvas color to white (Modify > Canvas > Canvas Color > White). Then, remove the Stroke from the white rectangle.
|
|
|
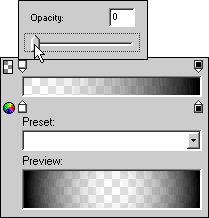
Use the Fill type selector in the Properties inspector to change the rectangle fill to Radial. Click the fill color box to bring up the gradient editor. You'll notice a significant change from Fireworks 4: in addition to the regular color chips there is a second set of chips at the top of the gradient editor bar. These are transparency chips. Fireworks MX makes it possible to create gradient transparencies.
Click the left, lower color chip and set its color to white. Click on the right, lower chip and set its color to black. Click on the left upper (transparency) chip and move the slider to 0% opacity. Leave the right transparency chip at its default 100% opacity.
|
|
You can begin to see the final effect. The rose is fading to black but we want white. Here's where we apply the transparency gradient etch.
|
|
|
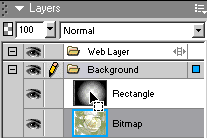
Select the bitmap layer in the Layers panel and, holding down the CTRL key, hover the cursor over the thumbnail of the gradient rectangle. You'll notice that a small rectangle appears in addition to the cursor. Click the thumbnail of the rectangle. This applies the transparency gradient to the bitmap.
A selection marquee appears over the gradient rectangle on the canvas. The marquee boundaries indicate the 50% transparency point, not the actual selection. Press the delete key to cut the selected area, and then click on the eye icon for the gradient rectangle in the Layers panel to hide the rectangle.
|
|
The final result: the edges of the water color rose fade to white, using the transparency gradient bitmap etch process.
All that remains is to choose the settings in the Optimize panel-select JPEG-and export the final image.
|
|
|
|
There are many other ways to create a vignette. One method involves making the gradient white-to-transparent white and using the layer as an overlay mask. But we wanted to highlight the etch process because it's so useful for other purposes.
For example, you can use it to create a fading animation. Starting with the same mask, you can vary the gradient extent sequentially from wide to narrow. The mask can be used to etch a series of copies of an original bitmap to make the frames of the animation.
'In this tutorial we've only scratched the surface on using some of the new bitmap tools. With all of the new features available in the Fireworks MX there are many more creative tricks to explore.
|
About the authors
David C. Nicholls is a web developer, physicist, writer, photographer, and a recognized authority on graphics compression software, antique golf clubs, and regional fern species. He is co-author of the book Playing with Fire - Tapping the Power of Macromedia Firework 4 with Linda Rathgeber, published by Hungry Minds, Inc. He has contributed articles to numerous publications, including PC magazines, HiFi magazines and Amateur Radio journals, computer instruction manuals, book reviews in newspaper literary columns, scientific journals, and government reports. David lives in Canberra, Australia with his wife, Trish, and assorted computers named Grunter, Xerxes, Darius, Perseus, and Wally. He can be reached at www.dcnicholls.com and www.home.aone.net.au/byzantium.
Linda Rathgeber is a former editor, layout and graphic artist for the Holistic Resource Magazine.
Since turning freelance, her design contractors include Roubaix Interactive, Easter Associates, Webeze, Electric Sage Designs, and Great Web Sights. Her work has been featured by Macromedia, King Pictures, FlashBang Media, and Project VII.
Linda's writing credits include a book, Playing with Fire: Tapping the Power of Macromedia Fireworks 4. She is a contributor to New Rider's Dreamweaver Magic book series, to Project VII publications, and has written articles for MX Insite magazine, MX Developer magazine, and Macromedia's own Developer center.
She is currently developing a series of Design Aid Kit publications to "conjure up the sleeping artist in everyone who was brainwashed into believing they can't draw." http://www.webdevbiz.com/graphics.cfm
Linda lives in Sumter, South Carolina with a monitor pet named Missy and two reliable but aging DELL PC's. She can be reached at lightly@sc.rr.com
|
| |