|
|
Home | Audio | DIY | Guitar | iPods | Music | Brain/Problem Solving | Links| Site Map
This work is licensed under a Creative Commons License.
Glassy Navigation
In this tutorial you’ll see how to create a glassy navigation bar. After you started with a New document, follow the steps below.
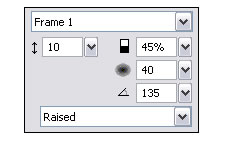
STEP ONE
Select the rectangle tool and draw a rectangle, 400 pixels of width and 35 pixels of height. Set solid background - #CCCCCC and 1-Pixel soft style border - #999999 color. Set the rectangles roundness to 100. After youve done that, select the rectangle and in the Properties window go to Effects -> Bevel and Emboss -> Inner Bevel and set all values like theyre setted on the image below.
STEP TWO
Then go to Effects -> Shadow and Glow -> Inner Shadow and set all values like theyre setted on the image below.
STEP THREE
After that, go to Effects -> Shadow and Glow -> Drop Shadow and set all values like theyre setted on the image below.
STEP FOUR
Now, select the rectangle tool and draw another rectangle. Set roundness to 100. Set solid background - #95CFF4 and 1-Pixel Soft style border - #666666 color. Place the second rectangle over the first one.
STEP FIVE
Select the second rectangle and go to Effects -> Shadow and Glow -> Inner Glow and set all values like theyre setted on the image below.
STEP SIX
This is the final step. Go to Effects -> Shadow and Glow -> Drop Shadow and set all values like theyre setted on the image below.
That’s all and now you’ve got something like it’s shown on the image below.

Home | Audio | DIY | Guitar | iPods | Music | Links | Site Map | Contact
![]()