|
|
Home | Audio | DIY | Guitar | iPods | Music | Brain/Problem Solving | Links| Site Map
This work is licensed under a Creative Commons License.
Glass Orb/Button
1. Create a new canvas of 200 x 200 pixels with a background color of #AAAAAA.
2. Use the Ellipse tool and draw a circle at 150 by 150 pixels. Center this on your canvas.
Tip: Centering objects on the canvas can be done from the main menu...
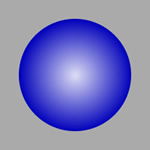
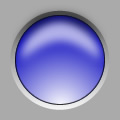
Commands > Document > Center Document3. Select the circle so that it is highlighted. Go to the Fill Floating Panel and select Radial. Click on edit in the "Fill" Floating Panel and change the two colors to #0000BB and #FFFFFF. You should now have a something similar to the image below.
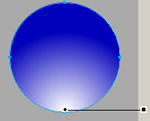
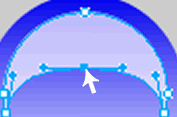
4. Select the circle so that it is highlighted. Go to the Tools Floating Panel and select the Paint Bucket. You should now see a thin black line with handles at either end on the circle (view image below). This will allow you to change how the radial fill will look. Move the Paint bucket cursor over the ends of the adjusting bars so that it looks like the image below.
5. Create a new circle on your canvas at 130 by 130 pixels with the color #FFFFFF. Center this in your document (refer to step two for tip on centering objects in your document). Once this is centered highlight it and select Edit > Copy from the main menu (CTRL C on the keyboard). Then select Edit > Paste (CTRL V on the keyboard).
6. You should now have two white circles at 130 by 130 pixels. You cant see the two circles because one was pasted on top of the other. At this point select the top White circle and press and hold the Shift key. While holding the shift key down select the Down Arrow key on your keyboard. This will move the top white circle 10 pixels. Go ahead and press the down arrow key again. The result should look like this.
Note: The shift and arrow keys allow you to move whatever object is highlighted 10 pixels in any direction. We moved our object 20 pixels in the down direction.
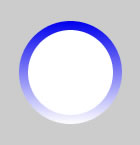
Now that we have the 2 circles visible, highlight the bottom white circle. While the circle is highlighted press shift on the keyboard and click on the top white circle. You should now see both white circles highlighted. Got to the main menu at the top. Select Modify> Combine> Punch. What this does is punches out a portion of the top circle. You should now have a white crescent shape.
7. Highlight the crescent shape and go to the Layers Floating Panel. Click on the slider bar to set transparency to 70% (you can also type in the number)
 |
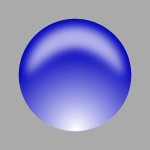
8. As you can see our glass orb/button is starting to take shape. Highlight the crescent shape once again. Now go to the Effects Floating Panel. From the drop down list select Blur> Glaussian Blur. An option box should pop up. I chose to add 4.5 to the blur effect. You can choose what ever level of blur you want. This part s purely up to you. Adding a blur of 5.0 gives the effect of a sandy finish to the orb. No blur gives it a crystal clear effect.
If you want a glass orb add a drop shadow and there you have it. You can leave it at that. If you want a Glass button continue on.
Additional info: You can also use the Subselection tool (see image below) to move the individual points of the objects. You can change the shape of the crescent to be thicker or thinner. Just select the object then click on one of the white points. It will turn to a blue color. This means that you can now either use the arrow keys on your keyboard to move it or you can click and hold the point while dragging the mouse.
 |
 |
You should have a graphic that looks like this.
9. We now need to add a new circle, which will be our border for the orb to make it appear as a button. Select the blue circle that has the Radial fill. Now do a copy and paste to make a copy of the blue circle. Go to the Info Floating Panel and enter the dimension of 165 by 165 pixels. Now go to the Fill Floating Panel and change the fill from Radial to Linear. Now change the fill colors to #FFFFFF and #555555.
With the circle still highlighted go to the Tools Floating Panel and choose the Paint bucket. Adjust the fill so that the darker color is at top and lighter color at bottom.
We now need to take that new circle and place it at the bottom of the layers (highlight the circle then press Shift+CTRL+ Down Arrow) You should end up with something like the image below. The end result should look similar to this.
I added a couple of things to the button. I added a stroke of 1pt. to the blue circle to give a little depth and I also added another crescent shape to the top portion of the button to show more shadow. I encourage you to experiment as well.
Home | Audio | DIY | Guitar | iPods | Music | Links | Site Map | Contact
![]()