Today you are going to see how to create a nice looking chat icon.
STEP ONE
Start with a New document (800X600).
STEP TWO
Click on the Assets panel on the right side, below the Layers panel. Then choose Shapes subcategory. Scroll down untill you find the talking icon. Click on it and drag it in your document. Set the following size: 80 pixels of width and 74 pixels of height.
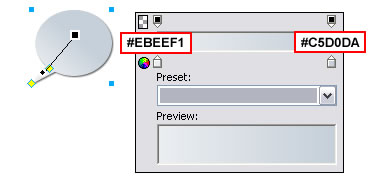
STEP THREE
Click the background icon and choose Gradient -> Linear background. Set colors like they’re marked on the image below. Also, place the background line, like it’s place on the image below.
STEP FOUR
It’s time to set border for the icon. Select the talking icon and set border value to 1, 1-pixel Soft style. Color of border should be #003366.
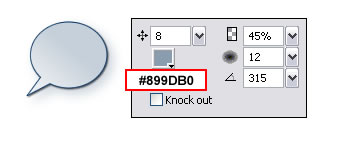
STEP FIVE
Now, we have to add shadow to the icon. In the properties window click Effects -> Shadow and Glow -> Drop Shadow and set values like they’re set on the image below.
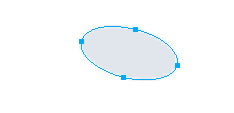
STEP SIX
Select the Ellipse tool (keep pressing “U” untill you’ve got the Ellipse tool) and draw an ellipse. It’s size should be 24 pixels of width and 13 pixels of height. Set background to #E0E6EB.

(zoomed 400%)
STEP SEVEN
Press CTRL+T and rotate like it’s rotated on the image below (zoomed 400%).
STEP EIGHT
Now, place the ellipse over the talking icon, like it’s placed on the image below.
That’s all folks. Now you have a nice loking chat icon. Try different colors.
Cool Chat Icon