|
|
Home | Audio | DIY | Guitar | iPods | Music | Brain/Problem Solving | Links| Site Map
This work is licensed under a Creative Commons License.
Image Gallery using Spry framework
This tutorial will explain how to create image gallery (thumbnail viewer) using Spry Widgets which come together with Dreamweaver CS3. Demo is available here.
Create the following folders and sub folders:
images/large
images/thumband files, directly in your site´s root folder:
data.xml
index.htmlPrepare 6 different images and resize them to something like width 339px mine are 339px wide and 254px high. Place all of then inside of the images/large folder. You will also need to create thumbnails for them with the same name as the large ones, but much smaller. For this purpose I have resized and cropped all images so that the thumbnail has a shape of square rather than rectangle. I have chosen the dimensions: 50px / 50px.
Place your thumbnails inside of the images/thumb folder.Now it´s time to prepare our xml file which will store all necessary information about our images.
Open data.xml and after the line which reads <?xml version="1.0" encoding="utf-8"?> type:<imageset><image><imgfile>001.jpg</imgfile> <imgthumbwidth>50px</imgthumbwidth> <imgthumbheight>50px</imgthumbheight> <imglarwidth>339px</imglarwidth> <imglarheight>254px</imglarheight></image> <image><imgfile>002.jpg</imgfile> <imgthumbwidth>50px</imgthumbwidth> <imgthumbheight>50px</imgthumbheight> <imglarwidth>339px</imglarwidth> <imglarheight>254px</imglarheight></image> <image><imgfile>003.jpg</imgfile> <imgthumbwidth>50px</imgthumbwidth> <imgthumbheight>50px</imgthumbheight> <imglarwidth>339px</imglarwidth> <imglarheight>254px</imglarheight></image> <image><imgfile>004.jpg</imgfile> <imgthumbwidth>50px</imgthumbwidth> <imgthumbheight>50px</imgthumbheight> <imglarwidth>339px</imglarwidth> <imglarheight>254px</imglarheight></image> <image><imgfile>005.jpg</imgfile> <imgthumbwidth>50px</imgthumbwidth> <imgthumbheight>50px</imgthumbheight> <imglarwidth>339px</imglarwidth> <imglarheight>254px</imglarheight></image> <image><imgfile>006.jpg</imgfile> <imgthumbwidth>50px</imgthumbwidth> <imgthumbheight>50px</imgthumbheight> <imglarwidth>339px</imglarwidth> <imglarheight>254px</imglarheight></image></imageset>Save and close the file.
Now open the index.html file and attach the style sheet which I have created for the purpose of this tutorial.
You can download it from here.In between the <body></body> tags type:
<div id="wrap">
<div id="limg">
<img src="#" width="" height="" alt="" />
</div>
<div id="cont">
</div>
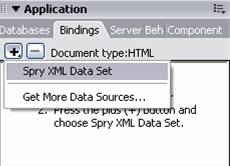
</div>Now from the Bindings tab of the Application panel choose Spry XML Data Set.
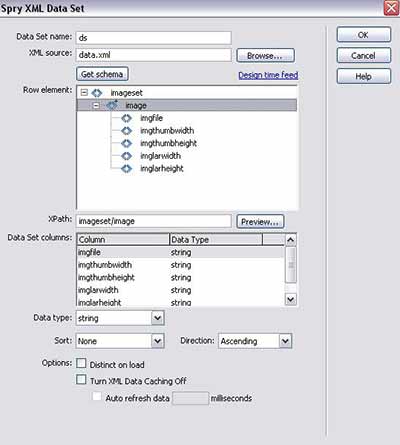
In the Spry XML Data Set window, give your data set a name I have just left it as ds and attach our data.xml file by clicking Browse button and pointing to its location. Once the file has been attached click Get schema button to retrieve the schema of the xml file.
In the Row element section, select the image node and click OK to create a data set.
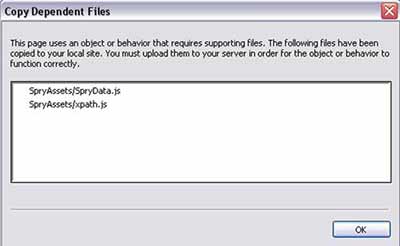
Save the file and in the window which will pop in click OK to indicate that you´ll remember to copy dependent files (generated by Dreamweaver) to your remote server.
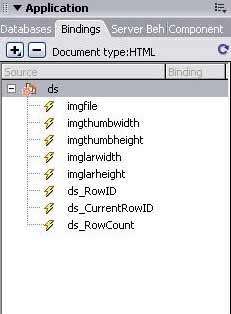
In the Bindings section of the Application panel you should now see our data set.
Still in the Code view, place your cursor after the <div id="cont"> line and change the view to Design.
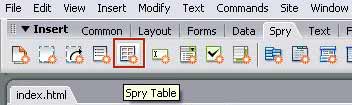
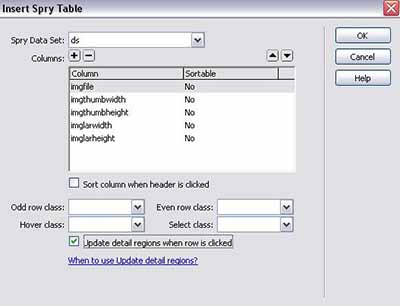
From the Spry tab of the Insert panel choose Spry Table.
In the Insert Spry Table window check Update detail regions when row is clicked and click OK.
Now change the view to Code and identify our table:
<table><tr><th>Imgfile</th> <th>Imgthumbwidth</th> <th>Imgthumbheight</th> <th>Imglarwidth</th> <th>Imglarheight</th></tr> <tr spry:repeat="ds" spry:setrow="ds"><td>{imgfile}</td> <td>{imgthumbwidth}</td> <td>{imgthumbheight}</td> <td>{imglarwidth}</td> <td>{imglarheight}</td></tr></table>
We will convert our table to unordered list (<ul>).
First of all completely remove the following content:
<table><tr><th>Imgfile</th> <th>Imgthumbwidth</th> <th>Imgthumbheight</th> <th>Imglarwidth</th> <th>Imglarheight</th>
and:
<td>{imgfile}</td>
 <td>{imgthumbwidth}</td>
 <td>{imgthumbheight}</td>
 <td>{imglarwidth}</td>
 <td>{imglarheight}</td>
This way we are only left with:
<tr spry:repeat="ds" spry:setrow="ds">
Change the tr to li and at the end of this line type the closing </li> tag.
Your line should now look like this:<li spry:repeat="ds" spry:setrow="ds"></li>
Now place your cursor at the beginning of this line and type:
<ul id="ulthumb">
and after closing </li> tag type closing </ul> tag.
The entire line should now read:<ul id="ulthumb"><li spry:repeat="ds" spry:setrow="ds"></li></ul>
We need to insert an image tag for the thumbnail in between the <li></li> tags. After <li spry:repeat="ds" spry:setrow="ds"> type:
<img src="images/thumb/{imgfile}" width="{imgthumbwidth}" height="{imgthumbheight}" alt="{imgname}" />The names within the curly brackets {} are the names of tags from our xml file which populate relevant information for each record.
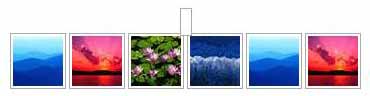
If you test your page in the browser you should now see a list of 6 thumbnails displayed horizontally.
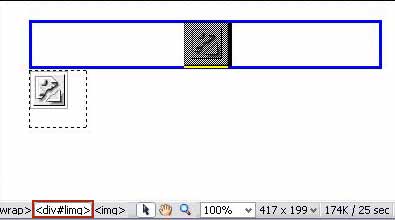
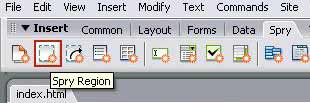
Go to the Design view, click on the upper image placeholder and then click <div#limg> tag selector.
Now from the Spry tab of the Insert panel choose Spry Region.
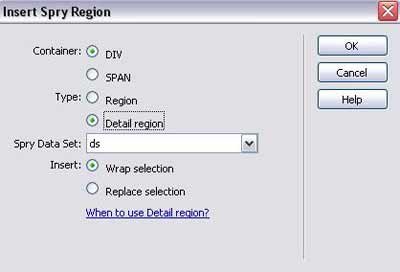
In the Insert Spry Region window select DIV and Detail region, from the Spry Data Set choose our data set ds and for Insert select Wrap selection and click OK.
Change the view to Design and identify the line which reads:
<img src="#" width="" height="" alt="" />Remove the hash (#) symbol and in its place type images/large/.
Now from the Bindings section of the Application panel drag and drop imgfile to the end of the src path. Your src path for the image should now look like this:<img src="images/large/{ds::imgfile}" width="" height="" alt="" />Do the same with the width, height and alt attributes assigning the following:
width: imglarwidth
height: imglarheight
alt: imgfileYour image in the Code view should now look like this:
<img src="images/large/{ds::imgfile}" width="{ds::imglarwidth}" height="{ds::imglarheight}" alt="{ds::imgfile}" />You can add another tag to your xml file which would store some more meaning full name for the image and replace the alt tag value with it. The same if you´d like to display some description for each image.
Save and test the file by clicking thumbnails to change main image.
And that´s all there is to it.
Home | Audio | DIY | Guitar | iPods | Music | Links | Site Map | Contact
![]()