|
|
Home | Audio | DIY | Guitar | iPods | Music | Brain/Problem Solving | Links| Site Map
This work is licensed under a Creative Commons License.
Using CSS To Display Elements and Align
When you design for print, you can put text and graphics anywhere on the page, and even overlap them to create a sense of depth and add visual interest. Unfortunately, HTML and Cascading Style Sheets (CSS) have more limited layout possibilities.
CSS does have a position property that lets you place an element in an exact position in the browser window. When CSS first made its way into Web browsers, designers thought they had found a magic bullet for creating sophisticated Web layouts. But due to bugs in Web browsers that prevented consistent cross-browser positioning and an incomplete understanding of how positioning works, many Web designers abandoned the position property out of frustration.
Fortunately, modern browsers have (mostly) conquered display bugs related to CSS positioning. With modest doses of CSS positioning, you can achieve effects that aren't normally possible with HTML, such as overlapping page elements, captions that sit on top of photos, and images that float outside of the edges of their containing divs. To get a taste of some of the possibilities, click on "The Magic Bullet In Action" below to check out my examples before reading on:
What's It All About?
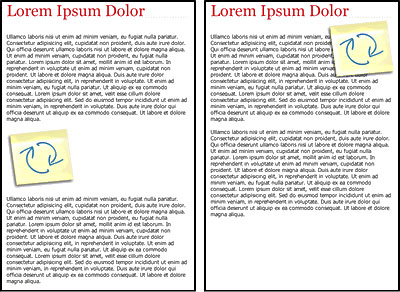
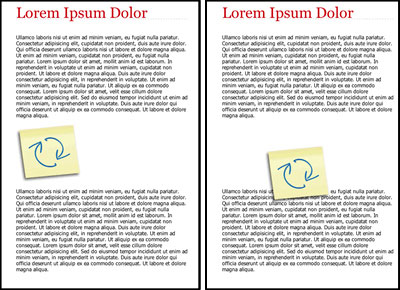
The CSS position property controls how and where a Web browser displays an element. You can assign one of four values to this property: static, fixed, absolute, and relative. Static is the normal way Web browsers display content: in other words, choosing this value won't change the way an element looks on a page. Fixed positioning lets you fix an element in the browser window, so that when a user scrolls up or down the page, the element sticks in place -- kind of like the old frames-based Web sites. The fixed position holds a lot of promise, but because it's not well supported in Internet Explorer 6, few Web designers use it.So in this article, I'll focus on absolute and relative positioning, both of which give you some powerful layout tools. Absolute positioning lets you place an element in relation to the browser window. For example, in Figure 1, a sticky note appears in its own paragraph in the middle of the Web page.
Figure 1. The left-hand example does not use absolute positioning of the sticky note; the right-hand example does.To get that, you'd give the paragraph an ID of "postIt" and create a style like this:
The image would then move to a position that's 350 pixels from the left edge of the browser window and 50 pixels from the top, like the right-hand image in Figure 1.
You're allowed to use negative values, so you can move a positioned element partly (or entirely) outside of the browser window.
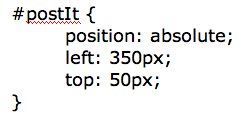
CSS lets you specify a position from either the left or right edge, and the top or bottom edge. For example, you could get the same effect as the page in Figure 1 with this style:
Keep in mind that the positioning is relative to the browser window, so if the user resizes her browser window as she views the page, the positioned element may move around as well.
As you can see in Figure 1, absolutely positioned elements have another distinctive trait: They float above the page. In CSS terms, the positioned element is removed from the flow of the page, meaning that the element sits on top of other content. The other parts of the page don't know the positioned element exists, so the space formerly reserved for the element disappears. In Figure 1, positioning the sticky note image makes the second paragraph move up the page.
You may not always want to place something in relation to the browser window. For example, say you have a graphic that's associated with a headline (Figure 2).
Figure 2. When you want an absolutely positioned element to move in relation to a parent tag, use relative positioning on the parent.You might use absolute positioning to make the image appear above and a little to the left of the headline. But if you used absolute positioning as described so far, the image would be placed in relation to the browser window, so if the headline moved -- maybe you added an extra paragraph of text above the headline -- the image would stay in the same location in the browser window. In other words, the image wouldn't move along with the headline.
This is where relative positioning comes in. Unfortunately, this is one of the most misunderstood CSS concepts. Many people think you apply relative positioning to the element that you wish to position relative to some other element -- for example, apply a relative position to the image since you want to place it relative to the headline. But that's not how it works.
The CSS position property's relative value lets you position an element relative to its current position on the page, which may sound like what you're looking for. However, relative positioning leaves an empty placeholder where the element used to be. For instance, the left-hand image in Figure 3 shows a paragraph with an image in it. When the paragraph's position property is set to relative and the left and top values are set (right-hand image in Figure 3), the paragraph and the image move relative to its old location. However, the space formally occupied by the paragraph remains -- it's like a vacant lot that no other content can fill.
Figure 3. A relative positioned element always leaves an empty space that occupies the place.Because of that strange behavior, some people assume that relative positioning isn't very useful. But it is. The key is that you don't use relative positioning on the element you want to position. Instead, you set the position property of an ancestor of that element to relative. (An ancestor tag surrounds another tag; for example, if a link is inside a paragraph, the paragraph is an ancestor of the link.) The relatively positioned element then provides the positioning context for any absolutely positioned tags inside it.
Here's an example to make this clearer. Say you have a headline with text (an <h1> tag, for example). Inside that tag, you have an image. The HTML might look like this:
To position the image in relation to the headline, you first set the positioning of that headline to relative:
That one style sets the top, left, right, and bottom edges for positioning the image.
With the above code, the image will be placed at the top of and 15 pixels off the left edge of the headline, instead of at the top and off the left of the Web browser window. The key to making this work is that the HTML tag for the element you want to position (the image in this example) is inside the tag of the element you want to position relative to (the headline.) In other words, if the <img> tag is outside the headline tag (either before or after the <h1>) the above CSS rules wouldn't work: the image would still be placed in relation to the browser window.
Absolute and relative positioning are concepts that are easier to grasp when you're actually working with them, so in the rest of this article, I'll show you how to use sample files that take advantage of the CSS position property to give you three cool effects.
Download the following sample files, unzip them on your computer, open your HTML editor, and get started!
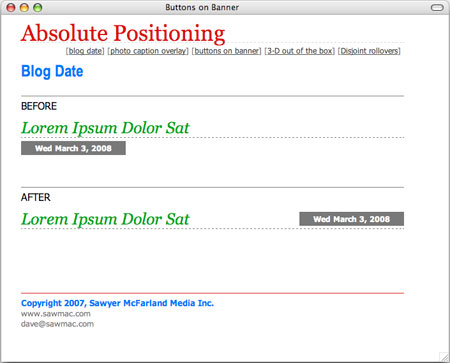
Tutorial 1: Blog Date
When posting time-sensitive material (such as a blog entry or a press release), it's common to add the date somewhere near the headline. In this exercise, you'll use CSS to accurately place a date to the far right of the headline (Figure 4).
Figure 4. Without relative positioning, the blog date goes underneath the post's headline. With relative positioning, the date can be on the same line as the headline.
- Start up your favorite HTML editor and open the file blog.html (inside the downloaded positioning_site folder). This page contains a headline ("My Super Blog") and a fictitious blog post. The post's headline, date, and text are all contained in a div with a class of "post" applied to it. There's already a style sheet in this page, so you'll add a new style.
- After the .post h2 style, add the following new style:
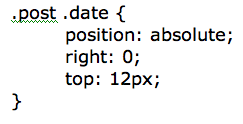
The date is contained in a paragraph with the class "date". This style applies to that paragraph when it's inside another tag with a class of "post". Since the paragraph is inside a <div> tag with that class, the rule applies.
Note For Dreamweaver users: You don't need to go into code view to do these exercises. Simply create CSS styles the way you normally would. All CSS positioning properties are in the Positioning category of the CSS Rule Definition window.
- Preview the page in a Web browser. Notice that the date is positioned at the top-right corner of the browser window, nowhere near the headline. The style you just created positions the date at the far right, 12 pixels down from the top of the window. If you resize the browser window, you'll see that the date travels in relation to the window. But what you really want is to position the date relative to the top of the blog post, where the headline is.
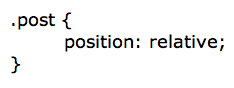
- Return to your HTML editor and add another style to the page:
- Preview the page in a Web browser again. Now the date moves into position to the far right of the headline. By changing the .post style to relative, you've set a new position context for all absolute positioned elements inside the tag with the class "post" applied to it. In this case, the date is now positioned relative to the top-right corner of the <div>, not the browser window.
Tutorial 2: Fancy Captions
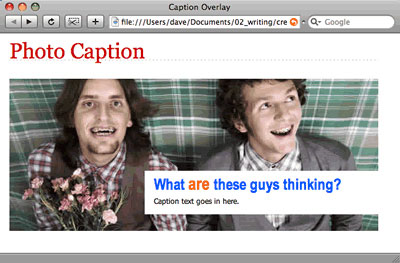
Absolute positioning lets you stack elements on top of one another. In this exercise, you'll superimpose a caption on top of a photo (Figure 5).
Figure 5. The caption on top of this photo is live text, not part of the JPEG.
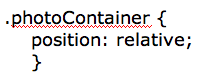
- Open the file photo_caption.html in your HTML editor. This page contains a <div> tag with the class of "photoContainter". Inside that <div> are the photo and a caption. The caption, at this point, appears below the photo and is contained inside its own <div> with a class of "caption".
- Click between the opening <style> and closing </style> tags and add the following style:
This sets a new positioning context for any absolutely positioned elements inside the photoContainer <div>. Now you can absolutely position the caption relative to the edges of the <div> .
- Add another style to the page:
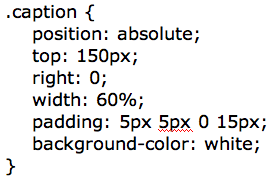
This style does several things. Most importantly, the first three lines instruct the Web browser to place the caption <div> at the far right and 150 pixels down from the top edge of the photoContainer. The width property makes the caption only 60 percent of the width of the photo, while the padding and background color provide white space so the caption text is easy to read.
Preview the page and you'll see that the caption is placed on top of the image. You can, of course, move the caption anywhere you wish to within the photo box by using different values for top, right, left, or bottom.
Tutorial 3: Breaking Out of the Box
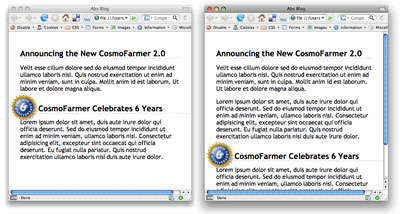
One complaint about Web design is that so many sites look "boxy." The rectangular shape of HTML elements forces us to essentially place lots of boxes side by side and above and below other boxes. The current version of HTML doesn't let us create round <div> tags or even place a div at an angle. However, with CSS positioning, we can add depth to our designs and interrupt the parallel edges that can make a Web page look so monotonous (Figure 6).
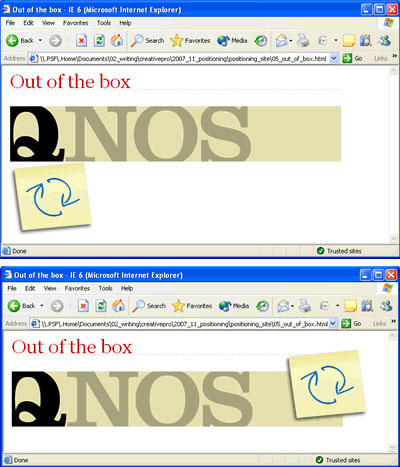
Figure 6. The top page is typically boxy; the bottom page breaks out of the box.
- In your HTML editor, open the file out_of_box.html. This page has a <div> tag with an ID of "banner". It contains two images: one is a rectangular banner, and the other is a small sticky note. To make the banner pop, you'll position the sticky note so it looks like it's stuck on the banner.
- Within the <style> tags at the top of the page, add this style:
You've just set the banner div to relative so that you can position the image inside it relative to the div's edges and not the browser window's edges. (You may also notice a style that's already in the page: "* html img". If you've been following this column, that might look familiar. This style allows Internet Explorer 6 to display transparent PNG images, as I described in "Harnessing the Power of PNGs."
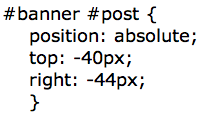
- Add one additional style to the style sheet:
One of the great benefits of absolute positioning is the ability to use negative values. Using a negative top value on an item that's positioned in the browser window merely moves the item outside the window and out of view. However, using negative positioning values for an item positioned relative to another tag actually moves the positioned element outside the boundaries of the other tag. In this case, the sticky note image will move outside the banner image.
This article has just touched the surface of some of the fun effects that are possible using absolute positioning. You can see a few more examples of positioning on the "Magic Bullet In Action" pages. You'll also find these examples in the tutorial files you downloaded above.
Dave Sawyer McFarland is the author of Dreamweaver CS3: The Missing Manual and CSS: The Missing Manual. You can learn more about his books and work at www.sawmac.com.
Home | Audio | DIY | Guitar | iPods | Music | Links | Site Map | Contact
![]()