|
|
Home | Audio | DIY | Guitar | iPods | Music | Brain/Problem Solving | Links| Site Map
This work is licensed under a Creative Commons License.
Creating Rollover Images
Cody Berndsen
Step 1: Creating the Rollover Graphics in Fireworks MX
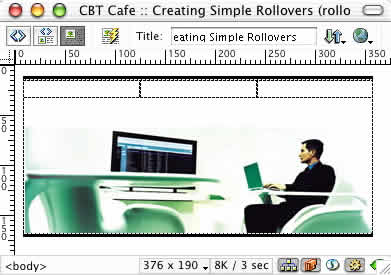
In our example, the menu contains 3 buttons: about | contact | services. Each button has 2 states: The Up state and the Over state. This gives us a total of 6 graphics. This looked in Fireworks MX before exporting:
It's very important that you export each graphic at the same size or your rollover images can be distorted.
In the image above, the bottom graphics (the Over state) are larger than the top ones. In order to ensure our images are the same size, we'll create a canvas the size as the largest image and then export every image from that canvas size.
The image size for each of the bottom graphics is: 101x24.
- Create a new file 101x24
- Place the larger (Over) graphic on the new canvas
- Set the X and Y coordinates in the Property Inspector to 0,0. This ensures the graphic is perfectly placed on the new canvas
- Copy the smaller (Up) graphic to the new canvas and line up the text so that it aligns with the bottom text

- Turn off the visiblity of the Over image (bottom layer) by clicking the Show/Hide Icon (the eyeball graphic). We're going to export the Up graphic first.
- Set the Optimize panel to Gif | Adaptive | 8 Colors
- Export the image and name it: "about_Up"
- In the Layers Panel, turn the visibility off for the "Up" graphic and turn the visibility on for the "Over" graphic
- Set the Optimize panel to Gif | Adaptive | 8 Colors
- Export the image and name: "about_Over"
- Repeat steps 1-10 for the remaing 2 buttons
Inserting the Rollovers
- Open "rollover_start.html"
- Place your cursor in the first table cell
- From the Insert Menu, select Insert > Rollover Image
- You can type in a name for the Image name and override Dreamweaver's default naming convention
- Set the Original and Rollover images by using the Browse button or by typing in the names. If you type in the image name be sure you type the path to the images correctly. I generally prefer to use the Browse button for the first image and then copy and paste the name for the Rollover image and make the necessary name changes.
- Dreamweaver will select "Preload Rollover Image" by default. Leave that option selected.
- Type in a descriptive name for the Alternative Text field. This is the text that is displayed when a the cursor is over the image
- Use the Browse button to navigate to the page you want the link to visit when clicked. You can leave this blank for this exercise and Dreamweaver will automatically set the link to a "null link" by placing the pound sign (#) in the Link field. Null links are temporary links that will not go anywhere but are needed for setting up the rollover image.
- Continue adding the rollovers for the remaining two buttons
Step 2: Editing the Rollover Images
At point you may need or want to go back and change one of your rollovers after you've created them. You can easily do this by using the Behaviors Panel.
- Select the image you want to change
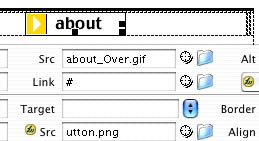
- To change the Up state of the button, click the Browse For File icon in the Property inspector and browse to the new image.
- To change the Over state of the image, go to the Behaviors Panel, double-click the (onMouseOver) Swap Image behavior. This is why naming your images when you set this up is so important.
- The image you select is the Up state of the image. That is the name that is highlighted in the Images field.
- Set Source to lets you change out the Over image for the currently selected image. In this case, we selected the Services button and if we change the Set Source to image, we'll have a different Over state for the Services button.
Home | Audio | DIY | Guitar | iPods | Music | Links | Site Map | Contact
![]()