|
|
Home | Audio | DIY | Guitar | iPods | Music | Brain/Problem Solving | Links| Site Map
This work is licensed under a Creative Commons License.
Creating your first website – Part 2: Creating the page layout
Jon Varese
Prerequisite knowledge:
Creating your first website – Part 1: Setting up your site and project files
Examine the design comp
Typically, you don't begin building a website by opening Dreamweaver and laying out pages. The first steps to creating a website begin on a piece of paper or in a graphics-editing application like Adobe Fireworks or Adobe Photoshop. Graphic designers usually sketch out a piece of comprehensive artwork (also known as a comp) for the website to show it to the client and make sure that the initial ideas for the site meet with their client's approval.
A comp consists of any number of page elements that the client has requested for a website. For example, the client might say, "I want to have a logo at the top of the page, a navigation that links to these other pages, a section for an online store, and a place where I can insert video clips." Based on that discussion, the designer begins planning the layout of the site and creates sketches of sample pages that fulfill the client's requirements.
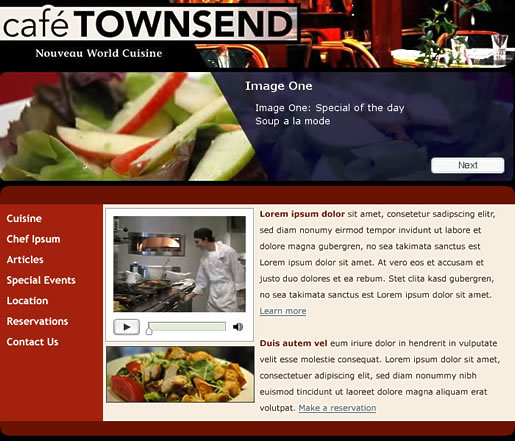
This tutorial provides you with the completed and approved comp for Café Townsend, a fictional restaurant that is in need of a website. As the web designer, your job is to transform the comp into a working web page (most likely with the help of other graphics designers and Flash developers). Figure 1 shows a comp of the Café Townsend page layout.
Figure 1. A comp of the Café Townsend page layout
You'll notice that the graphic designer has provided you with a web page comp that includes a number of content areas, as well as some graphic ideas. In the following sections, you'll use Dreamweaver to lay out this design.
You can also open the original comp file if you want to see it on the computer screen. You can find the comp, homepage-mockup.jpg, in the images folder of the cafe_townsend folder that you copied to your hard drive in the first part of this article series, Setting up your site and project files. You might even want to print the comp so that you can have it in front of you as you build your page.
Create and save a new page
After you have set up a site and examined any comps, you are ready to begin building web pages. You'll start by creating a new page, and saving it in the cafe_townsend local root folder of your website. The page eventually becomes the home page for Café Townsend.
Note: If you haven't created the cafe_townsend local root folder, you must do so before you proceed. For instructions, see Setting up your site and project files.
- In Dreamweaver, select File > New.
- In the Blank Page category of the New Document dialog box, select HTML from the Page Type list, select <none> from the Layout list (these two options should already be selected by default), and click Create.
Note: In the Page Type list below the <none> option you'll see all of the CSS layouts that come with Dreamweaver. Later you can return to this dialog box to explore the different kinds of CSS layouts available.
- Select File > Save As.
- In the Save As dialog box, browse to and open the cafe_townsend folder that you defined as the site's local root folder. (In Part 1 of this tutorial series, you created this folder within a folder called local_sites.)
- Enter index.html in the File Name text box and click Save. The file name now appears in the title bar at the top of the application window, as well as in the tab of your new document.
- In the Document Title text box at the top of your new document, type Cafe Townsend (see Figure 2).
Figure 2. Adding the page title
This is the title of your page (different from the file name). Your site visitors will see this title in the browser window title bar when they view the page in a web browser.
- Click once on the page to move the insertion point out of the Document Title text box. You'll see that an asterisk (*) appears next to the file name in the document's tab. This asterisk indicates that a file has changed and that you need to save the file if you want to keep the changes.
- Select File > Save to save your page.
Insert tables
Next you'll add a table that will hold text, graphics, and Adobe Flash assets.
- Click once on the page to ensure place the insertion point is in the upper-left corner of the page (see Figure 3).
Figure 3. Placing the insertion point in the upper-left corner of the page
- Select Insert > Table.
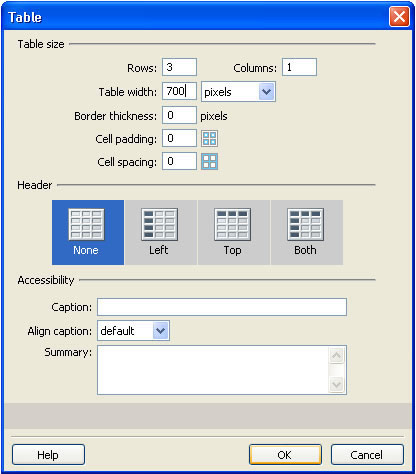
- In the Insert Table dialog box, do the following (see Figure 4):
- Enter 3 in the Rows text box.
- Enter 1 in the Columns text box.
- Enter 700 in the Table Width text box.
- Select Pixels from the Table Width pop-up menu.
- Enter 0 in the Border Thickness text box.
- Enter 0 in the Cell Padding text box.
- Enter 0 in the Cell Spacing text box.
Figure 4. Entering the initial table properties
- Click OK.
A table with three rows and one column appears in your document (see Figure 5). The table is 700 pixels wide with no border, cell padding, or cell spacing.
Figure 5. A table with three rows and one column appears in your document
Note: Tables are a powerful tool for presenting tabular data and for laying out text and graphics on an HTML page. A table consists of one or more rows; each row consists of one or more cells. When you create multiple rows with multiple cells, the cells form columns. Technically, a cell is a division within a horizontal row, and a column is the vertical accumulation of those cell divisions.
Dreamweaver displays the table width and the width for each table column in the Table selector (indicated by green lines) when the table is selected or when the insertion point is in the table (see Figure 6).
Figure 6. Table width and column width in Dreamweaver
Next to the widths are arrows for the table header menu and the column header menus. You can use the menus for quick access to common table-related commands. You can also enable or disable the display of the widths and menus by selecting View > Visual Aids > Table Widths.
Tables can have borders, and the cells of a table can have padding, spacing, or both. Cell padding refers to the number of pixels between the cell's content and the cell's boundaries. Cell spacing refers to the number of pixels between adjacent table cells.
If you don't explicitly assign values for cell padding and cell spacing, most browsers display the table as if cell padding were set to 1 and cell spacing were set to 2. If you want to ensure that browsers display the table with no padding or spacing, set cell padding and cell spacing to 0.
For more information about tables, see Presenting content with tables in the Dreamweaver Help.
- Click once to the right of the table to deselect it.
- Select Insert > Table to insert another table.
- In the Insert Table dialog box, do the following for the second table:
- Enter 1 in the Rows text box.
- Enter 3 in the Columns text box.
- Enter 700 in the Table Width text box.
- Select Pixels from the Table Width pop-up menu.
- Enter 0 in the Border Thickness text box.
- Enter 0 in the Cell Padding text box.
- Enter 0 in the Cell Spacing text box.
- Click OK. A second table with one row and three columns appears below your first table (see Figure 7).
Figure 7. A second table with one row and three columns appears below your first table.
- Click to the right of the table to deselect it.
- Insert a third table by selecting Insert > Table and entering the following values in the Insert Table dialog box:
- Enter 1 in the Rows text box.
- Enter 1 in the Columns text box.
- Enter 700 in the Table Width text box.
- Select Pixels from the Table Width pop-up menu.
- Enter 0 in the Border Thickness text box.
- Enter 0 in the Cell Padding text box.
- Enter 0 in the Cell Spacing text box.
- Click OK. A third table, with one row and one column, appears below your second table (see Figure 8).
Figure 8. A third table, with one row and one column, appears below your second table.
- Click to the right of the table to deselect it. Your page should now look like Figure 9.
Figure 9. How the table looks after deselecting it
Note: You may see the Table selector (indicated by green lines) after you insert a table. You can always make the Table selector disappear by clicking outside the table. You can also disable the Table selector by de-selecting View > Visual Aids > Table Widths.
Set table properties
Now you'll set precise table properties, using Expanded Tables mode, a feature that temporarily adds cell padding and spacing to tables and increases the borders of the tables to simplify editing. Specifically, it lets you position the insertion point precisely without accidentally selecting the wrong table or other table content.
Note: After you finish setting table properties in Expanded Tables mode, always return to Standard mode. Expanded Tables mode is not a WYSIWYG (what you see is what you get) environment, so some operations, such as resizing, do not display the expected results.
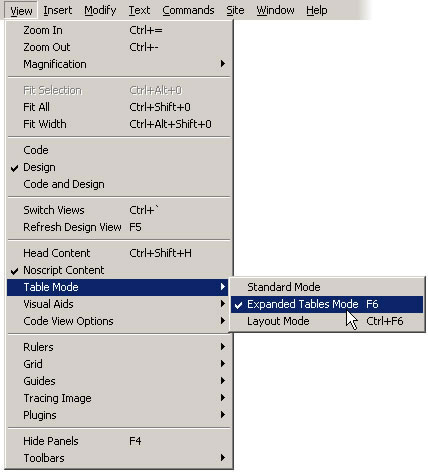
- Select View > Table Mode > Expanded Table Mode (see Figure 10).
Figure 10. Switching to Expanded Tables mode
Note: If you see the Getting Started with Expanded Tables Mode dialog box, click OK.
- Click once inside the first row of the first table (see Figure 11).
Figure 11. Clicking inside the first row of the first table
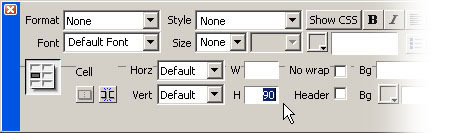
- In the Property inspector (Window > Properties), enter 90 in the Cell Height (H) text box and press Enter (Windows) or Return (Macintosh).
Figure 12. Setting the height of the table cell
Note: If you cannot see the Cell Height text box, click the expander arrow in the lower-right corner of the Property inspector.
- Click once inside the second row of the first table (see Figure 13).
Figure 13. Clicking inside the second row of the first table
- In the Property inspector, enter 166 in the Cell Height text box and press Enter (Windows) or Return (Macintosh).
- Click once inside the third row of the first table.
- In the Property inspector, enter 24 in the Cell Height text box and press Enter (Windows) or Return (Macintosh).
You should now have three rows of differing heights in the first table (see Figure 14).
Figure 14. Three rows of differing heights
Next you'll set properties for the second table (the table that contains three columns).
- Click once inside the first column of the second table (see Figure 15).
Figure 15. Clicking once inside the first column of the second table
- In the Property inspector, enter 140 in the Cell Width (W) text box and press Enter (Windows) or Return (Macintosh).
- Click once inside the second column of the second table.
- In the Property inspector, enter 230 in the Cell Width text box and press Enter (Windows) or Return (Macintosh).
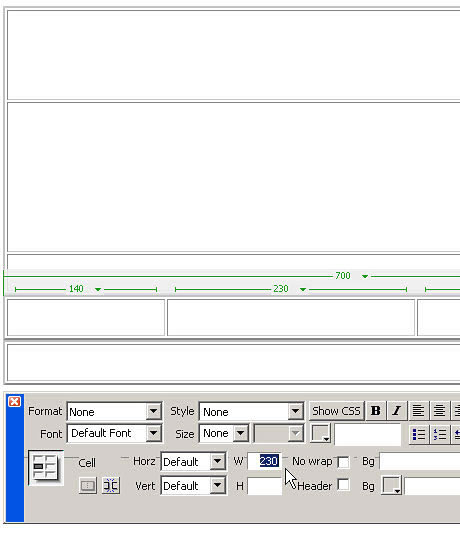
Figure 16. Setting the cell width in the Property inspector
- Set the width of the third column to 330 pixels.
If you have the Table selector enabled (View > Visual Aids > Table Widths), you'll see all three of the pixel values you just entered above the respective table columns.
You won't enter any height values for the cells in this table because the height of those cells will vary depending on the content you add later.
- Finally, click once inside the last table (the table with one row and one column).
- In the Property inspector, enter 24 in the Cell Height text box and press Enter (Windows) or Return (Macintosh).
Your layout should now look like Figure 17.
Figure 17. The table layout after setting the table properties
- Click the Exit Expanded Tables mode link at the top of the Document window to return to Standard mode.
- Save your page.
Insert an image placeholder
An image placeholder is a graphic that you use until final artwork is ready to be added to a web page. An image placeholder is useful when you lay out web pages because it allows you to position an image on a page before you actually create the image.
- In the Document window, click once inside the first row of the first table.
- Select Insert > Image Objects > Image Placeholder.
- In the Image Placeholder dialog box, do the following:
- Type banner_graphic in the Name text box.
- Enter 700 in the Width text box.
- Enter 90 in the Height text box.
- Click the color box and select a color from the color picker. You can also type a hexadecimal color value into the Color text box to select a color. For this tutorial, select a reddish brown (#993300).
- Leave the Alternate Text text box blank.
Note: Alternative text is a textual description of an image on a web page. It is part of the HTML code and does not appear on the page. It's important to provide alternative text for most of your images so that people who use screen readers or text-only browsers can receive the information provided by the image. In the case of a banner graphic, which merely displays a logo for a website, it is not essential to provide alternative text. When you leave the Alternate Text text box blank in the Image Placeholder dialog box, Dreamweaver adds an alt="" attribute to the img tag. Later, if you want to add alternative text to an image, you can select the image and enter the alternative text in the Property inspector. For example, if you later change the logo to include a phone number or address, you would want to provide that information as alternative text.
- Click OK.
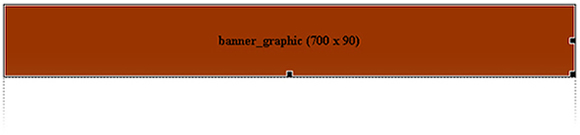
The image placeholder appears inside the first table (see Figure 18). The image placeholder displays a label and the size attributes of the image that you'll eventually place there.
Figure 18. The Image placeholder
Note: When viewed in a browser the label and size text for an image placeholder do not appear.
- Save your page.
Note: An image placeholder is a graphic you use until final artwork is ready to be added to a web page; it is not a graphic image that displays in a browser. Before you publish your site, replace any image placeholders you've added with web-friendly graphic files such as GIFs or JPEGs.
Add color to the page
Next, you'll add more color to the page by setting colors for some of the table cells and for the background of the page.
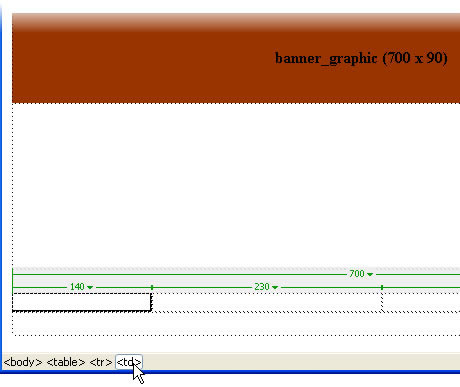
- Click once inside the first cell of the three-columned table.
- Click the <td> tag (cell tag) in the tag selector to select the cell.
Figure 19. Using the tag selector to select the table cell
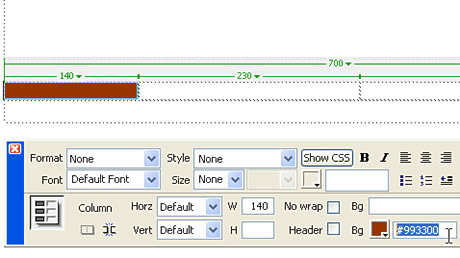
- In the Property inspector (Window > Properties), click once inside the Background Color text box. The text box is located directly next to the Background Color (Bg) color box.
Note: If you cannot see the Background Color text box, click the expander arrow in the lower-right corner of the Property inspector.
- In the Background Color text box, enter the hexadecimal value #993300 and press Enter (Windows) or Return (Macintosh).
Figure 20. Setting the color of the table cell
The color of the table cell turns to reddish-brown.
- Click once inside the second cell of the three-columned table.
- Click the <td> tag (cell tag) in the tag selector to select the cell.
- In the Property inspector, click once inside the Background Color text box, enter the hexadecimal value #F7EEDF, and press Enter (Windows) or Return (Macintosh).
The color of the table cell turns to light tan.
- Repeat steps 5 through 7 to change the color of the third table cell to light tan as well.
- After you have all three cell colors set, click once outside the table to deselect it.
Next you'll change the background color for the entire page by modifying page properties. The Page Properties dialog box lets you set a number of page properties, including the size and color of page fonts, the colors of visited links, page margins, and much more.
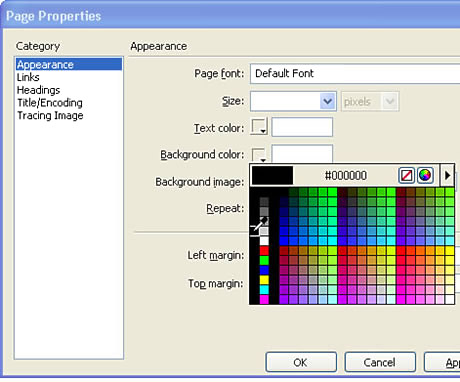
- Select Modify > Page Properties.
- In the Appearance category of the Page Properties dialog box, click the Background Color color box and select black (#000000) from the color picker.
Figure 21. Setting the page background color
A note on picking colors: In HTML, colors are expressed either as hexadecimal values (for example, #FF0000) or as color names (red). A web-safe color is one that appears the same in Netscape Navigator and Microsoft Internet Explorer on both Windows and Macintosh systems when using 256-color mode. There are 216 common colors, and any hexadecimal value that combines the pairs 00, 33, 66, 99, CC, or FF (RGB values 0, 51, 102, 153, 204, and 255, respectively) represents a web-safe color.
You can select colors in Dreamweaver by entering hexadecimal values in the appropriate text boxes, or by selecting a color from the color picker. The color picker uses the 216-color web-safe palette; selecting a color from this palette displays the color's hexadecimal value. To use the color picker, click on the color box and use the eyedropper to select a color.
You can also use the color picker to match colors. For example, if an image on your page contains a certain shade of blue and you want the background color of a table cell to match it, you can select the table cell, click on the color box to open the color picker, move the eyedropper over the blue in the image, and click the mouse button. The color picker fills the selected area with the closest match possible to the color you clicked with the eyedropper. If you select colors by this method, however, the color that the color picker chooses for you may not be a web-safe color.
- Click OK. Your page background turns to black (see Figure 22).
Figure 22. The page background turned to black
- Save your work.
Your page layout is now complete. The layout contains a number of tables that can hold assets such as images, text, and Flash Video (FLV) files.
In the next installment of this tutorial series, Part 3: Adding content to pages, you'll learn how to add assets to the page using the various insertion features that Dreamweaver provides.
About the author
Jon Michael Varese is a Senior Technical Writer at Adobe, and Lead Writer for Dreamweaver. He has written web and print documentation for Dreamweaver, Fireworks, FreeHand, Flash, and ColdFusion. In the past he has held such illustrious positions as baker, clown, and funeral attendant. In addition to writing web tutorials, he is currently at work on his Ph.D. in 19th-century British Literature.
Home | Audio | DIY | Guitar | iPods | Music | Links | Site Map | Contact
![]()