|
|
Home | Audio | DIY | Guitar | iPods | Music | Brain/Problem Solving | Links| Site Map
This work is licensed under a Creative Commons License.
Use Your Ipod as a Startup Disk
Editor’s Note: The following article is an excerpt from the just-released second edition of Take Control of Your iPod: Beyond the Music, a $10 electronic book available for download from TidBits Electronic Publishing. The 134-page book shows readers over a dozen practical and fun ways to use your iPod for more than just listening to music.
The iPod’s storage is optimized for storing digital music, pictures, and video, but you can use it to store any kind of data that you can put on your computer’s hard drive, thus enjoying the flexibility of a small, fast, portable drive and taking advantage of any extra storage space on your iPod. For instance, a 40GB iPod might have 30GB available for other information.
In this excerpt from my ebook Take Control of Your iPod: Beyond the Music , I provide detailed instructions for setting up an iPod as a portable disk drive with your Mac. On the next page, we’ll turn our attention to use your iPod as a Mac startup drive.
Use your iPod as a disk on a Mac
To use your iPod as a portable disk drive, begin by enabling disk use:
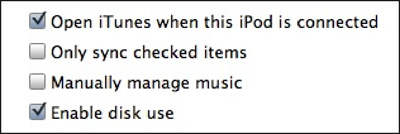 |
Figure 1 : Select the checkbox to “Enable disk use.” And, if you plan to use the disk function of your iPod more often than you’ll sync media, uncheck “Open iTunes when this iPod is connected.” |
Your Mac can now use the extra space on your iPod just as it would any other storage device.
Using the disk
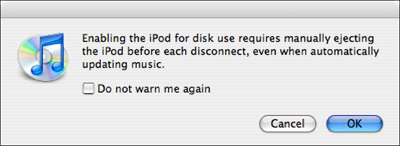 |
Figure 2 : Warning! Warning! |
While your iPod is attached to your Mac, you’ll see a disk icon for it in the Finder. Depending on your Finder preferences, the iPod’s icon will appear either on the Desktop or in the upper section of any Finder window’s sidebar (or it could be in both locations).
Double-click the iPod’s disk icon to open it and see several folders—Calendars, Contacts, Notes, Photos, and more. The number and names of the folders will vary depending on the type of iPod you have.
As with any Macintosh drive, you can now create a new folder on that drive and start dragging items into the new folder. To ensure that you don’t corrupt the data that iTunes manages, drag files and folders only into new folders that you’ve created.
Ejecting the disk-enabled iPod
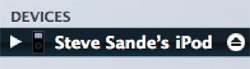 |
Figure 3 : See where it says “Steven Sande’s iPod?” That symbol to the right is the eject button. Always remember to click it to gracefully eject your iPod before detaching the cable. |
Several paragraphs ago, I noted that you need to manually eject your iPod before unplugging it from your Mac. In iTunes, that’s a simple matter of selecting your iPod in the list at the left, and then clicking its eject icon, as shown in Figure 3.
After you click the eject icon, the “Do Not Disconnect” logo on your iPod screen should disappear shortly (up to 15 seconds in some cases), and then you may safely unplug it.
Tip: Other ways to eject
Clicking the eject button isn’t the only way to eject an iPod:
- Drag the iPod icon to the Trash.
- Select it on the Desktop and press Command-E.
- In any open Finder window, find your iPod in the sidebar and click its eject icon.
- Click the “other” eject button in iTunes, which appears in the lower right of the iTunes window when the iPod (or content on an iPod) is selected.
Shuffle users: Choosing between songs and data
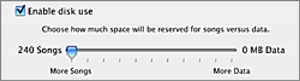 |
Figure 4 : Allocate space between songs and general use. |
If you use the shuffle, as you follow the directions for enabling disk use, you’ll encounter a storage allocation slider that you can drag to the left to increase the amount of space for your music or to the right to increase the space reserved for non-music files.
Use your iPod as a Mac startup drive
Macs are not immune to hard drive or system startup problems. On occasion, something may go wrong during the boot process and your computer just sits there. If you have enough open space on your iPod, you can use it as an emergency startup disk. Then, if you experience the frightening feeling of not having your Mac boot properly, you can at least boot it from the iPod and possibly repair the problem or at least move some of your files off the boot drive. (Of course, this assumes that the boot drive hasn’t been physically damaged, in which case you may be out of luck.)
In this section, I first look at how you can install a copy of Mac OS X on your iPod, a simple and inexpensive way to proceed. Then, I look at a product from Micromat, TechTool Protogo, which can configure an iPod as a versatile startup disk that includes troubleshooting and problem-solving utilities.
Warning! Your iPod wasn’t designed as a startup disk, and using it as one may void your warranty and cause serious damage to the iPod. Here’s why: normally, the iPod runs its drive only long enough to transfer music (or whatever media you are using) into memory. Since the drive isn’t spinning all the time, the drive uses less power and is less likely to be damaged from a sudden shock.
When you use an iPod to boot a Mac, the iPod’s disk runs constantly. This can make the iPod overheat. I suggest using an iPod as a startup drive only for short periods of time in emergencies.
Which iPods work as startup drives? Unfortunately, not all iPods can operate as Mac startup drives—you need an iPod with disk-based storage. These criteria exclude the iPod nano and shuffle since they both use solid-state storage.
There are conflicting reports about being able to use USB 2.0 iPods, such as the fifth-generation iPod, as startup drives. Some Mac configurations appear to be able to boot from these iPods, while others cannot. If you have an older FireWire-based iPod, your chances of success are much higher and your boot times will be faster.
Install Mac OS X yourself
To set up an iPod as a startup disk, follow these steps:
- Verify that you have the right equipment—you must use a disk-based iPod, so a shuffle or nano won’t work:
Use the right iPod: As noted above , you’ll have better results if you use an older iPod that has a FireWire cable for syncing.
Mac OS X install discs: You need a Mac OS X installation disc set. These directions work for Mac OS X 10.3 Panther and Mac OS X 10.4 Tiger, but if your discs are for Mac OS X 10.2 Jaguar, these directions won’t work—check out Mike Bombich’s $5 Carbon Copy Cloner; it can “clone” a Jaguar installation from a Mac to an iPod.)- If you haven’t set up your iPod as a disk, flip back to Set Up the iPod as a Disk, and enable disk use.
- Attach the iPod to your Mac, and verify that the iPod has mounted—if it has, it will appear on your Desktop and/or in the top portion of the sidebar in any Finder window. (If the disk icon does not appear on the Desktop or in the sidebar, choose Finder -> Preferences. Click General to select items you want to see on the Desktop, and click Sidebar to select items you want shown in the sidebar.)
- Restart the Mac, and make sure the iPod is still mounted.
- Insert a Mac OS X installation disc, and run the installer. I suggest that you forego installing extras—such as foreign languages, printer drivers, and applications—to reduce the amount of space taken up by the installation. At one point, the installer asks where you want to install the operating system. In the list of available disks, click the iPod icon.
- Click Continue to step through the rest of the installation.
Since your iPod is now a Macintosh startup volume, it now has new folders on it that you can see if you open it in the Finder—System, Library, Applications, and Users. These standard Mac OS X folders appear on any Mac OS X startup drive.
Note: You can set up your iPod as a startup disk for Mac OS 9 using a method similar to the one I described for Mac OS X, except you install from a Mac OS 9 CD. Get more details in this 2005 article by Michael Gowan.
Now that you’ve installed system software on the iPod, if you ever need to boot from it in an emergency, at that time, you must first tell your Mac to use the iPod as a startup disk. Here are two methods; you must use the second one if the Mac won’t boot at all:
- Plug the iPod into your Macintosh, wait for it to appear on your Desktop and/or sidebar, and then open the Startup Disk pane in System Preferences. In the Startup Disk pane, click the icon for the iPod and then press the Restart button.
- With your Mac turned off, plug your iPod into the Mac. Reboot the Mac while holding down the Option key. This lets you choose the boot volume (it may take a while for the Mac to list all the available boot volumes). Select the iPod with your mouse or arrow keys, and then click or press Enter to continue booting from the iPod.
Use TechTool Protogo to install Mac OS X
 |
Figure 5 : The large icons at the top of the installer window denote the Mac OS version and architecture (Intel, PowerPC) that will be loaded onto the iPod. The smaller icons show which diagnostic tools will be installed. |
If you have an old, FireWire-based iPod and have been looking for a good reason to buy a new one, I may have a solution for you: set up the old iPod as a startup disk and problem-solving tool using Micromat’s $135 TechTool Protogo, and then buy a new iPod to listen to music, watch videos, admire your photos, and do all the other things discussed in this book.
TechTool Protogo (“pro-to-go,” get it?) installs operating systems on an iPod-based disk, enabling it to start up everything from the latest Intel-based systems to older Macs that can boot into Mac OS 9. Protogo also includes a variety of troubleshooting and repair tools.
The TechTool Protogo installer (seen in Figure 5) can install five different types of profiles on an iPod:
- Mac OS X Universal Profile: This installation can boot most PowerPC or Intel-based Macs.
- Mac OS X Basic Profile: This installation can boot PowerPC Macs.
- Mac OS X Full Copy Profile: You may not be able to fit this profile on any existing iPod: it creates a bootable Mac OS X disk based on your currently running Mac OS X installation. In other words, it’s a bootable duplicate of your Mac’s current startup drive.
- Mac OS X and Mac OS 9 Profile: I use this profile, because some of my clients still run Mac OS 9. When those old Macs have problems, I can boot them with the Mac OS 9 partition Protogo created on my iPod. When I work with systems running Mac OS X, I can boot them from the Mac OS X partition.
- Mac OS 9 Profile: As you might suspect, this profile only boots machines that can start up using Mac OS 9.
The Mac OS X profiles include: Micromat TechTool Pro 4 (for testing and optimizing hardware), Micromat DiskStudio (to partition disks), Disk Utility (to test, erase, and partition disks, and to perform some high-level disk verification and repair), Terminal (to type some magic on the Unix command line), System Profiler (to view the Mac’s hardware and software configuration), and Console (to read log files).
If you’ve installed a profile with more than one volume (that is, both Mac OS 9 and Mac OS X), you won’t be able to listen to music on the iPod. When you turn on your iPod in this situation, it briefly displays a triangular warning icon next to a picture of a folder, followed by the Internet address for iPod technical support, before shutting off.
To start up a Mac from a connected TechTool Protogo iPod, hold down the Option key while powering up or restarting: after a few moments, the Mac will display available boot volumes. Select the appropriate TechTool Protogo partition. If you chose a Mac OS X partition, Mac OS X loads and the Micromat Launcher application appears, allowing you to choose which tool you wish to use.
When iTunes transfers music to the shuffle, it copies only as many songs as it can fit into the space allocated for music files. I suggest allocating at least 128 MB for data. You may be surprised how often you’ll use your shuffle to move files between computers.
Home | Audio | DIY | Guitar | iPods | Music | Links | Brain and Problem Solving | Site Map | Contact
![]()
