|
|
Home | Audio | DIY | Guitar | iPods | Music | Brain/Problem Solving | Links| Site Map
This work is licensed under a Creative Commons License.
How-To: Backup Your DVDs and Watch Them in iTunes
One day, we wanted to watch one of our favorite DVD movies. We popped in into our DVD player, sat back on the couch, relaxed, and let ourselves get thoroughly into the action. Then it happened, and of course during a totally gripping scene: The movie playback suddenly got choppy, and then froze. Our DVD player was stuck, and we had to turn it off. When we ejected the DVD and flipped it over, there it was: a scratch deep enough to disrupt the movie, as well as put an end to our viewing experience.
As versatile as DVDs are, the disc surface area is quite sensitive and prone to scratches that’ll render it unusable. If you have kids at home, chances are you’ve spotted your little ones enamored with the shiny discs and how they make great toys. Or maybe you’re just a little careless (unintentionally or not) with the discs. That’s why it’s a good idea to make backups of
your DVDs.To do so, you need a freeware app called MacTheRipper (www.mactheripper.org) to extract the contents of the disc to your hard drive, and Roxio Toast 8 Titanium ($99.99, www.roxio.com) to burn the movie files onto a new DVD (you can also use Roxio’s Popcorn, which costs $49.99).
Commercial movies sold on DVDs are made so that you can’t easily copy them. MacThe Ripper can rip the movie from many commercially made DVDs for your own personal use (making a backup, for example), but just remember that making copies of protected DVDs for distribution is illegal.
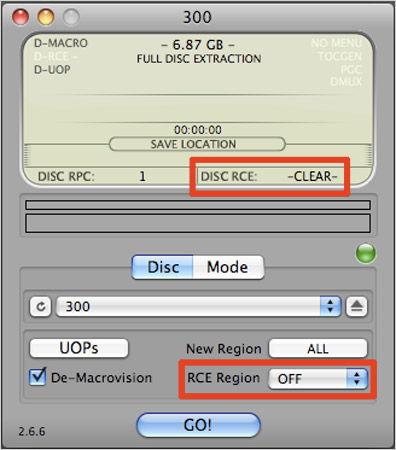
1. Region Setup
If DISC RCE says CLEAR, set the RCE Region to Off.
After you download and install MacTheRipper, launch it. Read the disclaimer. Insert the DVD you want to back up. MacTheRipper should automatically sense your DVD. Look at the section labeled DISC RCE. If it says DETECTED, you need to set the DVD’s region in the RCE Region menu. If it’s a U.S. DVD, set the RCE Region to RCE 1 (visit http://shurl.org/CIwvB to find out more about DVD regions).
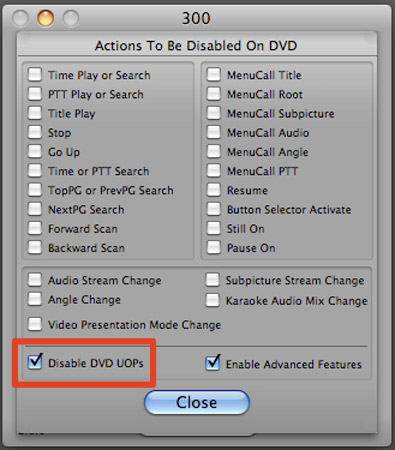
2. Fast-Forwards Allowed
Check this box, and you can skip the boring parts, such as the FBI warning.
You know how you can’t fast forward or skip certain parts of a DVD, such as the title screen or the FBI warning? They’re called User Operation Prohibitions (UOPs). You can set up your new DVD so you can skip these parts. Click on UOPs, then in the new screen that appears, click Disable DVD UOPs.
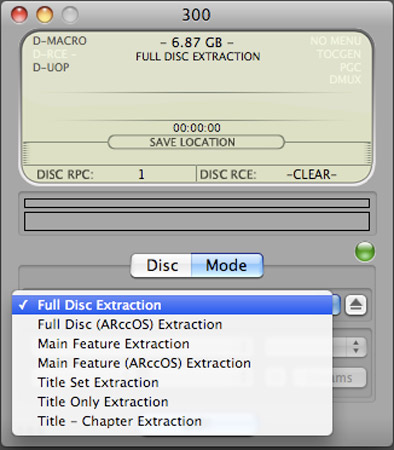
3. WHAT TO EXTRACT
By default, MacTheRipper extracts the whole DVD for backup.
Click the Mode button. You can select Main Feature Extraction if all you want is the movie. If you want to extract parts other than the main movie, you can use one of the Title Extraction settings, but you’ll have to figure out on your own what parts of the DVD you’re selecting.
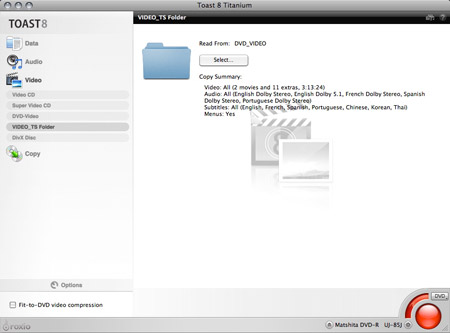
4. GO!
In Toast, create a new DVD using the VIDEO_TS Folder option.
Click the Go button to start ripping your DVD. How long it takes depends on the amount of content on the DVD and the speed of your Mac (MacTheRipper isnt a Universal app, so Intel Macs dont get a speed boost). Once the rip is done, youll have a folder full of files. You can then use Roxio Toast to burn a new DVD or you can leave the files on your hard drive and use the DVD Player application to watch the movie (File > Open DVD Media, then select the folder with the files).
Put Your DVD Movies On Your iPod, Apple TV, and More
iTunes makes it easy to buy or rent movies on your Mac and watch them on your iPod or iPhone, on your TV via Apple TV, or on your Mac. But what about that DVD library you’ve built up over the years? What you need is HandBrake (free, http://handbrake.fr), a utility that can take videos from your DVDs and reformat them for your iPod, iPhone, Apple TV, Mac, and other devices.
Like MacTheRipper, HandBrake can access movies from copy-protected DVDs, but HandBrake doesn’t rip the video to your hard drive. HandBrake converts the movie to MPEG-4 format; you can designate settings so the format suits the playback device. It’s not difficult to use, but it can take a while for HandBrake to do its thing—we’re talking 2 to 3 hours (or more) to convert a movie.
HandBrake is meant to create movies from your DVDs for your personal use. In the spring of 2007, MPAA Chairman and CEO Dan Glickman said that managed copying—converting DVD content for use on an iPod, Mac, or a home server—is acceptable. However, using HandBrake for purposes other than for your own personal viewing is illegal.
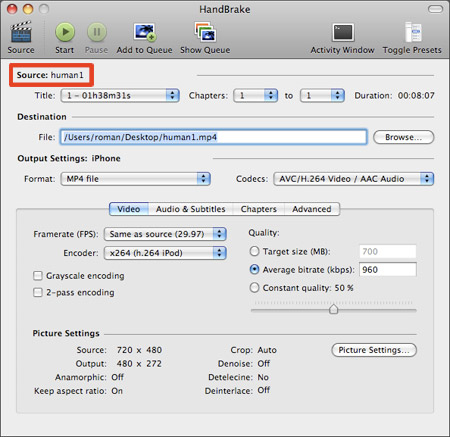
1. GET TO THE SOURCE
In step 1, make sure you selected the correct source by checking it under the Source heading.
Load the DVD into your Mac and launch HandBrake. The software needs you to select your video source. Navigate to your DVD and select it. If you ripped your DVD using MacTheRipper, you can use the folder of ripped files as a source. Once you select your source, it should appear under Source.
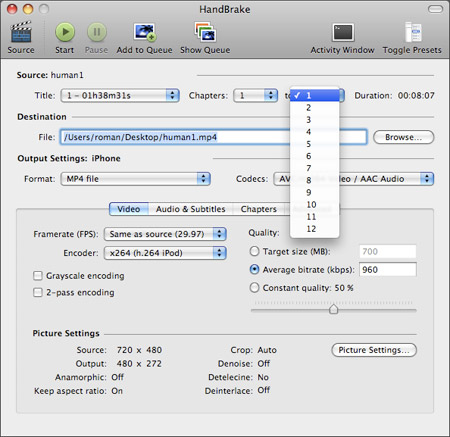
2. Now Get Inside The Source
If the DVD video is sectioned into chapters, you can select individual chapters instead of converting an entire movie.
The toughest part of HandBrake is figuring out which file on the DVD is the movie file. In the Title section in the main interface, you get a pull-down menu showing the available files on the DVD. The files are identified by time length, so if you’re ripping a movie, you select the file with the longest running time. (It can get tricky if you’re ripping a DVD with a commentary track or extra features that run the same length as the featured video.) If you’re selecting a TV show, look for running lengths of about 24 minutes or 45 minutes. Under Destination, pick a place where you want to save the converted file.
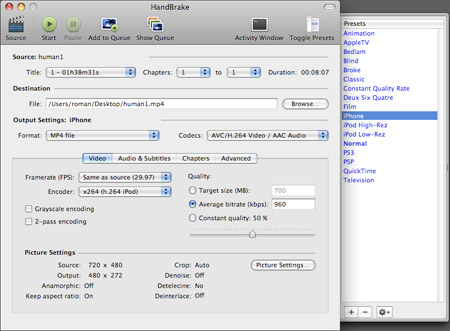
3. Output Settings
HandBrake also has a preset for the PSP.
If you want to convert a video for iPod, iPhone, or Apple TV, you can use one of HandBrake’s presets. Click the Toggle Presets button at the upper-right to open the Presets window (if it’s not already open). To create a video to play on your Mac, select QuickTime.
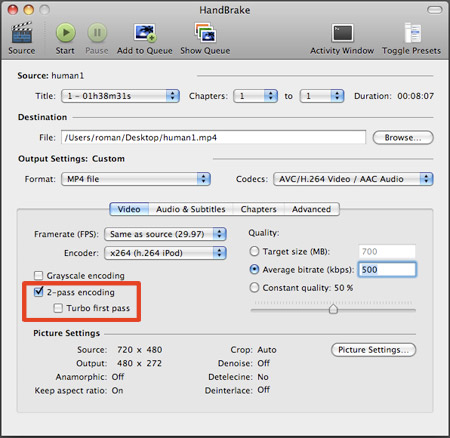
4. Tweak the Video Settings
Selecting 2-pass encoding will improve video quality, but it takes longer to create the file.
The bottom half of HandBrake’s main window lets you make adjustments to the settings. For example, lowering the framerate can help reduce the file size. The Quality settings also influence file size. If you select a Target size, HandBrake will make a video based on your setting; the smaller the setting, the lower the video quality. If you go with an Average bit rate setting, enter a setting between 400 and 600 (though you can go much higher or lower if you want). Constant quality reduces the quality based on a percentage. Click on the Picture Settings button to adjust the pixel size of the video.
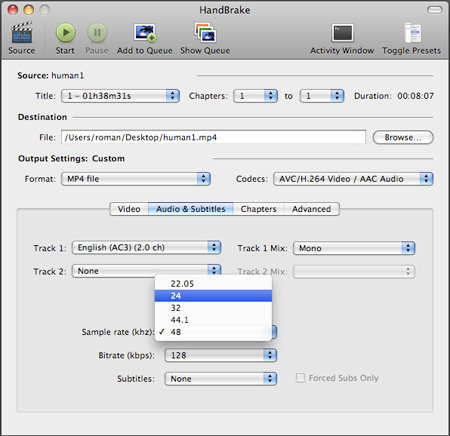
5. Tweak the Audio Settings
Lowering the bit rate also helps keep the file size down.
Click on Audio & Subtitles and to tweak the audio settings. Make sure the language you want is selected in Track 1. You can also adjust the sample rate, bit rate, and activate subtitles.
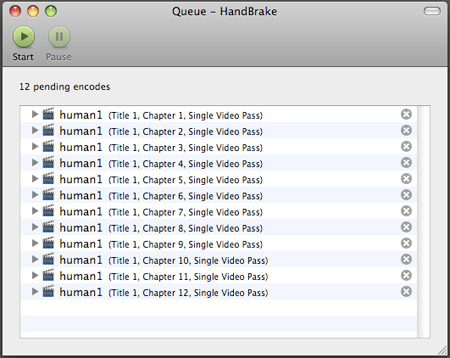
6. Hurry Up and Wait
Converting multiple files from a single DVD? You can create a queue, and HandBrake will convert them automatically.
When you have your settings settled, click on Start, and go do something else. It can take a while to rip a DVD. On a Dual 2GHz Power Mac G5, it took three hours to rip a 45-minute TV show. On a 1GHz PowerBook G4, it took six hours. Fortunately, HandBrake is a Universal application, so you Intel Mac folks will get much faster results. A 45-minute show took about an hour to rip on a 1.83GHz Intel Core 2 Duo iMac.
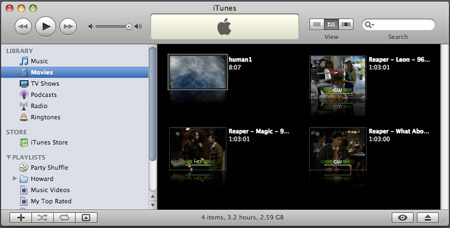
7. Drag and Drop into iTunes
iTunes stores your HandBrake movies in the Movies library, even if the video is a TV show.
When HandBrake is done, navigate to where you saved the file. Drag and drop the file into iTunes, then connect your iPod, iPhone, or Apple TV, and sync. iTunes will transfer the file to your device. Or, if the movie was converted for your Mac, just double-click the file to watch it.
Home | Audio | DIY | Guitar | iPods | Music | Links | Brain and Problem Solving | Site Map | Contact
![]()