|
|
Home | Audio | DIY | Guitar | iPods | Music | Brain/Problem Solving | Links| Site Map
This work is licensed under a Creative Commons License.
How to Recognize and Rip Protected Audio Music CD
Please do not get the wrong idea. We are opposed to pirating software and remain committed to paying artists for their work. But we also believe that when you purchase media content-whether it is a song a movie, or a TV show--you should have complete freedom to play it on all of your devices as many times as you'd like.
This is a great power, and with it comes great responsibility. It is within your right to copy media for your own use, however, as soon as you give that content to a friend, you're breaking the law and violating the artist's copyright. If artists stop getting paid for their work, they'll stop making it, and we'll miss out on the music and movies we love. Extracted from MaximumPC.
The material below is via cdfreaks.com
Available audio cd protections:
- Cactus Data Shield 100 Availability: -
- Cactus Data Shield 200 Availability: ++
- Cactus Data Shield 300 Availability: --
- Key2Audio Availability: ++
- Doc.loc Availability: -
- MediaCloq Availability: --
- SafeAudio Availability: --
Note: this list is not complete, more protections are available. Availability is mainly targeted at Europe.
How to recognize a protected audio cd:
- use Clony XXl (German version, homepage might be down. English version can be found here.)
- use Tccd Scout (German version. English version unavailable ?)
- visual inspection
Note: Clony XXL/Tccd Scout will not always properly recognize the protection because audio protections are hardware dependant protections, dependant on your reader. Your reader might not properly report/read the content of the disc in which case Clony XXL can't determine the protection. Another factor: audio protections are still evolving and newer versions are silently released.
Cactus Data Shield 200 (Example: Natalie Imbruglia - White lilies island)
A CDS200 protected audio cd can be recognized by visual inspection as follows:
- Copyright statement referring to Midbar Tech, Tel-Aviv, Israel somewhere on the front/back cover or inlay.
- Availability of the Cactusplayer (= proprietary mp3-player) when cd is inserted in a cd-rom player.
- Availability of the hidden text file 'versions.txt' in the datatrack. In this file the used version of CDS200 is mentioned. Note: older versions of CDS200 may not have this file.
Key2Audio (Example: Shakira - Laundry service)
A Key2Audio protected audio cd can be recognized by visual inspection as follows:
- Warning stating 'will not play on pc/mac' on the front/back cover and label side of cd.
- Text string 'Sony Music' or 'Sony dadc' on the inner ring on the data-side of the cd.
Doc.Loc (Example: Hitzone 21 - various artists, released in the Netherlands)
A Doc.loc protected audio cd can be recognized by visual inspection as follows:
- Text string 'DocData' on the inner ring on the data-side of the cd.
Note: DocData not only develops audio copy protections, it has also normal cd replication/manufacturing plants. It has been reported that non-protected cds also may have the text string 'DocData' on the inner ring on the data-side of the cd.
Logo's
The record industry nowadays uses special logo's so customers can recognize cds which contain copy protections. The following logo's are used:
This logo is a general logo stating the cd has a copy protection.
This logo states the cd can be played on most cd/dvd players but not on a personal computer.
This logo states the cd can be played on a personal computer but cannot be copied.
Note: A lot of modern dvd players are also able to play mp3 cds. In order to achieve this a cd rom is used. This means you can encounter the same problems as when trying to play this cd on your personal computer.
A user-contributed list of protected cds around the world can be found here. Note: be aware that wrong information might be displayed! For the Netherlands an official site with list can be found here.How to copy/rip a protected audio cd
General considerations:
Audio protections are hardware dependant protections, based on your reader. This means that when you have the 'right' reader, audio protections will give (almost) no trouble copying/ripping. But it could also mean that when you have the 'wrong' reader you won't be able to copy/rip the cd at all... The writing part is not interesting because all available writers are able to write protected audio cds.
Tricks used by audio protections: illegal Table Of Content entries, multi-session tricks. A normal audio cd-player is a single-session device, it just reads the first session where the audio tracks are, it isn't bothered by the extra sessions because it can't read the extra sessions. Also, an audio cd-player expects only audio-tracks so can't be confused by illegal TOC entries which claim that the audio-tracks are data-tracks. A Cd rom-player (or dvd-player, cd-writer) is a multi-session device, it tries to read all sessions. But these (illegal) extra sessions are purposely added to the cd to fool the cd rom-player. Also, a cd rom-player can read audio as well as data, so it can be confused by illegal TOC entries which claim that audio-tracks are data-tracks.
Because the protection is hardware dependant we can classify 3 categories:
- reader is (almost) not affected by protection and just reads the cd.
- reader is affected by protection, but is still able to read the cd using tricks.
- reader is affected by protection and can't even read the cd using tricks.
1.) You are lucky, you can copy/rip the protected cd relatively easy with programs like CloneCD, Feurio or ExactAudioCopy or Isobuster. You might need to tweak the advanced settings of these programs.
2.) You are still able to copy/rip the protected cd with the marker-trick.
3.) You are not able to read the protected cd, whatever you try, you won't succeed. Only option: try another firmware which might make your reader able to read the protected cds. LiteOn is a good example for this, since november 2002 recent models can suddenly read most audio protections, while before they couldn't read almost any...
Recommended hardware:
- Yamaha CRW F1 (appears to read all copy protections and all versions of the copy protections, also the older and more harder versions)
- Plextor - all models
- LiteOn - starting from models 40sp and higher with the latest firmware
General tips regarding the used software:
CloneCD v4 is the easiest way to backup your audio protected cd. Just use the audio-profile which reads only the first session so your backup is not protected anymore.
Feurio can be used to rip the tracks. Of course your backup, when writing the ripped tracks, isn't protected anymore. Feurio is able to detect illegal TOC entries and gives you the option to ignore the further sessions and illegal entries. If you succeed in reading the protected audio cd with CloneCD you should also be able to rip it with Feurio. You might need to tweak the advanced settings of Feurio first.
Exact Audio Copy can be used to rip the tracks. Of course the protection is gone after ripping. In some cases you might need the option 'manually detect TOC' in order to be able to rip the tracks. The advantage of EAC is its secure reading method (which has nothing to do with the protection).
Always try to let your application to close the cd-tray with the protected audio cd in it. Do not insert the protected audio cd earlier because Windows might interfere with it and 'activate' the protection. Programs like CloneCD lock the drive so Windows can't mess up things. Again: don't insert the disk to early!
In order to prevent Windows (or the firmware of your drive) to access the protected cd too early, you also need to make sure that you have disabled 'auto insert notification' and 'auto play'. These options can be disabled through the device manager or the registry, depending on your Windows version. CloneCD also has a special entry in its settings for disabling these settings.
How to copy/rip a protected audio cd if the above mentioned methods don't work:Make a digital copy using your audio cd-player and a sound card.
- make an analog copy using your audio cd-player and a sound card.
If your audio cd-player has a digital-out and your sound card. has a digital-in, you could connect the two and use the 'record audio data'-option from Feurio. Total Recorder is also able to record from line-in.
If your audio cd-player has no digital-out or your sound card. has no digital-in, you could still connect the 2 the analog way. Just connect the line-out cinch-plug with the line-in mini jack-plug of your sound card. Again use Feurio or Total Recorder to record incoming audio data. The disadvantage of this method is you are copying in the analog domain, your digital data is converted twice which might degrade the resulting copy. In practice an analog copy can be very good, but we CDFreakers prefer the best, so we go for the digital copy!
Re: Troubleshooting: Enabling/Checking DMA in Windows Vista, XP, 2000, Me, 9x
Resetting DMA using VBS Script
You can use the following VBS script to reset your DMA mode in windows without having to go through the guides below.
Be warned that this COULD damage your computer and therefore you use it at your own risk.http://rapidshare.com/files/14861593/resetdma.vbs.html
Instructions:
- Despite any warnings click on the [Open] or [Execute] buttons as required to execute the file resetdma.vbs.
- If the program found any ATA channel to reset, reboot your computer and test all drives.
- If the problem is still not solved, set the offending channel to PIO manually, reboot your computer, set the channel back to DMA, and reboot again.
Re: Troubleshooting: Enabling/Checking DMA in Windows XP, 2000, Me, 9x
Enabling/ Checking DMA In Windows 9x/ME
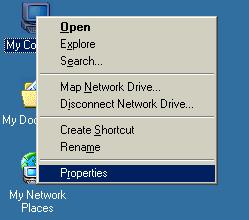
The first thing to do is to right click on “My Computer”. Once you have right clicked on it then choose “Properties”.
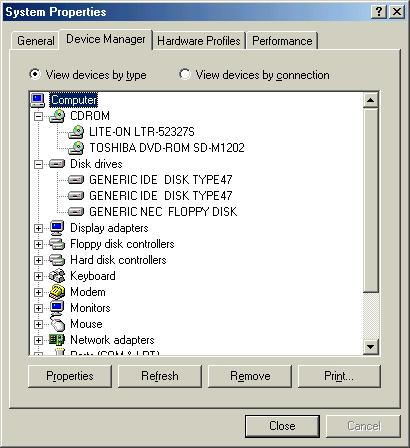
The next thing to do is to click the “Device Manger” tab at the top of the screen.
Under device manager you need to find your hard drives and CD-Rom drives. These are normally found under “Disk Drives” and “CDROM”. Under this you will have a number of items. You can ignore the floppy disk drive.
To bring up the next window you will need to double click on one of the items. We will take one of the hard drives first.
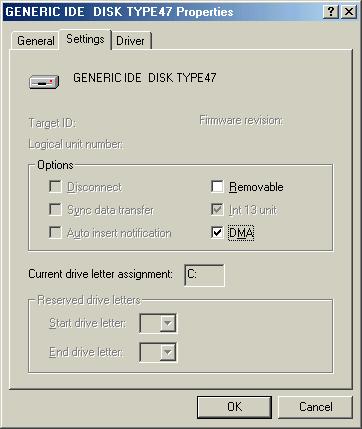
The next thing to do is to click the “Settings” tab at the top of the screen.
This is the screen that will come up. In the “Options” box you should be seeing a tick in the box next to “DMA”. If not then you need to click in the box to put a tick there.
To finished simply click the “OK” button to exit the windows.
A screen may come up saying that you will need to restart your computer. You will have to for the settings to take effect. Before you do though you will now need to check your other drives.
Now you will have to reset your computer for the changes to take effect.
If when you have restarted the computer one of the channels is back on PIO-Only mode the last thing you can try is to uninstall the channel from the Device Manager window. When you then restart the computer it will force windows to reinstall the drivers and hopefully use the DMA if available mode.
(Added note: DO NOT delete the IDE channel if your hard drive containing Windows is also on that channel! An alternative to deleting the channel can be found in this thread. -C64K)Re: Troubleshooting: Enabling/Checking DMA in Windows Vista, XP, 2000, Me, 9x
Information
The Microsoft Windows XP operating system enables DMA by default on most of the ATA or ATAPI (IDE) devices. To ensure system stability, however, PIO mode will be selected for DMA-capable devices under some circumstances. This article explains the reasons for an ATA or ATAPI device to be in PIO mode on systems running Windows XP.
PIO mode is enabled by default in the following situations:
• For ATAPI devices, except DVD and CD-R/RWW drives. Windows XP enables PIO by default on ATAPI tape drives, CD-ROM drives, and ATAPI removable drives such as magneto-optical (MO) drives. The user can, however, enable DMA on an ATAPI device through Device Manager, as described at the end of this article.
Windows XP enables DMA by default on ATAPI DVD and CD-RW/CD-R drives.
• For ATA or ATAPI devices that do not work properly in DMA mode. Compatibility testing at Microsoft has shown that enabling DMA on certain drives could cause data corruption or reduced system stability. There is no way for the user to enable DMA on these devices.
• For certain IDE chipsets that cause data corruption. For ATA or ATAPI devices using chipsets that are known to cause problems running in the DMA mode, Windows will enable PIO by default.
System manufacturers can override this default behavior by implementing the _GTM and _STM methods in the ACPI BIOS. Also, the user can enable DMA using the Device Manager.
• For repeated DMA errors. Windows XP will turn off DMA mode for a device after encountering certain errors during data transfer operations. If more that six DMA transfer timeouts occur, Windows will turn off DMA and use only PIO mode on that device.
In this case, the user cannot turn on DMA for this device. The only option for the user who wants to enable DMA mode is to uninstall and reinstall the device.
Windows XP downgrades the Ultra DMA transfer mode after receiving more than six CRC errors. Whenever possible, the operating system will step down one UDMA mode at a time (from UDMA mode 4 to UDMA mode 3, and so on).
If the mini-IDE driver for the device does not support stepping down transfer modes, or if the device is running UDMA mode 0, Windows XP will step down to PIO mode after encountering six or more CRC errors. In this case, a system reboot should restore the original DMA mode settings.
All CRC and timeout errors are logged in the system event log. These types of errors could be caused by improper mounting or improper cabling (for example, 40-pin instead of 80-pin cable). Or such errors could indicate imminent hardware failure, for example, in a hard drive or chipset.
Source: Microsoft WebsiteRe: Troubleshooting: Enabling/Checking DMA in Windows Vista, XP, 2000, Me, 9x
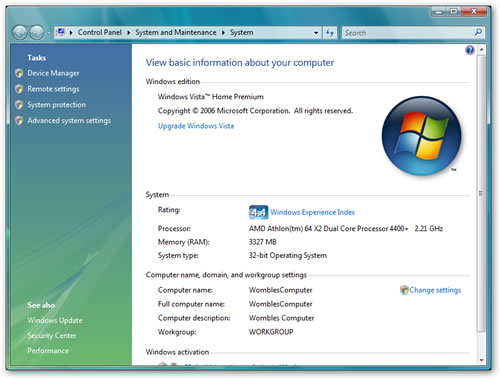
Enabling/ Checking DMA In Windows Vista
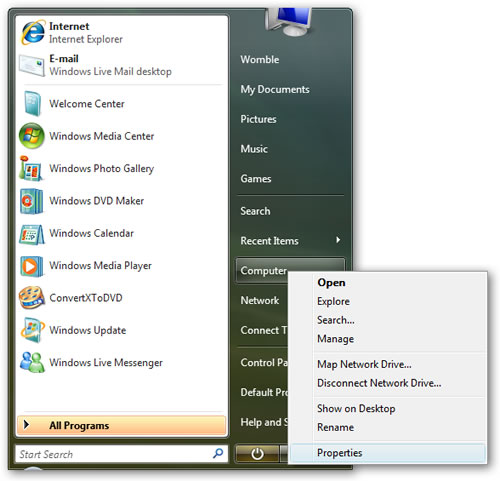
The first thing to do is to right click on “Computer”. You can use the icon in the Start Menu or the one on the Desktop if you have one. Once you have right clicked on it then choose “Properties”.
The next thing to do is to click the “Device Manager” link which can be found at the top left of the screen.
Under device manager you need to find your hard drives. These are normally found under “IDE ATA/ATAPI Controllers”. Under this you will have a number of items. The ones that we are interested in are the ones with channel in their name.
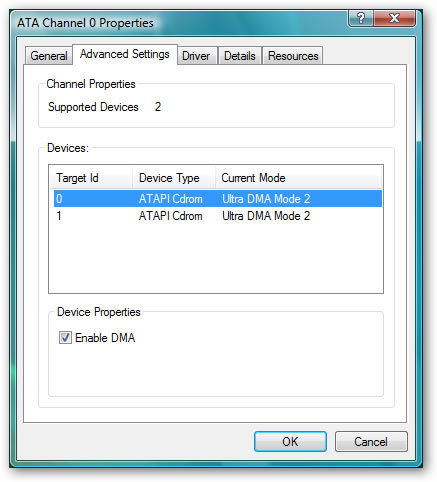
You will need to do the same to all of the ones with channel in their name. To bring up the next window you will need to double click on the item. We will take the first ATA Channel 0 to start with.
Note: Depending upon your motherboard chipset and drivers you may have different names for your channels along the lines Primary IDE Channel or something similar.
This is the screen that will come up. The device with Target ID 0 is the primary device on the channel and Target ID 1 is the slave device. In the “Current Mode” box you should be seeing something like “DMA If Available” or a specific DMA mode such as "Ultra DMA Mode 2".
If not and you are seeing “PIO Only” then you need to click on the line with the PIO reference and then tick the box underneath that says "Enable DMA".
To finished simply click the “OK” button to exit the windows. You will now need to check your other IDE channels for the same thing.
Now you will have to reset your computer for the changes to take effect.
If when you have restarted the computer one of the channels is back on PIO-Only mode the last thing you can try is to uninstall the channel from the Device Manager window. When you then restart the computer it will force windows to reinstall the drivers and hopefully use the DMA if available mode.
(Added note: DO NOT delete the IDE channel if your hard drive containing Windows is also on that channel!
Home | Audio | DIY | Guitar | iPods | Music | Links | Brain and Problem Solving | Site Map | Contact
![]()