|
|
Home | Audio | DIY | Guitar | iPods | Music | Brain/Problem Solving | Links| Site Map
This work is licensed under a Creative Commons License.
Remove the FairPlay DRM from Your iTunes Songs
UPDATE: MONDAY, JUN 18, 2007
Remove the FairPlay DRM from Your iTunes SongsBy: Roman Loyola
MacLifeThe 99-cent songs in the iTunes Store come with a bunch of restrictions known as FairPlay DRM. Here's how to ditch it and free your tunes. We provide two different methods. Only the first is detailed, but if you understand what is going on then you should have no problem with the second method.
Method I
To convert DRM songs, first burn them to audio CD via iTunes. Then add them from the new CD to Roxio Toast's Export feature at the bottom of the "Audio" disc options (instead of burning them to disc-- again).
You get AIFF files which can then converted to whatever audio format you want via iTunes or another audio converter.
WHAT YOU NEED
There’s a whole lotta talk going on about digital rights management (DRM) technology. In case you’ve been living in a cave, DRM is what Apple uses on music purchased from the iTunes Store to restrict who can play your songs. DRM helps prevent music piracy, but it also limits how you listen to your music. Every 99-cent song purchased through iTunes has Apple’s FairPlay DRM (artists who are signed with music label EMI have DRM-free songs available as “iTunes Plus” tracks for $1.29).
There are ways to remove FairPlay so you can play your songs on devices other than your Mac and iPod. You can burn your iTunes Store music to a CD, and then import the songs into your iTunes library, thereby creating FairPlay-free files. The problem is that you end up reprocessing music that’s already been processed for compression, which will affect your sound quality (you can rip your songs from the CD using the Apple Lossless Encoder to create FairPlay-free music, but your files will be a bit bigger then if you used a lossy compression scheme). Another method involved using JHymn (free, www.hymn-project.org), but Apple crippled JHymn with each iTunes update. JHymn development for the Mac (it’s an open-source application) seems to be in limbo.
But there are a couple of ways you may not have thought of. We’ll take a look at other ways to create FairPlay-free music from your iTunes-purchased songs. Since iTunes limits you to seven CD burns of any playlist that contains FairPlay-protected tracks, you might want to use one of these methods instead.
Method 1: Rerecord the Audio
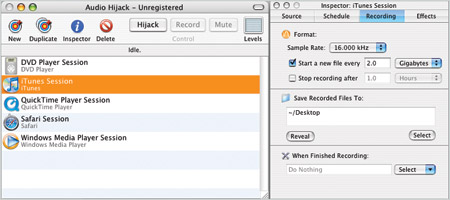
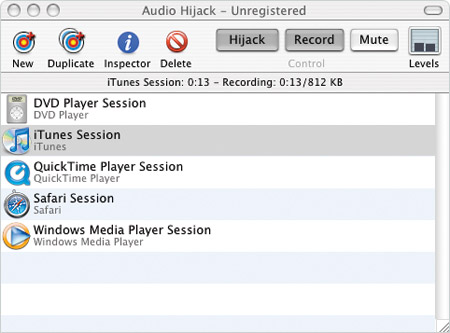
The unregistered version of Audio Hijack lays noise on all recordings longer than 10 minutes. Pay for it!This method uses Audio Hijack ($16, www.rogueamoeba.com) to record the music playing on your Mac. It’s not the quickest solution, since you have to listen to each song while the app records it in real time, but it cuts down the amount of compression reprocessing done to the songs, preserving the audio quality.
The unregistered version of Audio Hijack lays noise on all recordings longer than 10 minutes. Pay for it!
1. Get Ready to Hijack iTunes
After you’ve downloaded Audio Hijack, launch it. Select iTunes Session in the main window. In the Inspector window, you can modify settings. For example, if you click the Recording tab in the Inspector, you can adjust the sample rate, change the location of you saved files, and more. If you want to apply equalizer effects, click the Effects tab and adjust accordingly. After you’re done tweaking, make sure you have iTunes closed, and click the Hijack button. iTunes will launch, and Audio Hijack will monitor the music playing from iTunes.
Audio Hijack doesn’t start recording until you press play in iTunes.2. Record the Music
If you want to record just one song, isolate the song in iTunes by either creating a single-song playlist or performing a search that results in just that song showing in your library. If you don’t do this, iTunes will go to the next song, and Audio Hijack will keep recording. Click the Record button in Audio Hijack - the application doesn’t start recording until you play the song in iTunes. Play the song in iTunes, and you’ll see Audio Hijack do its thing. Audio Hijack will stop recording when the song is over, though the app will still be in Record mode, so if you go into iTunes and play another song, Audio Hijack will record it. Click the Record button to stop recording.
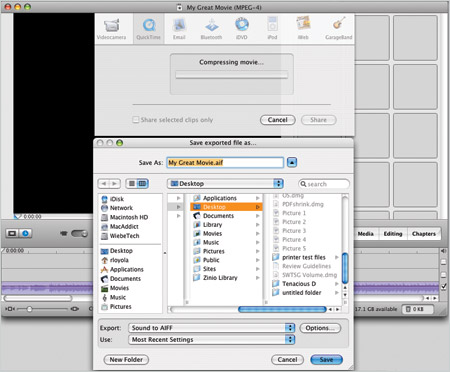
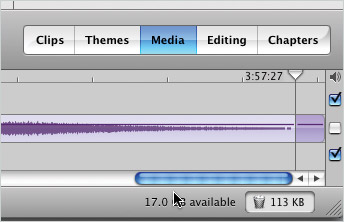
iMovie HD can be used to trim your audio files.3. Trim, Save, and Import
Navigate to where the saved file is located (we chose the Desktop), and look for a file called iTunes Session 2007xxxx xxxx (2007xxxx is yearmonthdate; the last xxxx is military time). It’s an AIFF audio file. If you want to edit the file (trim excess silence, for example, or cut out some audio), you can bring the file into iMovie HD or some other audio-editing software. If you use iMovie HD and you’re ready to save the file, go to File > Export, and under Compress Movie For, select Expert Settings and then click Share. In the Export pull-down menu, select Sound To AIFF. Click Save. You can now import the song into iTunes (Audio Hijack also has options for automatically importing the recordings into iTunes).
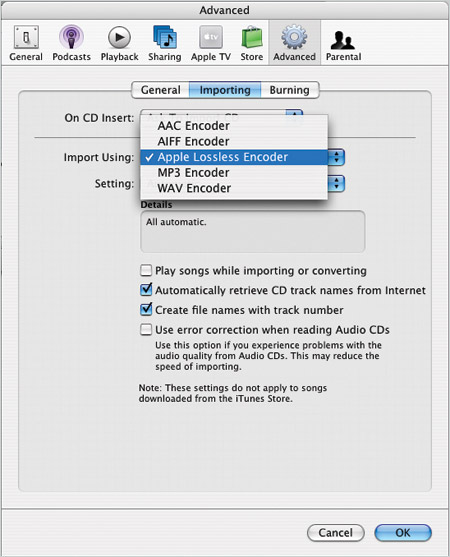
Apple Lossless Encoder will condense your song to about half its uncompressed size.
4. MP3, AAC, or Apple Lossless
To import the song into iTunes, just drag and drop it into your iTunes library. Now you have a decision to make: Do you want to convert the song to a smaller format? You could keep it as an AIFF file, but those files are huge. If you use Apple Lossless, youll preserve the sound quality, but your file wont be as small as it would be if you convert it to AAC or MP3. Theres no harm in trying different compression settings - to change the file compression in iTunes, go to iTunes > Preferences > Advanced and click the Importing tab. You can modify the compression settings here. To convert a file, select it in the iTunes library, then go the Advanced > Convert Selection To (the format you decided on in the Preferences). But whatever you choose, the end result will be a FairPlay-free song.
Reformat Using iMovie HD
With this method, you use iMovie HD ($79 as part of iLife ’06, www.apple.com) to import a FairPlay-protected song into a movie. You then export the sound to an AIFF song. This method isn’t efficient, but it works. There’s an application called FairGame (free, http://seidai.50webs.com) that can animate the process, but we ran into problems with FairGame when converting multiple files.
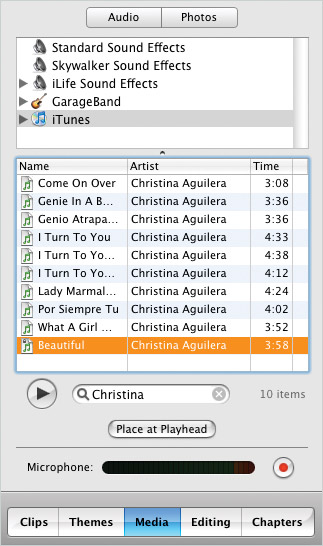
Click Place At Playhead, and your song appears in the Timeline.
1. Import into iMovie HD
In iMovie HD, create a new project. Import the song by clicking the Media tab, and in the library window atop the right window pane, select iTunes. Find the song you want, select it, and click Place At Playhead. iMovie HD will place the song in the Timeline.
The picture you choose won’t be in your final audio file.
2. Image Is Nothing
Now you need to import a picture into your project. Why? iMovie HD won’t create a new media file without video. Click the Media tab, click Photos at the top of the right window pane, and then find a picture in your Aperture or iPhoto library. It doesn’t matter what image you select—it’s just a placeholder and won’t be in your final file. You might want to select a photo you know is small in file size, to cut down the waiting time as iMovie imports it into your project.
You can trim excess silence in iMovie HD.
3. Covert in iTunes
If you want to edit the file (trim excess silence, or cut out some audio), you can do so in iMovie HD. When youre ready to save the file, go to File > Export, and under Compress movie for, select Expert Settings and then click Share. In the Export pull-down menu, select Sound To AIFF. Click Save. This saves just the audio of your project. You can now import the song into iTunes (see step 4 in Rerecord the Audio). You now have a song without the dreaded DRM.
Method II
Another way to convert DRM songs is to first burn them to audio CD via iTunes. Then add them from the new CD to Roxio Toast's Export feature at the bottom of the "Audio" disc options (instead of burning them to disc-- again).
You get AIFF files which can then converted to whatever audio format you want via iTunes or another audio converter.
Home | Audio | DIY | Guitar | iPods | Music | Links | Brain and Problem Solving | Site Map | Contact
![]()