|
|
Home | Audio | DIY | Guitar | iPods | Music | Brain/Problem Solving | Links| Site Map
This work is licensed under a Creative Commons License.
Setting Up A Guitar
Oct 14, 2007 - Contributed By glnflwrs
Recording Tips, News and Reviews
HRC member, Glenn Flowers, shows us how to properly set up a guitar that doesn't involve giving your local luthier money.A low, fast, non-buzzing string action really helps your playing, but relatively few know how to adjust the various devices on a guitar to achieve the desired affect. Proper sequence, analysis, and technique are necessary because one adjustment made early might need re-doing later, then this one over again, and then redo that.
Also, it is assumed that the bridge is in good condition and has properly working adjuster screws, that the nut grooves are not worn too deep, and all the frets are the same height and in good condition.
Step 1. Checking the Neck Angle
Neck angle is probably the single most important aspect of a neck and its relationship to the guitar. One reason is fixing this requires removing and re-setting the neck into the body which is a very expensive process.
Checking for correct angle is simple. Place a carpenter?s framing square onto the fingerboard between the strings and setting on the frets, not on the nut or bridge. Slide the square toward the bridge until it is within one-quarter inch of the bridge. A proper angle is shown by the square lining up just a sixteenth inch or less below the top of the bridge as shown in Fig. 1.
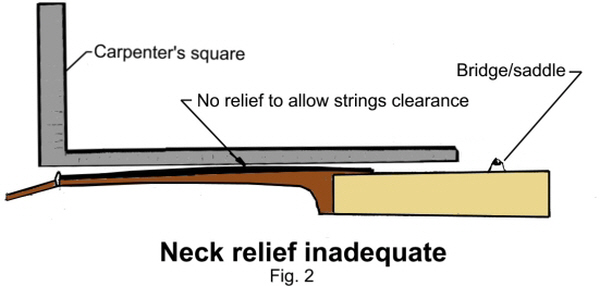
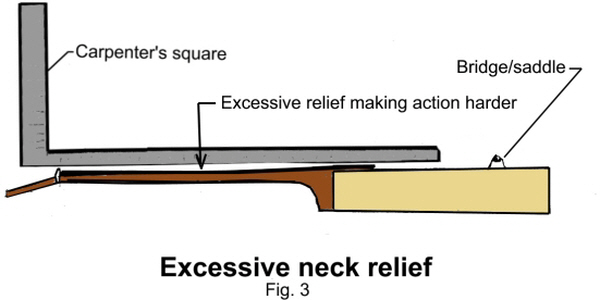
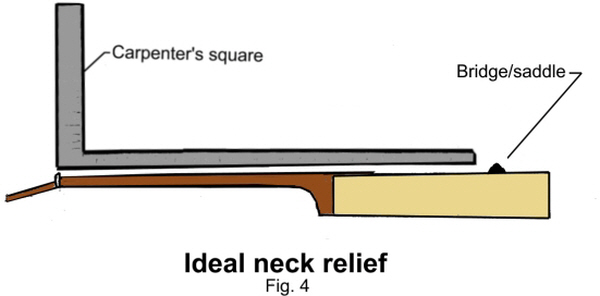
Step 2. Neck Relief
The truss rod in the neck is used only for this purpose. It provides the correct bend or arch to the neck to give the strings clearance and still be close to the fingerboard and frets. Use a square sitting on the neck to determine if the relief is straight and adequate as shown in Fig. 4, bends away as in Fig. 2, or bends toward as in Fig. 3.
The inadequate relief in Fig 2. can be adjusted out of the neck by tightening the truss rod adjuster nut. This is usually under a small plastic cover on the front of the guitar?s tuner head. It will require either a socket or allen wrench to adjust it. Tightening the rod will straighten a neck going away as in Fig 2. Loosening the rod will relax the neck and eliminate the forward arch in Fig. 3. In most cases turning the nut one half revolution or less will be sufficient.
Step 3. String Height
After assuring the neck is still at the right angle, and checking the neck for string clearance, the strings should be close to parallel to the fingerboard its entire length. Adjusting the height of the strings above the frets should now result in a low, fast action all the way from the nut to the highest fret (tone wise) on the fingerboard without causing any buzzing.
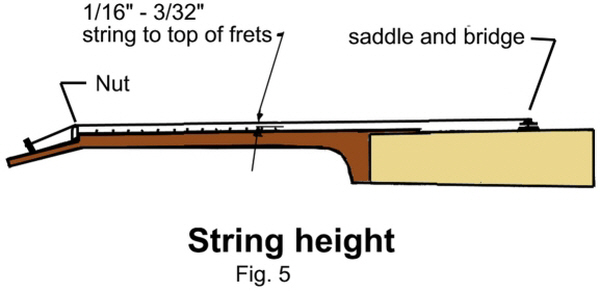
The optimum clearance for a wide range of string gauges is between a sixteenth and three thirty-secondths of an inch above the frets. That is a one thirty-secondth tolerance. Quite a small amount for a fudge factor, but anything other than that will easily be noticed as too high or too low.
You will need an accurate, easy to read ruler or scale graduated in at most, sixteenths of an inch. You can measure the thirty-secondth by adjusting to halfway between one-sixteenth and one-eighth inch. A scale graduated in thirty-secondths is best.
You need to establish the correct height on a single string first and then see if the other strings are even close. If the nut and bridge are in good shape the other strings should be very close or even right on. Place the scale on top of a fret about half way up the neck right next to or touching the third or fourth string. (See Fig. 5) Read the distance from the fret to the BOTTOM of the string it is next to. If it is between one-sixteenth inch and one-eighth inch go to another fret up or down the neck and measure again. If the neck angle and relief are correct, these measurements should be almost exactly the same as the first measurement. Check two more places on that string to make sure. If it is OK, measure at least four times on each remaining string, two high and two low on the neck. If they are all halfway between a sixteenth and an eighth inch you are done. If you find that the strings are consistently lower near the nut than they are higher up on the fingerboard, the nut grooves are too deep and the nut should be replaced.
If the first measurement you take is lower than a sixteenth or higher than halfway between a sixteenth and an eighth of an inch, you will need to adjust the bridge.
Normally you will need to raise both ends of the bridge equally by turning the bridge adjustment screws about half to one whole turn in the proper direction. Measure the height again at the same fret. Raise or lower the bridge again to get halfway between a sixteenth and an eighth inch. Then, do a pre-check on the other five strings at the same fret to make sure they are level with the first string. If any of those five strings are not within the range of halfway between a sixteenth and an eighth, raise or lower only the bridge screw on the corresponding end of the bridge just a quarter turn. String heights significantly higher or lower could also be caused by a worn nut. Recheck that string and adjust more if needed. Check all five strings at the same place again. If you get all five into the right range, check them all up and down the neck and make slight adjustments where needed.
You can see that each inspection and adjustment depends on the previous steps being done in order, and the adjustments made as accurately as possible. If these procedures are performed properly you should be happy with the results, and ecstatic that you now know the true purpose of each neck component and how to use them like a pro.
I hope this can be of help to some, I know when I learned this I was relieved to learn the right way of doing it. I had been doing a lot of things wrong for so many years.
Home | Audio | DIY | Guitar | iPods | Music | Links | Site Map | Contact
![]()