|
|
Home | Audio | DIY | Guitar | iPods | Music | Brain/Problem Solving | Links| Site Map
This work is licensed under a Creative Commons License.
Connecting a Turntable to Your Computer Configurations
If you're new to vinyl playback, you may not know that the output of a standard turntable must be amplified and the signal properly conditioned (equalization) before it's usable with the rest of your stereo system, or can be input to a computer. Without the proper signal conditioning, the output of a turntable will sound thin and harsh.
-Amplification: a CD player, iPod or tape deck might have a maximum output of 1 volt, while a turntable will have an output of only 0.01 volts. The higher level signal is called "Line" level, and the small turntable output must first be amplified to Line level. This will be necessary for all turntables that don't specifically provide a built-in Line output.
-Equalization: in addition to needing this extra amplification, a turntable preamplifier (which can be an add-on box, or incorporated into a receiver or amplifier as a "Phono" input) must supply a precise amount of bass boost and treble cut. This equalization is called an inverse RIAA curve, named for the standard adopted by the RIAA and used with vinyl recordings for over 50 years. The equalization is necessary to counteract the physical limitations of the vinyl recording and playback medium. Turntables that have a built-in Line level output automatically provide the needed equalization.
Here is a link to additional information: http://en.wikipedia.org/wiki/RIAA_equalization
Note that it's not possible to accurately recreate this smooth-shaped equalization curve using a graphic (or parametric) equalizer plug-in. It requires equalization that's designed purposely for this task to be able to follow the exact curve specification.
-Loading: there is a third factor involved, called cartridge electrical "loading." This is a specially tailored network of electronic components that are incorporated into the signal path of the preamplifier, at its input. A standard turntable preamplifier (or the Phono input of your receiver) already will provide the standard cartridge loading; likewise with a turntable having Line level outputs.
There are different ways to achieve the needed amplification and equalization. They are shown in the connection diagrams below. The most common situations are:
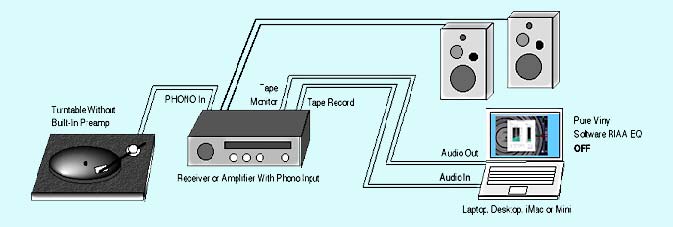
- Your receiver has a "Phono" input. Simply plug the turntable audio cables into the receiver Phono input. Use diagram 1 or 3 below. (Not to be used with turntables that have a Line level output!)
- Your receiver doesn't have a Phono input, only CD, AUX, TAPE, etc. If this is the case, you have several options:
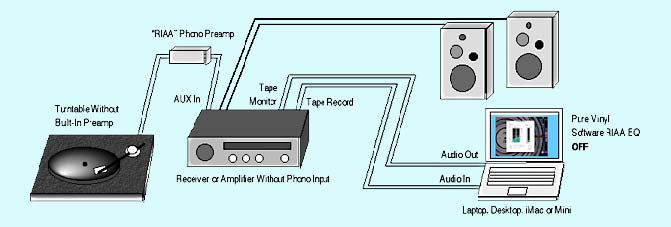
- Buy a Phono adaptor from an electronics retailer (e.g., Radio Shack). Use audio cables to connect the turntable to the adaptor's input and cables to connect the output of the adaptor into your receiver AUX (or CD or TAPE) input. Use diagram 2 or 4 below.
- Use a turntable that has a built-in preamplifier, and has a LINE OUT. Use diagram 5 below.
- Use a turntable that has a built-in preamplifier, and has a built-in USB or FireWire interface that supplies digital audio to your computer. Use diagram 6 or 7 below.
There also are more elaborate configurations that will deliver the highest possible sound quality. The Advanced Audio Enthusiast setups shown after the Basic Turntable Connections are intended to be used in conjunction with the information on the Pure Vinyl Software Inverse RIAA FAQ page. If the information on that page seems confusing, then just use one of the connection options in the Turntable Connection Diagrams below.
For those new to vinyl: "USB Turntables" are touted as being of "professional quality." Are they referring to the quality of the audio? Many people seem to be satisfied with a simple USB integrated turntable setup. However, if you want to stay "in vinyl" for awhile, think of the USB turntable approach as being entry-level, sonically. There are a considerable number of alternatives.
Choice of Audio Interface
-For the Basic Turntable Connections shown below, the choice of audio interface isn't critical. You'll find an extensive range of interfaces available for the Mac at music retailers such as Audiomidi or Sweetwater Sound.
Here's what you'll want to look for: An interface with 24 bit sampling resolution is preferable, and the higher the sample rate the better. Generally, for a given total channel count, higher price equals higher quality. However, we recommend at least trying the built-in audio input and output of your Macintosh computer (if you're a new Macintosh user, keep in mind that the quality of Macintosh built-in audio has historically proven to be superior to the built-in audio of other computer platforms.)
-The Advanced Audio Enthusiast connections below prefer an audio interface with balanced (differential) input connections and 192 kHz analog inputs and outputs. This will provide the ultimate quality for recording and playback. We also provide a few pointers to audio hardware that will deliver a pleasurable listening experience.
Whatever your choice of audio interface, rest assured that with Pure Vinyl, the signal processing and recording software will not be the audio system's sound quality "bottleneck." Pure Vinyl maintains a pristine, 64-bit internal signal path for all audio processing operations; the sound quality will solely depend on the quality of your audio interface, turntable and cartridge.
Basic Turntable Connections
Selection Guide
Receiver With Phono Input Receiver Without Phono Input Standard Turntable (Without Built-In Preamplifier)...Connection Diagram 1 or 3 Connection Diagram 2 or 4
Turntable With Built-In Preamplifier...Connection Diagram 5
Turntable With Built-In Preamplifier, plus USB or Firewire Connection...Connection Diagram 6 or 7
1. Turntable without Built-In Preamp; Receiver or Amplifier With Phono Input; Using Computer Built-In Audio
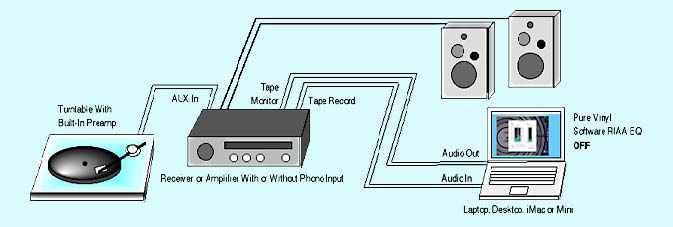
2. Turntable without Built-In Preamp; Receiver or Amplifier Without Phono Input; Using Computer Built-In Audio
NOTE: An alternative connection to the above, especially if your receiver doesn't have Tape Recorder inputs and outputs, would be to connect the Preamp LINE OUT to the computer Audio In (instead of to the Receiver AUX In), and the computer Audio Out to the Receiver AUX In.
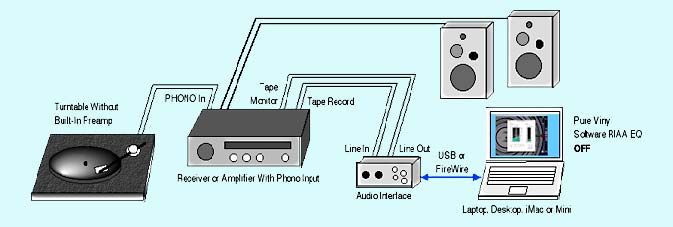
3. Turntable without Built-In Preamp; Receiver or Amplifier With Phono Input; Using External Audio Interface
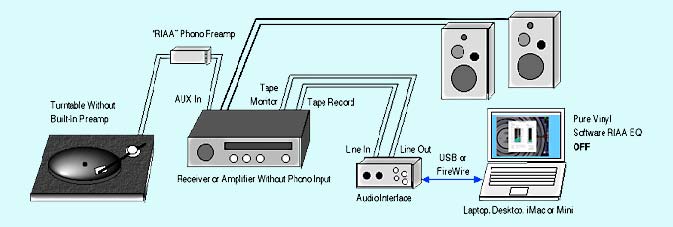
4. Turntable without Built-In Preamp; Receiver or Amplifier Without Phono Input; Using External Audio Interface
NOTE: An alternative connection to the above, especially if your receiver doesn't have Tape Recorder inputs and outputs, would be to connect the Preamp LINE OUT to the Audio Interface Line In (instead of to the Receiver AUX In), and the Audio Interface Line Out to the Receiver AUX In.
5. Turntable with Built-In Preamp; Using Computer Built-In Audio
NOTE: An alternative connection to the above, especially if your receiver doesn't have Tape Recorder inputs and outputs, would be to connect the turntable LINE OUT to the computer Audio In (instead of to the Receiver AUX In), and the computer Audio Out to the Receiver AUX In.
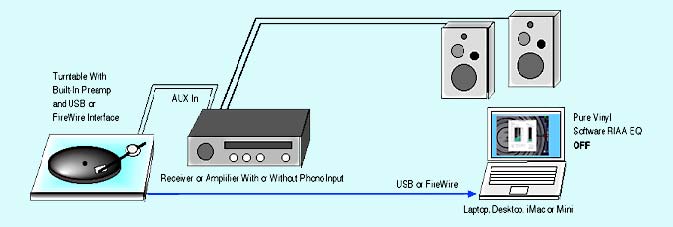
6. Turntable with Built-In Preamp and USB or FireWire Interface; Monitor via Turntable Analog Output
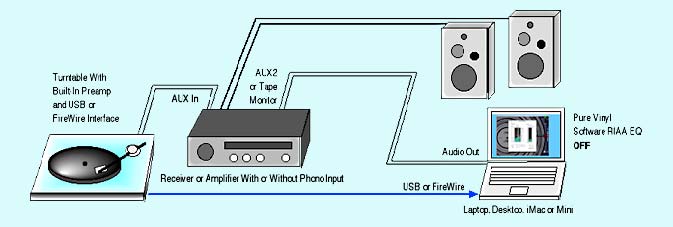
7. Turntable with Built-In Preamp and USB or FireWire Interface; Play Recordings via Computer Audio
- When recording, select the Receiver AUX In to monitor the sound.
- When playing back a recording, select the Receiver AUX2 or Tape Monitor to listen to the sound.
NOTE: An alternative connection to the above, especially if your receiver doesn't have Tape Recorder inputs and outputs, would be to connect the turntable LINE OUT to the computer Audio In (instead of to the Receiver AUX In), and the computer Audio Out to the Receiver AUX In. Then, the USB / FireWire connection would not be used.
Advanced Audio Enthusiast Configurations: Hardware Recommendations
Here are hardware recommendations for Audio Interface / Preamp, that we've used for our own vinyl playback systems, are compatible with Mac computers introduced in the last several years, and have conducted extensive listening evaluation sessions with. Choice of moving magnet or moving coil cartridge is open to personal preference, but a low-output moving coil type should provide the electrically quietest signal (because of the low source impedance of a low-output moving coil cartridge). Correctly set up (with fully balanced wiring between cartridge and preamp), there will be no audible hum.
System 1, Best Value 192 kHz Playback or Recording: Focusrite Saffire.
Has decent A/D and D/A converters plus a built-in microphone preamp. Use Connection Diagram 1 or 2 below.
System 2, Audiophile Vinyl Listening Bliss: Add Grace Design Model 101 (two 101s are required) or a Model 201 preamp to System 1 (the two-channel preamp in the Grace Lunatec V3 also can be used).
This is an upgrade to System 1. The Grace preamp has super wide bandwidth and low distortion, even at 60 dB gain. This will provide noticeably more smoothness in the midrange and treble, and about 10 dB better signal to noise ratio (depending on your cartridge) than the built-in Saffire preamp. The Saffire A/D converter from System 1 will preserve the sonic qualities of the Grace preamp. Use Connection Diagram 5 below (also can be used with Moving Magnet cartridge).
Manufacturer links:
Focusrite Saffire: http://www.focusrite.com
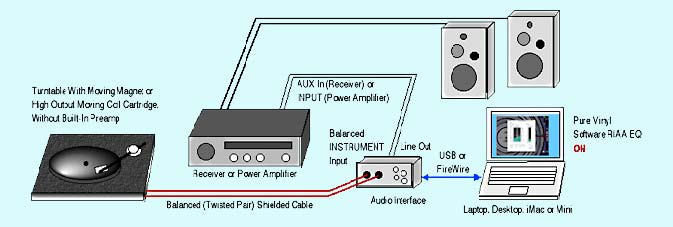
Grace Design: http://www.gracedesign.com1. Turntable with Moving Magnet Cartridge; 100% Balanced Input Connections; External Audio Interface
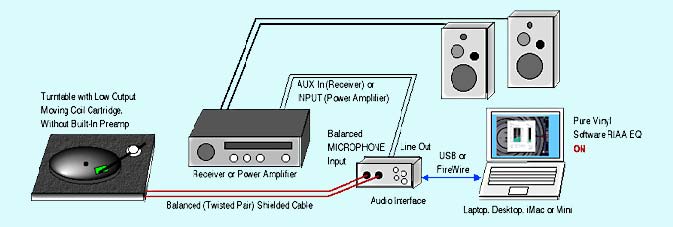
2. Turntable with Low Output Moving Coil Cartridge; 100% Balanced Input Connections; External Audio Interface
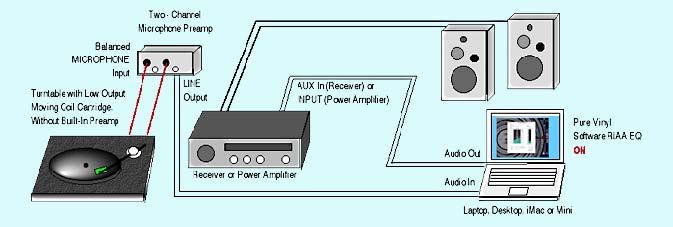
3. Turntable with Low Output Moving Coil Cartridge; Balanced External Microphone Preamp; Using Computer Built-In Audio
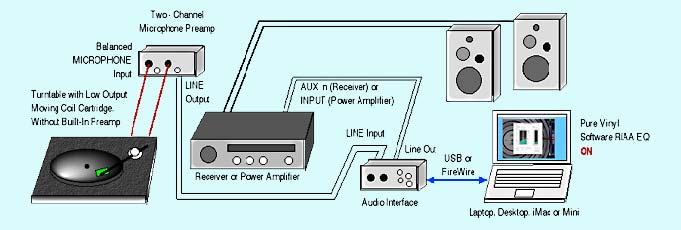
4. Turntable with Low Output Moving Coil Cartridge; Balanced External Microphone Preamp; Using External Audio Interface
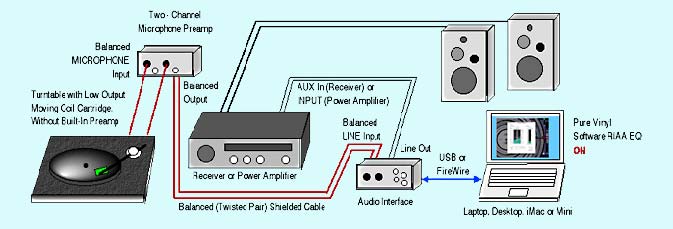
5. Turntable with Low Output Moving Coil Cartridge; 100% Balanced Input Connections; External Microphone Preamp; Using External Audio Interface
Home | Audio | DIY | Guitar | iPods | Music | Links | Site Map | Contact
![]()