|
|
Home | Audio | DIY | Guitar | iPods | Music | Brain/Problem Solving | Links| Site Map
This work is licensed under a Creative Commons License.
Converting LPs to Digital: Connecting The Turntable to PC
Here is how you can connect your turntable to your computer.
What you need:
- One turntable;
- One receiver;
- One PC with a sound card installed;
- One stereo RCA + ground cable to connect the turntable to the receiver;
- One cable with one stereo mini jack at one end and two RCA connectors at the other end to connect the receiver to your PC;
- A pair of computer speakers to monitor what is being recorded.
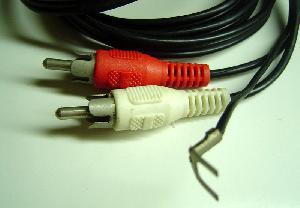
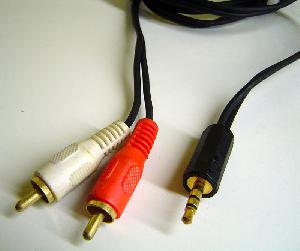
First let's take a look on the cable that connects the turntable to the receiver. This cable is shown on Figure 1. It has three plugs on each end, one red (or yellow) RCA standard, one white (or black) RCA standard and one ground wire with an "Y" shaped terminal.
Figure 1: Cable used to connect your turntable to your receiver.
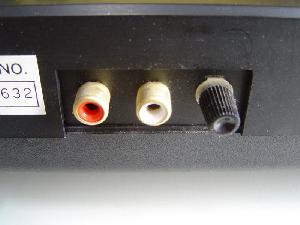
Locate on the rear of your turntable were the plugs are connected. You will find two female RCA connectors and one thumb screw to connect the ground wire, see Figure 2.
Figure 2: Turntable plugs.
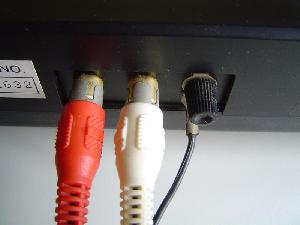
Just connect the male red (or yellow) plug from the cable into the red (or yellow or labeled "R" or "Right") female turntable plug, the male white (or black) plug from the cable into the white (or black or labeled "L" or "Left") female turntable plug and screw the "Y" shaped terminal from the ground wire to the thumb screw. The correct grounding is very important, because if this wire isn't connected or has a bad connection you will get noise ("hum" noise). This color scheme for cable connection will be the same from here on.
Figure 3: Turntable with its cable correctly installed.
The other end of the cable you will need to connect to the receiver. You cannot connect your turntable directly to your PC, you must use a receiver. There are two issues involved. First, the impedance from the turntable output and the sound card input are different, which means that the sound level will be very low. Secondly, the output of the turntable is not RIAA equalized. We will explain what this is shortly.
Looking at the back of your receiver you will find a lot of plugs. The turntable must be connected to the plugs labeled "Phono" and your sound card must be connected to the plugs labeled "Tape Out" or "Record Out". Check this out on Figure 4.
Figure 4: Plugs located on the receiver rear.
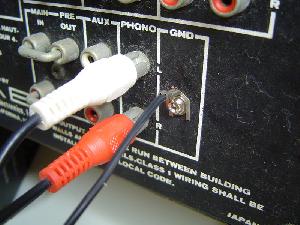
Just connect the other end of the turntable cable to the Phono inputs. The red (or yellow) male RCA connector from the cable must be connected to the red (or yellow or labeled "R" or labeled "Right") female RCA Phono plug from the receiver and the white (or black) male RCA connector from the cable must be connected to the white (or black or labeled "L" or labeled "Left") female RCA Phono plug from the receiver. The ground wire should be screwed to the thumb screw labeled "Ground" or "GND" on the receiver. Once again, this connection is really important. If you don't connect the ground wire or if its screw is not tight enough you you will get "hum" noise.
On Figure 5 you can check the cable installation.
Figure 5: Turntable connected to the receiver.
Connecting The Receiver
Now you need to connect the receiver to your PC. You will need a cable that at one end is a stereo mini jack plug (also called P2, is the same plug used by walkmans, discmans and MP3 players to connect the headset) and at the other end are two RCA plugs. If you have trouble finding this cable, just look for "a cable to connect my discman to my home stereo" on the stores. Check it out on Figure 6.
Figure 6: Cable used to connect your receiver to your PC.
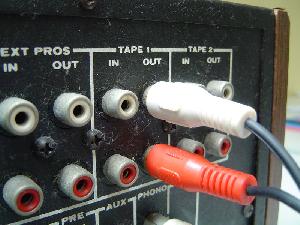
The RCA plugs will be installed on the output labeled "Tape Out" of your receiver, while the mini jack plug will be installed on the input labeled "Line In" of your PC. Just connect the red (or yellow) male RCA plug from the cable to the red (or yellow or labeled "R" or labeled "Right") plug on the receiver and the white (or black) male RCA plug from the cable to the white (or black or labeled "L" or labeled "Left") plug on the receiver. Pay attention to connect the cable to the right place - "Tape Out". You will need a receiver with this output available.
Figure 7: Cable connected to the receiver.
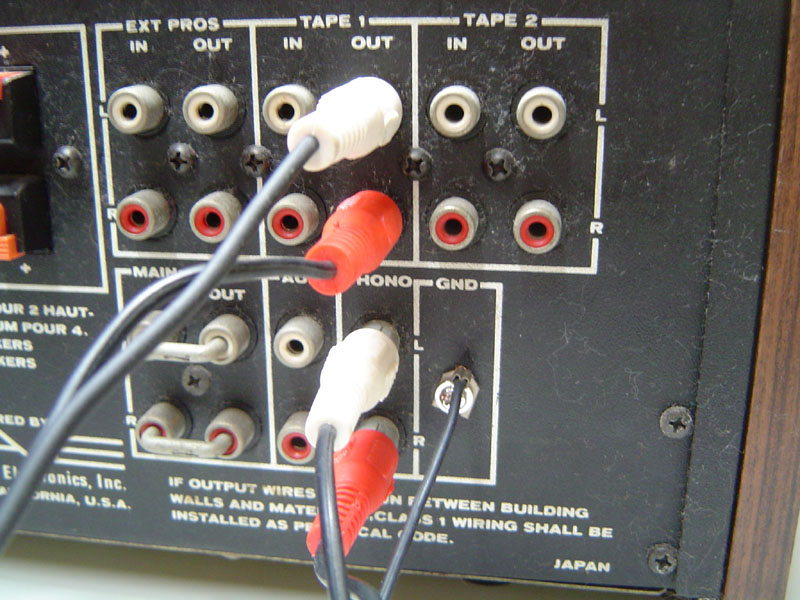
On Figure 8 you check the final aspect of the receiver cable installation.
Figure 8: Final aspect of the receiver cable installation.
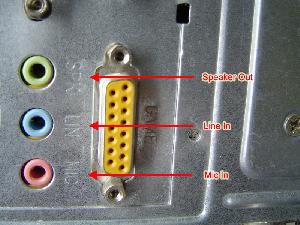
Now you need to install the other end of the cable - the mini-jack plug - to the "Line In" input of your sound card. This input usually uses a blue jack. Look at your computer's rear and locate it with the aid of Figure 9.
Figure 9: Sound card plugs.
Just connect the plug on the Line In input (blue jack), as you can see on Figure 10.
Figure 10: Cable installed.
Since you will need a pair of speakers to monitor what is being recorded, the final sound card cable installation will look like what we show on Figure 11. The speakers must be connected to the "Speaker Out" output, which uses a green jack.
Figure 11: Final aspect of the cable installation on the sound card.
Optical Digital Connection
If both your PC and your home theater receiver have this connection, that's the one you should use, because it provides the best quality. In other to connect your PC to your receiver using this connection, you will need a fiber optic cable, which comes with your receiver.
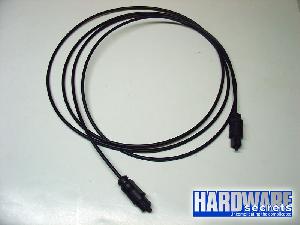
click to enlarge
Figure 12: Fiber optic cable needed to connect your PC to your home theater receiver using optical digital connection.On the receiver, plug one end of the cable to the input labeled ?Digital Optical In?, ?Digital DVD In? or similar (on our receiver this input was labeled ?Optical Video 2 In?). Before inserting the plug, pay attention if the receiver input is closed or not. If it uses a squared black peg, you should remove it before trying to insert the plug.
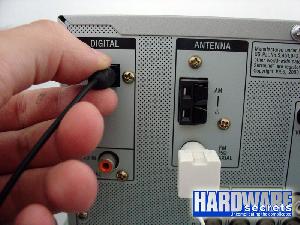
click to enlarge
Figure 13: Connecting the cable on our receiver.Then connect the other end of the cable on your PC, on the black squared plug. But before inserting the plug, remove the black squared peg that protects the connector, like we show on Figure 14.
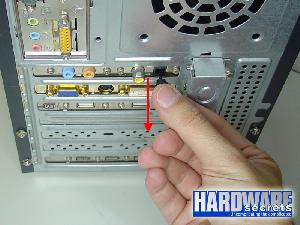
click to enlarge
Figure 14: Removing the optical connector protection.
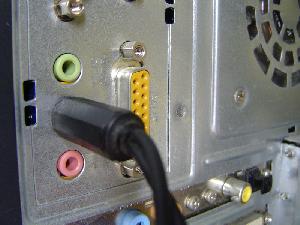
click to enlarge
Figure 15: Optical cable connected to our PC.Now everything is connected and should work just fine. You need to change the input selector on your receiver to ?DVD In?, ?Digital DVD In? or similar (on our receiver we had to change its selector to ?Video 2? since our cable was connected on an input labeled ?Optical Video 2 In?).
Coaxial Digital Connection
All home theater receivers have this connector. You should use it if both your computer and receiver have it and if your PC and/or your receiver don?t have optical digital connection.
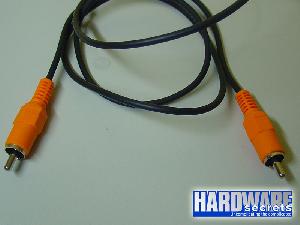
For this connection you will need a simple RCA-RCA mono cable, like the one shown on Figure 9. Usually home theater receivers come with a spare cable for this kind of connection, where the plugs are orange. The color isn?t important; you can use a cable with red, white, black, yellow, pink or whatever color plug.
click to enlarge
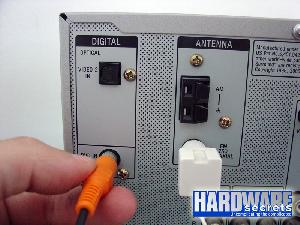
Figure 9: Mono RCA-RCA cable needed to connect your PC to your home theater receiver using coaxial digital connection.On the receiver, plug one end of the cable to the input labeled ?Digital Coaxial In?, ?Digital DVD In? or similar.
click to enlarge
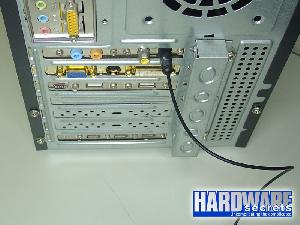
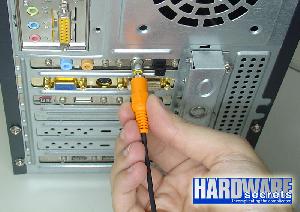
Figure 10: Connecting the cable on our receiver.Then connect the other end of the cable on you PC, on the plug we described on the first page of this tutorial.
click to enlarge
Figure 11: Connecting the cable on our PC.
Home | Audio | DIY | Guitar | iPods | Music | Links | Site Map | Contact