Managing your iTunes Library on an External Hard Drive
By Jesse David Hollington
Contributing Editor iLounge
Published: Monday, November 12, 2007
Category: iPod 201 Tutorials
More iPod How To's
Like many iTunes users, you may have started out with a basic iTunes library storing all of your media content on your primary internal hard drive. However, over time, with the addition of new content and video capabilities, your iTunes library may now be threatening to overtake what little storage you have left.
This is not at all an uncommon situation, and fortunately it’s really not all that difficult to relocate your iTunes library to another hard drive once you understand the basics of how iTunes manages your media content and the options available to you.
This tutorial is intended for both the average and slightly advanced iTunes user and will provide the necessary information that you need to know about moving your iTunes library onto an external hard drive, or even a secondary internal hard drive.
How iTunes Manages Media Content
Before we delve into the steps of actually moving your media content, it’s important to explain in some detail exactly how iTunes handles the management of your media files under the hood, what your options are for relocating these files, and the various pitfalls that you might encounter in this process.
The first and most important consideration is that ideally, iTunes is intended to handle all of the details of the underlying file system for you. By design, the user manages their content through iTunes, and ideally never even looks at the underlying file system, much less worries about moving files around. In this scenario, iTunes can even handle the relocation of the library for you, making the entire process quite seamless.
This may not match every user’s style of media management, but it’s important to understand how this affects the process of moving your media files to a new location.
The most important point to keep in mind is that once a media file is listed in the iTunes library, it is referenced by iTunes by the specific location (ie, full pathname) of where this file is located. Therefore, if you move a file, iTunes will almost certainly lose track of that file, and the result will be a broken link in the iTunes library.
This means that you cannot simply move your files manually to a new location and expect iTunes to find them after you’ve moved them, as it will still look for those files where it originally expected them to be. This one point alone has caused many users a great deal of grief, since repairing this situation can often be a tedious process of either manually adjusting the paths to hundreds of files or manually putting those files back into their original locations so that iTunes can find them again.
Fortunately, if you understand this and use iTunes and its related tools the way they were designed, you can ensure a smooth migration of your iTunes library to an external hard drive or even a completely new computer with minimal problems.
iTunes: The Database versus the Content
Another important point to understand: There are really two components that we are concerned about in this process, and these are somewhat distinct from each other in terms of where and how they are stored.
The iTunes Library Database contains the actual index of your media content. This is generally a file named “iTunes Library.itl” and several other supporting files, and by default lives in your Windows “My Music” folder or your Mac “Music” folder under a sub-folder named “iTunes.” This path is not modified by any iTunes preferences, and in fact could not be easily changed in versions of iTunes prior to v7.
The iTunes Music Folder contains your actual media content. Despite the name, this includes not only your music, but also audiobooks, TV shows, movies, podcasts and iPod games—essentially all types of content managed by iTunes. By default, this folder is named “iTunes Music” and located as a sub-folder under the iTunes Library Database folder, however this can be changed to any location you prefer via your iTunes advanced preferences.
Generally, when trying to conserve disk space, the iTunes Music Folder is the component that most users wnat to relocate. The iTunes Library Database can frequently remain in its default location for most users, and is generally only moved to an external hard drive when you want to move your iTunes library between more than one computer.
We will therefore focus primarily on the steps required to move the iTunes Music Folder to a new location, and briefly discuss moving the iTunes Library Database later in this article.
Standby to Prepare to Move: Checking your Preferences
So, armed with a basic understanding of how iTunes stores its media content, and knowing that you cannot simply move files around and expect your iTunes library to maintain references to these files, its important to look at how your library is currently setup, and understanding from there what your exact options are.
The key to this process is to review your storage settings under your iTunes advanced preferences, which can be found by selecting Preferences from the Edit (Windows) or iTunes (Mac) menu, and then selecting the Advanced tab:
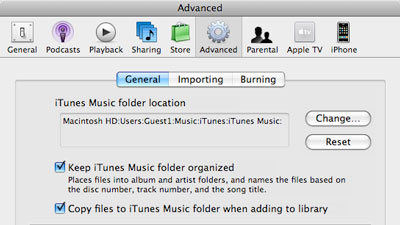
The first option, “iTunes Music folder location” indicates where your iTunes media content is stored by default. Remember that this only includes the media content and not the library database itself. Whether all of your content is located in this folder is going to depend upon the next two settings found on this screen.
Keep iTunes Music folder organized determines whether tracks in your iTunes Music folder are automatically organized based on the track information found within each file. With this option enabled, iTunes will move and rename files within the iTunes Music folder as necessary into an ARTIST\ALBUM folder structure, and name each file based on its track name from within the tags itself. If this option is disabled, then files are left as-is within the iTunes Music folder.
Copy files to iTunes Music folder when adding to library determines whether files that you add to your library are automatically copied into the music folder, or left in their original location. When this option is disabled, however, iTunes will simply store the full path to an added file from wherever its original location is.
Tracks copied into the iTunes Music Folder become “Managed” files (in that iTunes will manage the location and naming of these files), whereas files that are not copied into the iTunes Music folder are “Referenced” files—iTunes stores a full path to the file, but does not actually take any further action with those files in terms of organizing, renaming, moving, or deleting those tracks.
Note that content purchased from the iTunes Store or ripped from CD is always stored in the iTunes Music folder—those files have to go somewhere after all. So, this setting only affects existing files that are added to the iTunes library (ie, MP3/AAC files that you rip via other software or download from other sources).
So why is all of this important? How you have configured these options is going to determine how much flexibility you have when moving your iTunes media content elsewhere. In a default configuration where all of your media files live within the iTunes Music folder location ("Managed" files), and have been organized by iTunes, the process of moving your library may be considerably smoother than for a user who has a bunch of “referenced” tracks living in various locations and possibly even on different drives.
While iTunes can move your files to a new location in either scenario, the only way to move a library that consists of referenced files is to actually convert them to an entirely managed library approach in the process. Users who have built their own file-system organization for their media content and want to preserve that layout will likely find the process of moving their content to be much more challenging without creating a whole new iTunes library and reimporting it.
Moving Your Content: The Wrong Way
A very common mistake made by most users is to simply try and move their entire iTunes Music folder to a new location and update the iTunes Music folder path in iTunes’ preferences. While this will work in some cases, the reality is that you will risk iTunes losing track of some or all of your music files in the process.
The reason for this is that iTunes stores the entire full path to each music file in its library database. If you move that file somewhere else, then iTunes won’t be able to find it, and the result will be a broken link to that file, shown as an exclamation mark in iTunes immediately to the left of the track listing:

If you try to select a track with a broken link, iTunes will notify you that it cannot find the file, and give an opportunity to locate it yourself:
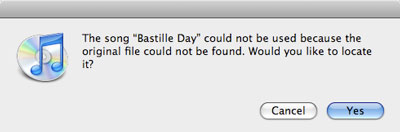
Selecting “Yes” will allow you to browse for the file, and iTunes will link the current entry to that specific file. This can be a viable solution for a few broken links, but you can well imagine that this could become very tedious if you had hundreds or even thousands of files in this state.
Should you find yourself in this situation, the simplest solution is generally just to move your iTunes Music folder back to its original location. iTunes still has the complete path to each file in its database, so if you put the actual files back, it should have no problem finding them again.
Note that users who have a completely “Managed” library configuration may be able to get away with using this method to move their library, however it is still not the recommended solution. The reason this method will work in this case is because iTunes will actually look for any missing tracks in their default location under the iTunes Music folder path. So, if your tracks are organized in the way that iTunes expects to see them, then it will be able to locate them in the new location. However, this solution is rarely completely reliable simply because it is not uncommon for users with large libraries to have a few referenced files due to changes to iTunes preference settings or even inconsistent behavior with older versions of iTunes.
Consolidate Library: The Right Way
So, knowing that these pitfalls exist, what’s the best way? Remember that iTunes’ philosophy of managing your media is actually to insulate you from having to worry about the underlying file system. On the basis of this approach, it makes sense that it should provide the necessary tools itself to facilitate moving your library to a new location.
So in other words, rather than messing around copying/moving files through Finder or Windows Explorer, why not let iTunes deal with this for you? This is handled in iTunes through the Consolidate Library option, found under the Advanced menu in iTunes.
What the Consolidate Library option actually does it to essentially consolidate all of the files listed in your iTunes library into the iTunes Music folder. It does this by copying any referenced files into the iTunes Music folder, renaming them with the proper track name, and organizing them into its standard file and folder structure (ARTIST\ALBUM, essentially). This option is at least partly intended to allow you to bring “referenced” files into the iTunes Music folder from various other locations in the event that you may have added them to your library with the “Copy Files” option disabled.
However, the only real distinction between a file that is “managed” and a file that is “referenced” is the actual iTunes Music folder path. Files in this folder are considered managed by iTunes, and anything outside is a “referenced” file. So, if you change the location of the iTunes Music folder to a new path and then use the “Consolidate Library” option, iTunes will happily copy all of these files into your new location, updating all of the file location information in the iTunes database in the process.
Performing the Move
So, the actual process of moving your iTunes media content is quite straightforward:
First, go into your iTunes advanced preferences, and change the iTunes Music folder path to whatever new location you want your iTunes media files to be stored in. This will usually be an external hard drive, but it can be any valid path, including a secondary hard drive or even a network share:

Once you have updated the iTunes Music folder location, simply select Advanced, Consolidate Library:

iTunes will advise you that it is about to copy all of your content into the iTunes Music folder, and warn you that this cannot be undone.
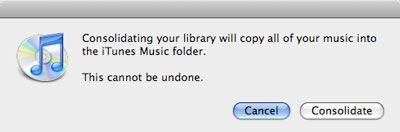
Simply click “Continue” and iTunes will begin the process of copying the files into their proper locations and updating these locations in the iTunes library database.
Note that this process copies the tracks to the new location rather than moving them. Although the original tracks still exist, the iTunes library database is updated with the new location, which makes the process difficult to undo unless you have kept a backup of your iTunes library database from before the consolidation. Making such a backup is certainly an option, although not normally required.
The other important note is that this will reorganize your entire library file system into iTunes’ own way of laying it out (ARTIST\ALBUM\TRACK.MP3). This may not be a desirable option for those who have their media file system laid out in their own organizational structure, or who use other third-party applications that expect media files to be organized a certain way. Unfortunately, if you’re in this situation, there really is no easy way to move your iTunes media content without creating a whole new iTunes library and reimporting all of your tracks into the new library from their new locations.
Confirming and Cleaning Up
Once this process has completed, you should be able to confirm that the files have been copied to the new location and that iTunes is referencing them properly from there simply by selecting a track at random and choosing File, Get Info. The “Summary” tab for the file properties will indicate the physical location of that track, which should reflect the new iTunes Music folder path.
Since iTunes copies the media content rather than moving it, you will also likely want to delete the your iTunes media files from their original locations.
Remember that this process only moves the iTunes content however. Your iTunes library database will still be located in its original location, likely on your primary hard drive in your “Music” or “My Music” folder, as described above.
Moving the Library Database
If you’re simply interested in moving your files to a larger disk, there’s seldom any reason to worry about moving the library database, as it doesn’t normally take up a lot of storage space, and there are advantages to leaving this file on your local hard drive and simply storing the content on an external drive.
That having been said, if you do want to move the library database to another location, this is certainly possible as well as long as you’re using iTunes 7 or later. This must be done separately from the process of moving the content described above, and you’re best to run the “Consolidate” operation and move the content first, and then relocate the library database.
To do this, shut down iTunes, and copy your “iTunes” folder (under your “Music"/"My Music” folder) to the new location. Keep in mind that by default, you may still have media content located in an “iTunes Music” sub-folder, and you probably don’t want to waste time copying this content over if you’ve already Consolidated it to another location, so you may want to exclude that one sub-folder.
Once you have copied the “iTunes” folder, including the “iTunes Library.itl” and any related support files and folders, simply restart iTunes while holding down the SHIFT key (Windows) or OPT key (Mac) and it will prompt you to either create a new library or choose a location for an existing library:
Simply click “Choose Library” and browse for the location that you copied the iTunes folder to. iTunes should start, and will be using that particular library database instead of the one from the original location. Once you have set this location, iTunes will continue to use it unless you change it again via the same method.
Moving the iTunes library database onto an external hard drive can be useful if you plan to move the external hard drive between multiple computers. It can also be useful to store it in a common area on a local computer for access by multiple user profiles, or even on a network share.
One word of caution, however: The iTunes database is not designed for multi-user access. If you decide to place it on a network share or in a common directory on a standalone workstation, always make sure that you do not have more than one copy of iTunes running against it at a time, otherwise you will risk corrupting the iTunes database.
Using an External Hard Drive and a Portable Computer
Once you have consolidated your library content onto an external hard drive, iTunes will continue to use that location for any newly imported or downloaded content, subject to your iTunes preference settings.
However, this creates an additional consideration for users of portable computers, since the external hard drive may not always be available. Fortunately, iTunes actually works around this quite well, so there’s no need to pack up the external hard drive when going out with your laptop.
Basically, when you start iTunes with your external drive disconnected, the iTunes Music folder path will temporarily revert to its default location on your local hard drive. This allows iTunes to run properly, although obviously you will not have access to any of the content that’s not already in that location. You will get broken links to any files that you try to access, since the external hard drive is not present. No need to worry, however, as this will correct itself once the drive is available again.
However, this does allow you to download new content (ie, import CDs, add files to your library, download podcast episodes, purchase content from the iTunes Store, etc). This new content will be saved in your local iTunes Music folder, and will be playable from there.
You can even sync your iPod (or iPhone) to your library in this state. “Missing” tracks (those with the exclamation marks beside them) will remain on the iPod, since they are still listed in the library. You obviously won’t be able to add content to your iPod that isn’t already there, but you could certainly sync any new content you’ve added while disconnected, since those files do exist on your laptop computer. Further, even ratings and playcounts will be updated in the iTunes library during an automatic sync.
This can be a useful way to rip a few tracks off a new CD when you’re away from home and get them loaded onto your iPod without having to wait until you get home or having to resort to switching your iPod to manual mode.
Once you do return back home and plug the external hard drive back in, you simply need to restart iTunes and it will detect that its proper iTunes Music folder has returned, and go back to using that as its iTunes Music folder path. Any content you’ve downloaded or imported while you were away from the main library storage area can be transferred over simply by running the “Consolidate Library” option to copy those files over.
The way that iTunes handles this provides a very effective way to maintain a large iTunes library that is somewhat usable on the go without having to keep it all on your laptop’s internal hard drive.
More iPod How To's
