Persuading a problematic vocal recording to play nicely with the rest of your mix can seem like a futile task. Well-recorded vocals and poorly-recorded vocals both need to be correctly prepared, and the processes we're going through today will help you turn your untreated vocal take into a polished and commercial sound.
Note: this tutorial contains embedded audio that will not display in a feed reader. Click back to the site to read the tutorial with audio or download the Play Pack at the end of the tut.

1. Get Rid of Background Noise with Gating
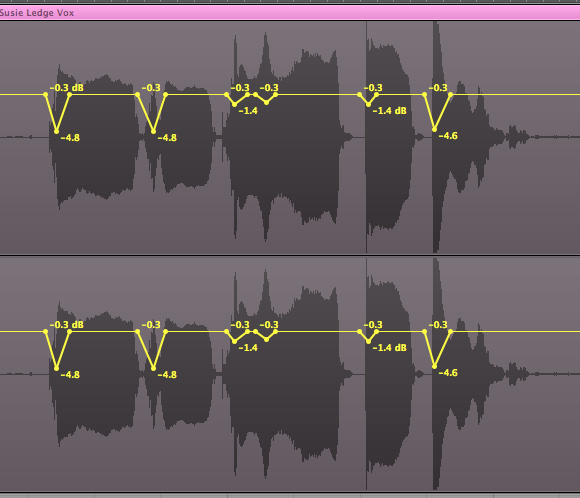
The first thing you’ll probably notice about any vocal recording (good or bad) is the presence of background noise, ranging from subtle to annoying. This can be caused by anything; a computer in the studio, traffic, background conversation and, of course, headphone output bleeding onto the microphone.
Before the core of the vocal signal can be tackled and processed efficiently, as much of this background noise as possible must be removed. You have a few options here as there are plenty of techniques available, including manually editing the areas of noise or even using automation to lower the level of these regions. Although perfectly valid techniques, the most convenient tool for tackling the issue is a noise gate.
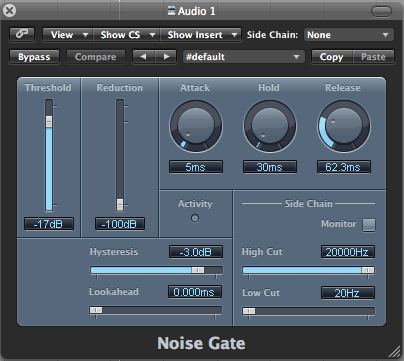
Noise gates are supplied in one form or another with pretty much every DAW (digital audio workstation). Products such as Cubase, Logic, Ableton and Digital Performer all include feature-rich gate plug-ins out of the box. I’m using Logic Pro 8 here, but the techniques are generic and can be used with any software and similar plug-ins.
Once you have selected your gate plug, it's simply a case of setting the threshold so that the body of your vocal is heard but the areas of silence or noise are muted. Even with the most precise setting here, you may notice that your vocal sounds unnatural when coming in and out. This can be solved with some tweaking of the attack and release settings. Some gates will have extra controls such as hold time and gain reduction amount to get an even more natural sound.
2. Dealing with Low Frequencies
Once your vocal is playing back without any noise it’s time to start thinking about a chain of processing that will compliment the vocal and bring out the best in the performance. The order that I have here is by no means set in stone and is simply one way you can work. Once you have a good understanding of each process you can mess with the order of the processors as you see fit.
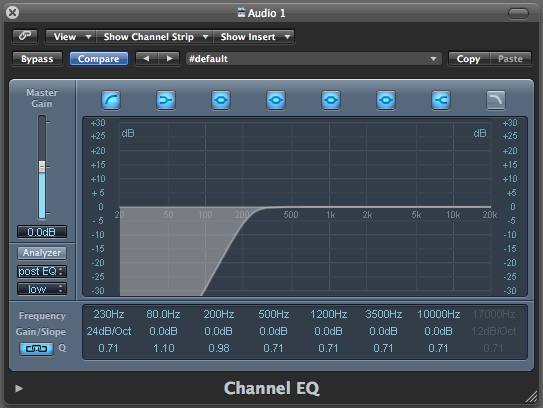
It is important to filter out low frequencies and it is always a good idea to do it early in your chain as this will allow any plug-ins after this point to operate at optimal capacity since they won't have to process large amounts of unwanted low frequency energy. Many problems due to vibration, further noise during the recording and so on can be eradicated with this simple process.
I have used an EQ plug-in with the high pass filter engaged. Watch the slope and frequency you use here, as these will need to be adjusted depending on the type of vocal you are working with. For instance, I was able to filter quite a lot of low end as I am working with a female vocal.