How to Process and Improve Home Recorded Vocals
Author: Joel Falconer
So, you’ve recorded a vocal, and now you want to mix it and process it so it sounds great in your mix. We’re not going to look at tracking vocals in this tutorial. Instead, we're going to focus on how to process vocals once you've recorded them. Depending on your room, your mic and placements, your pre-amps and inputs and, above all, your skill-level, the quality of your recorded vocal sound is going vary.
Vocal processing can seem like a bit of a dark art when you’re just trying to get by recording your material at home with budget equipment. But, no matter how bad your initial sound is, you can improve it.
Note: this tutorial contains embedded audio that will not display in a feed reader. To hear audio, click back to the tutorial or download the Play Pack for this tut (scroll down to the end).
In this tutorial, we’re going to look at some areas that can get pretty complicated, and bring them back down to earth so we can begin to understand what makes them tick and how to apply them to your vocals. These areas are compression, EQ, and reverb. There will be a few minor edits to the audio region, too, but there’s nothing “dark-artsy” about that.
If you’re recording at home, you should have a set of monitoring headphones. If you’ve gone and dropped $3,000 on studio monitors without having an acoustically treated room first, I’m sorry to say that your money just went down a drain. While it’s best to mix with monitors in a balanced room, good headphones are the second best option.
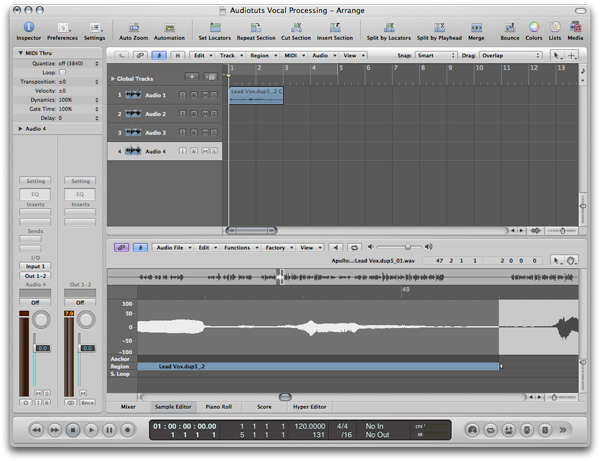
Step 1
Import the Original Vocal
Have a listen to the original vocal I’ve pulled from a Pro Tools session. We’ll be using Logic in this tutorial, but the same principles would apply in any DAW.
We’ve got a good starting point as far as sound quality is concerned here; the sound was pulled from a proper recording room, using a good Avalon pre-amp and a personal favorite mic of
mine, the Rode Classic II.
The first step of the process, of course, is to get your audio into the application. If you’re tracking and mixing in the same app, using the same session, you’ve already got it. Otherwise, drag the wave file into the arranger or use File > Import Audio File.
Step 2
Apply Vocal Compression
The biggest difference between our raw vocal as it is and the vocal you hear on, for instance, one of your favorite albums is that it’s totally uncompressed. If you’re using the same file as me, that’s actually not true—the Avalon preamp did some compression, but not too much, so that we could have more room to make adjustments later on. If you’re recording at home there’s a pretty good chance your raw signal is totally uncompressed.
Apply a compressor insert. I’ve used the one found under Dynamics > Compressor. If you’re recording at home and reading this, you may not be familiar with all the compression variables, so begin with a preset and tweak the settings to suit from there. Don’t try starting from scratch until you’ve read up on the topic and understand how compression works.
If you’ve got a vocal that jumps around in dynamic range a lot, you’ll need to make the attack shorter so that the compressor kicks in faster. While you’re fiddling, dial-up the attack as high as you can and play your file back so you can hear the difference in sounds side-by-side; before the compressor kicks in, and after.
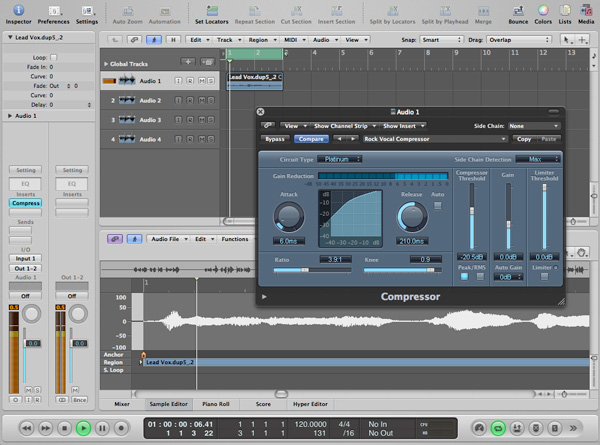
Once you’ve tweaked the compressor to suit your vocal, you’ll need to compensate for the loss of level that compression causes. Most compression plug-ins have a “Gain” variable—tweak this until an A/B test (using the Bypass button) produces approximately the same volume.
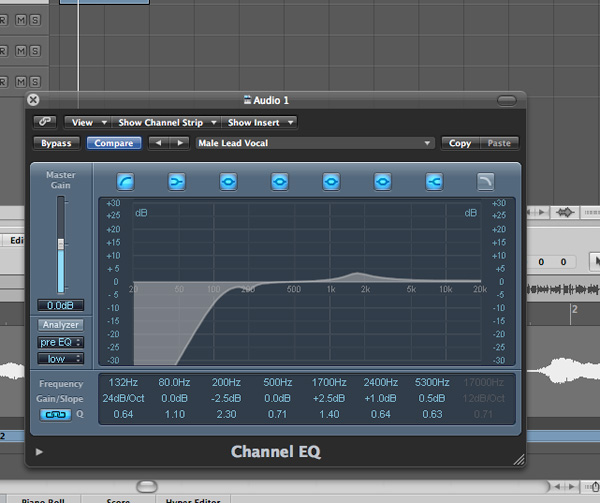
Step 3
Use Equalization to Remove Bad Frequencies
Again, while this file had some analogue EQ done thanks to the preamp, yours probably won’t. We need to clean up the frequencies in the audio a bit so that it’ll sound better on its own, and mesh with the rest of the instruments in our song.
This means cutting frequencies that the vocal isn’t meant to occupy, and perhaps some slight boost in frequencies where the vocal should stick out, but remember that subtractive EQ is always better than additive EQ.
I’ve loaded the plug-in found under EQ > Channel EQ. Here we want to scoop out a bunch of the very bottom end, a slight dip in the 200Hz area, and give a slight boost to the natural frequency range of the human voice around 2.5kHz.
The human ear has evolved to lock in on the human voice. It locks in based on frequency, which is why we’re just as easily distracted by other noises in the same frequency range. So it’s always good to accentuate that frequency in your vocals and get some attention.
Many musicians struggle with the idea of scooping out large chunks of a given frequency. It’s important to understand that recorded music is about creating a controlled environment and deciding in advance which instruments are going to take up which frequencies, and sculpting them to adhere to this. It’s essential to create “holes” in some sounds to let other sounds shine through.
Step 4
Create Space with Reverb
Our vocal sounds incredibly dry at this point. Obviously this is partly because it was recorded in a deadened room that has been specially treated for recording purposes, but you’re usually going to apply some sort of reverb no matter how dead or live your initial recording is.
Even though we’re only working with one file at this point, it’s good to get in the habit of using an auxiliary send for resource intensive plug-ins such as reverb. Route a Send (under Inserts) to Bus 1, and Logic will create an auxiliary channel strip and place it next to the vocal channel strip. Change the input (under I/O) of the aux track to Bus 1, and place a reverb unit on the aux as an insert. Make this reverb as wet as possible—we’ll control how much is sent through via the send.
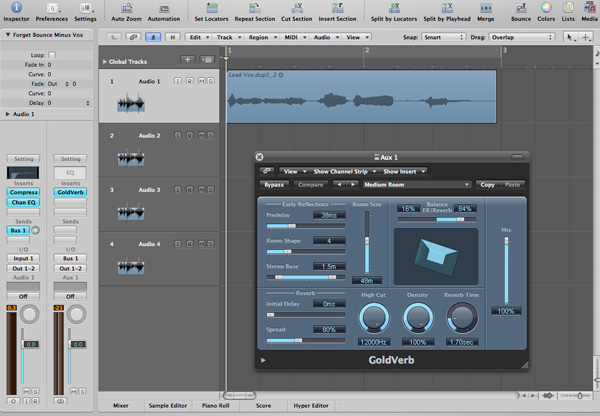
Somewhere between -20dB and -10dB is a good place on the send. -20dB is where I prefer to start, and -10dB is really quite wet. Experiment until you’re happy.
Step 5
Clean Up the Audio
You probably noticed the breath at the end of the audio file. We don’t want this hanging around. When working with larger sections of audio, we’d crossfade or insert a silence in spots like this, but since it’s an isolated file just switch to the Crossfade cursor and drag from just before the end of the last word, to the end of the file. Play back and tweak until you can no longer hear the breathiness at the end.

Your cleaned up audio should sound like this:
Step 6
Thicken the Sound
Now our vocal is starting to get somewhere, but it’s still a bit thin. The best thing to do is double track your vocals in the studio. Just have the singer sing the line again on a new track and mix them together. But sometimes you don’t have the opportunity or the time to go back in for extra recording, and you have to make do with what you’ve got.
Copy the audio file to a new track and apply some compression, EQ and reverb, just as we’ve done with the original. Now, get a pitch shifter on an insert. I’ve used the insert plug-in found under Pitch > Pitch Shifter II.
Ensure that Semitones is set to 0. We don’t want massive multi-tone harmonies, we want to double a bit, so having anything but 0 set here is bad.
Now, change the Cents variable to about -20 and drag the Mix all the way up to 100%. If you play back, you’ll hear the doubled effect. It’s not as natural as real double tracking and doesn’t sound as good, but it does the job.
Step 7
Vocal Mix via Aux
As projects get more complicated, it gets increasingly hard to alter the mix to compensate for new elements without throwing out a finely-tuned balance between two or more other elements. So, we’ll mix the two vocals here together, then route them through an auxiliary channel to control the vocal as a whole.
When we have more instruments involved, we can alter the vocal level using one fader and without altering the relative mix between one vocal and another.
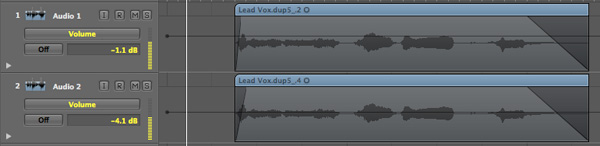
Get a good balance between your vocals—in this case I liked having the doubled vocal well below the level of the lead vocal, more of a backing than anything else. With a good double-tracked vocal, recorded separately, I would’ve had them roughly equal and panned to either side.
Once you’re satisfied with the balance, route the output (under I/O on the channel strip) of both vocal tracks to Bus 2. Like with our reverb aux, the vocal aux will be created automatically and show up next to our channel strip. I threw on a gentle compressor and a limiter here, to help our vocals cut through the mix (though at this stage there’s nothing else to cut through).
Step 8
Perform a Relative Mix
So far we’ve been unable to truly mix the vocal as a whole because mixing requires having something to mix against. Make sure you mix your vocal to a guitar, at the least, during your early guide tracking, unless the song is acapella, in which case this step is irrelevant for the most part.
For this example I dug up the instrumental guide tracks for this song. Because they’re guides they’re far from polished, but it provided something to mix against. This song was meant to have more of that classic hard rock sound. To achieve this you need to do the opposite of the pop rule of thumb, which is having vocals way out in front of everything else, and place it somewhere closer to the guitar (but still cutting through on top).
Here’s our finished vocal, that has gone from raw to processed and mixed:
