Creating custom sampled instruments using Logic’s EXS24 Software instruments that come jam packed with presets can be bittersweet; there are hundreds of ready-made sounds instantly available at your fingertips, but within months of an instrument’s release the patches become hackneyed and commonplace. What you may have thought was a unique and exciting instrument can soon become the very sound that makes your music feel just like everything else.
The solution is to develop your own unique voice using custom instruments, and thanks to Logic’s EXS24 Sampler it’s much easier to do than you might think.
In this tutorial we’re going to learn how to use EXS to create a full instrument out of a single wave file. This experiment will help familiarize us with the EXS editor and cover the basic concepts of creating an instrument from scratch.
We’re going to use the sample “AudioTutsMinorPad.wav”. The sound was created using a synth and filters outside of Logic. On it’s own it’s not terribly useful, but were going to use EXS to turn the sample into a playable instrument that can be used in Logic.
Note: this tutorial contains embedded audio that will not display in a feed reader. Click back to the site to read the tutorial with audio or download the Play Pack at the end of the tut.
Step 1
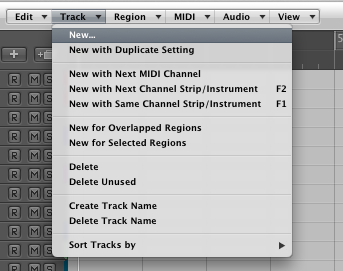
First we need to create a new software instrument track. Under the “Track” menu, select “New…” to bring up a New Track dialogue box.
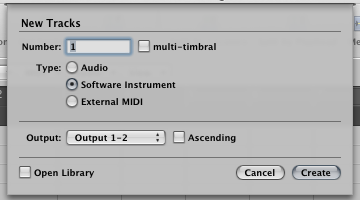
Create 1 software instrument and double check that the output is set to your main output (this should be default). Once everything is set, click “Create”.
Step 2
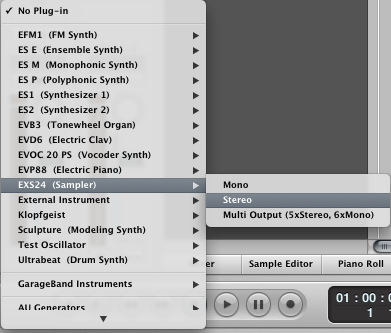
Instantiate EXS24 on our new software instrument by clicking and holding on the track’s input. Scroll down until you get to EXS24 and choose stereo. Stereo should always be your default choice; even you expect your initial instrument to be mono, choosing stereo opens you up to a wider possibility of effects that you can add later.
Step 3
Click on the “Edit” button, which is in the upper right corner of the main EXS window, to enter the EXS Instrument Editor window. This is where the bare basics of the instrument live, including which samples should be played by which keys and how they should be individually treated.

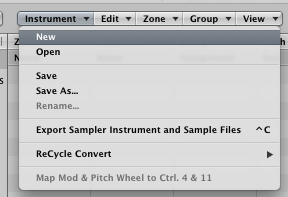
Under the “Instrument” menu select “New”. This will be our new instrument.
Step 4
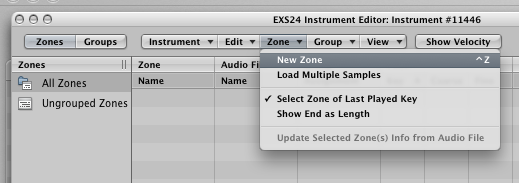
Under the “Zone” menu create a new zone. A zone contains all of the information about a single sample, including which audio file to reference, the key range, default pitch, and loop parameters. For this pad we will only be using one zone, which by default Logic will stretch across the entire width of the keyboard (If for some reason you want to limit the playable range of a zone, you can adjust the “Key Range” settings).
Step 5
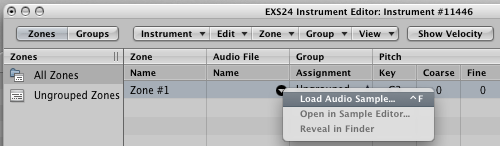
Load an audio sample into the zone by clicking on the small triangle under the Audio File parameter and choosing “Loud audio sample…”. Navigate to your “AudioTuts EXS Samples” folder and choose the file called AudioTutPad.wav.
Step 6
At this point you should be able to play your keyboard and hear the instrument play back. You may notice that right now when you play a C key you don’t actually hear a C minor chord, which means we need to adjust the Key Note. The AudioTutPad sample was created around a D3 pitch, so we need to adjust the “Key” paramater under “Pitch” by clicking on C3 and dragging up to D3. Play the pad again and you will now hear the pad at the proper pitch.

Step 7
For some instruments we could save what we have and call it a day, but there are a few adjustments we can make to our pad that will make it more playable. We’ve got the right keys matching the right pitches, but if we hold the key down for longer than a few seconds the sound just trails off. It’s more likely that if you use this instrument as a pad, you’re going to need the notes to sustain for a long time.
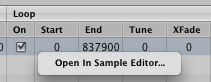
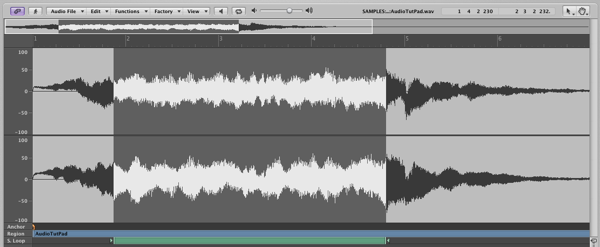
EXS makes it very easy to adjust the loops settings of each zone’s sample. At the right end of the the zone’s parameters are the Loop settings. First click the checkbox to turn Loop “on”, then ctrl-click on the Start or End number to choose “Open In Sample Editor…”. Here we will choose where we want the loop to begin and end.
Notice at the bottom of the sample editor is a green bar marked “S. Loop”. Adjust the beginning and ending of the loop by clicking and dragging the small green triangles. Since this pad has a slight pulse to it, I suggest you place the start and end points on a peak in the waveform. And because this particular sample is a washy pad, it will smooth the loop over if we choose a high XFade setting, for example around 250. Play the instrument as you adjust these settings to find a loop that feels natural and unnoticeable.
Step 8
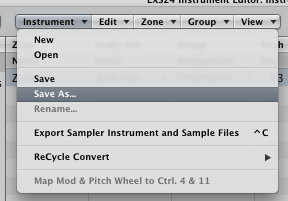
We have finished everything we need to do in the EXS Instrument Editor window, but before we close it we need to save our instrument. Under the “Instrument” menu choose “Save As…”. Logic will automatically default to your Sample Instruments directory, where EXS always knows to look for instruments.
Be sure to save your instrument directly into this folder or a folder within it, but not outside of this directory. Always try to provide as much information as you can in an instrument name so that finding it later is easy. In this example I’ve named the instrument “AudioTuts Minor Pad”.
Step 9
We now have an instrument that plays at proper pitch across the entire keyboard and loops for a nice long pad, but we can still add a few easy tweaks to make the pad more expressive. The main EXS window is where we adjust the global settings which apply to the entire instrument and not just individual samples.
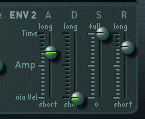
In the bottom right of the main EXS window are the envelope settings (ENV 2). Click on the round faders and drag up and down to djust the attack & release parameters to taste (for this type of instrument, I tend to like a slow attack so the pad creeps in, and a nice long release so it fades away).
Step 10
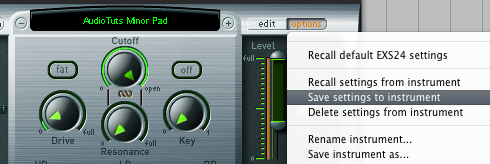
Adjustments to the main EXS window can be saved on an individual basis for each Logic session, but we want to make sure that our attack and release settings are a permanent part of the default AudioTuts Minor Pad. To do this, click on the “Options” menu and choose “Save settings to instrument”. Click yes when asked if you want to overwrite existing settings.
You’ve now seen how to create a basic instrument in EXS and adjust a few simple parameters to make it playable and useful. The next steps for moving forward into instrument creation are to experiment with different audio files. Try to get creative, using other instrument samples, drum loops, or even entire songs and see what you can come up with.
You can also begin to experiment with multiple zones for more complex instruments. With just a little bit of creativity and tinkering you can develop a personal library that makes your music sound like your music, not just the synth flavor of the week.