How to Break DRM (iTunes, DVD, etc.) for Lawful Purposes
(copying for back-up, transcoding into different devices)
This page was written with non-techie people in mind. If you read SlashDot or BoingBoing, if you're active in the anti-DRM movement, etc, then this page will have nothing new for you. But if you are an "average computer user", then you probably think that breaking DRM is too hard, too complicated, impossible, or illegal. This page is for you. With simple straightforward steps any grandmother could follow, I aim to empower the "average user" to legally break DRM, to practice their right to transcode media into different formats so that this media can be enjoyed on any device, and to make back-ups. If you have always wanted to rip, copy, and mix video the same way you can with audio, and make DVDs (or video CDs that you can watch on TV by playing on your DVD player) as easily as you make mixed CDs (using videos from your DVDs, from YouTube, from your digital camera, etc), then this page is for you.
And if you ARE fairly tech-savvy, then please send the address of this page (www.antidrm.hpg.ig.com.br) to your friends and relatives who AREN'T tech-savvy. They too deserve to be able to free their iTunes-purchased music from Apple's restrictions, to share it with each other. They too deserve to know how to rip their DVDs and put that video on any device they want (including a burnt DVD, VCD, or Divx CD). They too deserve to know how to download YouTube videos to their hard drives and iPods. So please, encourage them to do these things. You'll help weaken the grip of DRM on the media we all buy. And the world will be a better place... ;]
First of all, a note for anyone who may claim that the information on this page is illegal:
This website does not condone piracy. It is ILLEGAL and WRONG to own media for which you did not pay, or for which the creators were not paid. When musicians and film-makers invest time and money to create the music and videos we all love so much, they deserve some of your money if you want to enjoy their work. It's only fair. Downloading a song or video for free from the internet, or buying a pirated copy in the street (be it in Hong King, Rio de Janeiro, or New York) is wrong and illegal (with the exception of artists who choose to make their work available for free, of course).
The techniques described on this page should only be used FOR MEDIA THAT YOU ALREADY LEGITIMATELY OWN. When you do buy a song or video legally, you have the legal right to enjoy it on different platforms (e.g. buy a DVD and watch that movie in your iPod, buy an iTunes song and listen to it on your Zune or Creative Zen) and to back it up (make a copy in case your hard drive crashes, your DVD gets scratched, your house burns down, etc), even if this means making copies. This page describes how to do this. So you may only use the techniques below for those lawful purposes: To overcome DRM so you can enjoy your media on multiple devices and make back-ups, NOT to make files that then get sent to all your friends or into peer-to-peer networks.
|
How to break DRM
DRM stands for "Digital Rights Management", and includes an ever-growing set of technical tools implemented on the media you buy and on the devices and programs that play that media, so as to restrict what you can do with that media. DRM, supposedly there to enforce the "rights" of the content creators (the companies who funded the musicians and filmmakers), prevents you from copying that content, or from taking that content and transcoding it into a different file that can be played on some other device. It turns out, however, that content creators do NOT have the right to prevent you from enjoying your media on different devices, or from making back-up copies of it - you have a legal right to do those things, despite the DRM barrier. I want to help you to overcome DRM and do whatever you want with the content you own, with the videos and music you paid good money for.
This webpage explains how to liberate content from its DRM prisons, so that it can be copied, transcoded, and enjoyed in any platform. You should only have to buy content once at most: Once you buy a DVD, you should be able to watch that movie on your laptop, on your iPod, and on your PSP, without needing the original disc. So ripping a DVD is legal, but the DRM gets in the way. Similarly, once you buy a song or video from iTunes, you should be able to enjoy that song in any device, including a Zune or a PSP, and you should be able to watch that video on your DVD player or your PSP - but, again, the DRM gets in the way of transcoding that content into files that can be played by devices other than iPods and the computer you bought them on.
So, on this page, I'll go over how to transcode those videos and songs into files that can be enjoyed on any device. I will explain this in very simple step-by-step instructions that any non-tech-savvy person can follow.
And even if you ARE tech savvy, I bet you that most of your friends are not. Most of your friends probably think that they cannot copy DVDs, buy a DVD and watch that video on an iPod, buy a song on iTunes and send it for you to play it on your computer, or download any video on YouTube or Google Video or MetaCafe and watch it on their portable player.
So please, even if you are already familiar with the concepts on this page, I urge you to send this page's address to your friends so that they too can experience the freedom of a DRM-free media collection. By reading this page, your friends can be empowered to strike another blow against the DRM-dependency of the film and record industries. If everyone knew the techniques described on this page, would those companies even bother to DRM their media?
Table Of Contents
How to break iTunes DRM
How to rip and copy DVDs
Other DRM
How to download a video from YouTube, Google Video, MetaCafe, Daily Motion, iFilm, etc
How to use BitTorrent
And if you don't want to read this whole page and want only summarized step-by-step instructions:
How to break iTunes DRM
How to rip and copy DVDs
How to download a video from YouTube, Google Video, MetaCafe, Daily Motion, iFilm, etc
How to use BitTorrent
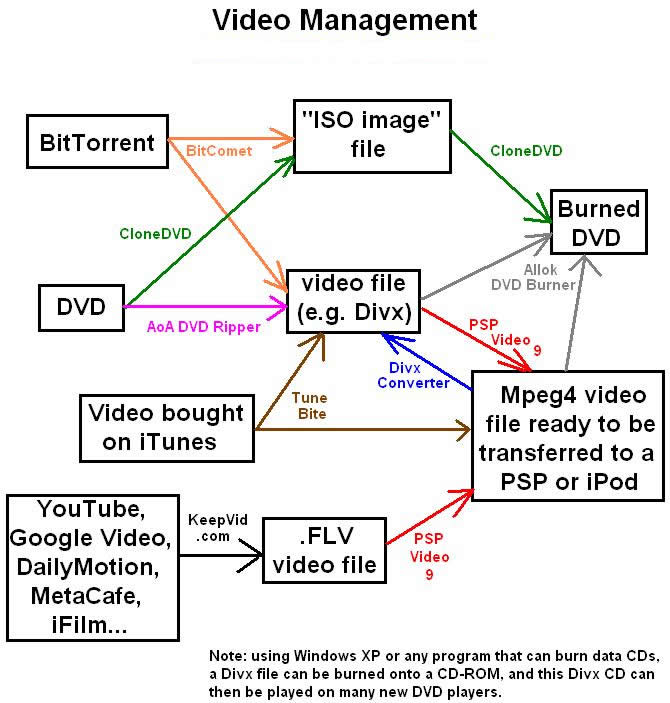
Helpful diagram about video management
|
iTunes
A lot of people complain about the DRM found on music bought at the iTunes Music Store. This is quite natural, since iTunes is by far the biggest supplier of music files, and the only legal place to buy files that play on iPods. iTunes only allows you to upload the files to a few iPods, burn them to a few CDs, and play them on a few computers. And you can only upload files to YOUR iPods; If someone else's iPod is set to play music from their account, the only way to put music from YOUR account into their iPod is to re-set that iPod to your account (which requires erasing all the music in it). And if you want to get music DOWN from an iPod, then this is basically impossible.
But at leasy Apple was kind enough to give us DRM that is easily broken (i.e. barely strong enough so that the major record labels would allow Apple to sell their music as downloadable files - Apple would use no DRM at all if the record companies let them, or so they say). You can burn your iTunes-purchased song to CD, then rip the CD. Yes, this wastes CDs, takes a while, and can only be done with about 20 songs at a time. You then have to find all the playlists that include each song, and replace each iTunes-purchased song by each CD-ripped song in each playlist. In other words, it's a big hassle. Plus, you lose sound quality: The CD is a lossless copy of the iTunes file (which is AAC-encoded), but once the CD track is encoded into MP3 (or back into AAC), it is compressed again, so quality is lost. Unless you import the CD as WAV files, which are way too big, and would reduce the number of songs your iPod can hold (and increase the hard disk space used by your song collection) by a factor of 10.
So, what to do?
Well, if you have a Mac, you have two other options, both of them also lossy. One is to put the iTunes-purchased song into an otherwise-empty iMovie movie, and then save it as an MP3. This has to be done one song at a time, although there are programs like FairGame that do it automatically for many songs (i.e. you tell the program what files to convert, and it converts all of them using the iMovie converting engine, instead of having you do it one at a time). It's not lossless (unless you save the files as .WAVs), and is (in my opinion) even bigger a hassle than burning and ripping CDs. (You still have to replace each iTunes-purchased song in all the playlists where it appears, etc). The other option is a free program called DrmDumpster. It burns your songs into CDs and then rips them... and if you have a re-writable CD in there (CD-RW), it then erases the CD and burns more songs and rips them, and erases the CD again and burns more songs and rips them, etc. So you don't have to sit there and baby-sit the computer and keep inserting new CDs - it burns all your purchased songs and rips them, using the same CD over and over, all by itself. Again, it's not lossless, but if you have a Mac, it's the best option.
What if you have a Windows computer? (I guess that can include Macs now). What if you want lossless conversion? Even better, what if you want a program that converts all your songs, and then looks through your library and replaces all playlist occurrences of each iTunes-purchased song it converted? That would be ideal. Lucky for us, that exists. Two programs out there do just that. (And they're free!)
One such program is QTFairUse. All you have to do is open it, adjust the settings if you want (To get lossless compression, set it to output AAC files instead of MP3s), pick a back-up folder (After it's done making non-DRM'ed versions of your iTunes-purchased files, it replaces those files in your library/playlists by the non-DRM'ed versions, and removes the DRM'ed files from your library folders... so where should it dump them?), and start the conversion. It will open up iTunes, use it to play the files (at up to 10x their speed, so it should take about 20 seconds per song), record the files' AAC stream as they play (i.e. the information that is encrypted by the DRM but that has to be decrypted by iTunes to play the files), and save a non-DRM'ed copy of each file. After all that, it will go through your library/playlists, replace each DRM'ed song with the corresponding non-DRM'ed copy it just made, and finally dump all the old DRM'ed files into the folder you specified. Nothing could be easier. Heck, you don't even need to INSTALL the program, just download the .zip file and open up the .exe inside it and the program runs! (Well, it does have a few minor problems: It sometimes refuses to convert certain files, and it sometimes creates files that are only 2 seconds long. If you have the latest version of this program and the right version of iTunes, though, that should not happen. You can read about this program's bugs, and how to solve all the problems you may encounter, here and here).
"FOR DUMMIES":
How to use QTFairUse to losslessly remove all the DRM from your iTunes collection
(and automatically substitute your old DRM'ed files by the new non-DRM'ed ones)
1) Go to hymn-project.org/forums/viewtopic.php?t=1553
2) Right-click on the link to hymn-project.org/download/QTFairUse6-2.5.zip
3) Choose "Save Target As" (Internet Explorer) or "Save Link As" (FireFox)
4) Specify the directory to which it will be saved. Say, your desktop, your C: drive, the "My Documents" folder, wherever. Click "Save".
5) Double-click on the .ZIP file that just appeared on your desktop (or wherever you saved it to). See all the little icons? Hit Ctrl+A and then Ctrl+C (this will highlight all the icons and copy them)
6) Go to your desktop. Right-click on empty space (on the background image). Hover your mouse over New, and click on Folder. Type QTFU and press Enter, then press Enter again. You are now in a new folder you created for QTFairUse.
7) Hit Ctrl+V. That will paste those icons from the .ZIP file into your new folder.
8) Double-click on the QTFairUse6 executable (its icon looks like a window, with a grey frame and a blue bar on top). The program will open.
9) If you wish, on the text field near bottom, specify which folder you want your old DRM'ed files to be dumped into after they are replaced by the new non-DRM'ed files this program creates. By default, the program will create a folder called "backups" inside the same folder where the QTFairUse6 executable file is (which, if you followed my instructions, is the QTFU folder on the desktop). The default is fine for now. (After the program runs, you can move the files from there to the backup directory/device of your choice, if you want).
10) Click "Start Conversion".
11) The program will ask you if you want it to create the backups folder. Click on "Yes".
12) The program will run. It will start iTunes, minimize it, convert your protected songs (about 20 seconds for each song), fix your library/playlists (substitute every appearance of each DRM'ed file in your playlists by its new non-DRM'ed equivalent), and dump the DRM'ed files in that backups folder. A window will pop up to say it "finished conversion", and you can press OK.
13) That's it, you can close the QTFairUse window. You can verify that all your DRM'ed songs are in the backups folder, and if you want, you can move them to the backup location of your choice (like burn a data CD, put them in an external hard drive, however it is you back up your files). You can verify that your purchased iTunes songs are now unprotected (go to itunes, click on "Purchased" on the left, and view the filetypes by right-clicking on "Name" at the top of your list of songs and then checking "Kind". All the files should have "AAC audio file" as their Kind. Files that have not been converted (i.e. files that you purchase from iTunes) have "Protected AAC audio file" as their Kind. (Files that have "Protected MMPEG-4 video file" as their Kind are videos purchased from iTunes. No, QTFairUse will not un-DRM those videos. You need TuneBite for that).
14) Next time you buy more music from the iTunes Music Store and want to un-DRM it, repeat steps 8-13 (or repeat all the steps, if for some reason you erased the QTFU folder or its contents after the conversion).
|
The other such program is MyFairTunes. Theoretically, it does exactly what QTFairUse does, as described in the previous paragraph. But I was never able to get it to work for me. I could get it to output nice perfect non-DRM'ed AAC files, but it did not put the old DRM'ed files into the folder I specified, and did not update my library/playlists. So I can't recommend it as enthusiastically. But some people love it, and apparently for some people it does all the stuff that QTFairUse did for me.
What about iTunes-purchased videos? I have not tried it, but I hear that the only way to break the DRM on videos you buy at the iTunes Music Store (such as movies, music videos, and TV shows) is to use TuneBite. When I have used it myself, I will write about it here, but there seems to be plenty of information online about it. Essentially, it "watches" the movies you bought (if your computer is slow, it will go slower than real time, to make sure it captures every frame and synchs the sound properly), and records them into a new file that is not DRM'ed. I presume you can change the settings so as to choose the format and properties (resolution, framerate, bitrate, compression algorithm) of the new file, but I won't know for sure until I try it.
And one last thing: What about downloading music from an iPod onto a computer? (This is something you're not supposed to be able to do, but many people keep their music collections in their iPods, not on their hard drives, which is understandable. And I guess not everyone is as disciplined about organizing and/or backing up their HD as I am). Well, I have never done this myself either, but I hear the following programs allow you to do it: ephPod, iLinkPod, iPodAgent, iGadget, PodWorks, SharePod, AnaPod, TuneTransfer, CopyPod, and PodUtil, among others. A search on Google for relevant keywords will bring up even more programs and tutorials for getting music off an iPod.
DVDs
DVDs are the OTHER major source of DRM in the world (besides iTunes). From the very start, all commercially-available DVDs ever made have been encrypted. To make a device that can play DVDs, you have to ask the DVD encryption people for a decryption key. To be given a decryption key, you have to promise that your device will make it very hard for the user to copy what is on the DVD by pretty much any means imaginable (and also that your device will only play DVDs that have a certain area encoding; American DVDs are Area 1, Latin American are Area 4, etc - each device can only play one area, or switch the area that it plays only a small number of times). So all DVD players "respect" DVD encryption and do not give you access to the DVD files or even to the digital video they stream out (and do not play DVDs from foreign areas). The only "straightforward" way to copy DVD video is to plug your DVD player into a VCR (or computer video card or some other device that captures the analog signal the DVD player sends to the monitor/TV) - i.e. record what comes out of the "analog hole".
That's why ripping a DVD into files you can enjoy on your computer is not as easy as ripping a CD. Or at least, it didn't USE to be this easy...
Well, in comes this Norwegian dude who figures out how to crack DVD encryption. He writes a short little program that allows any computer to have access to the files in the DVD, and he distributed the code online. The code even gets put on t-shirts. More importantly, it becomes part of several programs that make ripping/copying a DVD about as easy as ripping/copying a CD. In order to be able to rip a DVD (i.e. make a movie file on your computer of the movie that's in the DVD, or copy all the files in the DVD to your computer so that you can make a copy of the DVD), you must have one of these programs running in the background. These programs make your DVD drive think that the DVD is not encrypted, and so they treat it just like any other disc full of data: folders with files inside that you can copy out into your computer.
(Now, to actually copy the movie out of the DVD, and to make copy DVDs, you're going to need OTHER programs. But for now let's start with the decrypters).
There are two programs out there that are by far the best choice. One is DVD Decrypter. It's free and you can download it here or here or here or (I think) here.
The other is SlySoft's AnyDVD. It's not free (although you can use it for 21 days before paying). Since it's developed by a professional team of programmers in a software company in Germany, it's more reliable and is constantly being updated. If you write the company with questions or complaints, they will write you back and help you. In other words, it's a real commercial product, not a bunch of code some hackers slapped together and set free on the internet so that other hackers could modify it. Definitely worth the 30 dollars if you ask me.
I could give you step-by-step instructions on how to use these programs, but they're dead simple. Just download one, install it, and it just runs in the background (and make syour DVD drive behave a little differently). That's it.
Ok, now your computer can access the files on the DVD. So now what do you do?
There are two things you can do. One is to create a movie file that you can watch on your computer, iPod, PSP, etc - such as a DivX file, .mov file, Mpeg-4 file, .AVI file, etc. There are lots of programs out there that do this. My personal favorite (again, not free but well worth the 20 bucks) is AoA DVD Ripper. It can rip any section of the movie (in case you just want to record a certain clip) or the whole movie, and you have the option to add subitles, director's commentary, foreign-language dubbing, or any of these things included in the DVD. You can make files in any format; Mpeg4 (which plays in the iPod and PSP), DivX (which looks very very good (almost as good as the DVD) but allows for very small files - Fits a 2-hour movie in a 700-meg CD-ROM), Windows Media Player Video, etc.
When creating a video file, what format should you use? The default format of AoA DVD Ripper (and other programs) is Mpeg4 (MP4), which can be played on iPods and PlayStation-Portables, as well as by iTunes and Quicktime. But for the sake of watching the movie on your computer or burning it to a CD that can be played on your DVD player, you're better off encoding it into a Divx AVI file instead of Mpeg4. I highly recommend that you download the Divx codec. This will allow AoA DVD Ripper (or other programs) to create a movie file that looks almost as good as the original DVD video, but that is only about 700 megs (0.7 Gigs, compared to a DVD's usual 9.4 Gigs) so that it can fit into one CD. Many DVD players today will play Divx video files, so even if you don't have a DVD burner, you can have AoA DVD Ripper (or some other program) make you a Divx video file that you then burn onto a data CD and watch on your DVD player! I think this is really awesome. But to do this you must download and install the Divx codec. Once you do, most DVD-ripping programs will be able to make Divx video files, or you can use the Divx converter (included in the Divx installer)to convert video files into the Divx format. Divx files tend to end in.AVI and are playable on Windows Media Player if you have the Divx codec installed.
The other thing you could do (instead of making a video file) is copy the whole DVD - menus and special features and all - into a recordable DVD. (Naturally, you need a DVD burner for this). You can then watch in on the DVD player that plays on your TV, which is nicer than watching it on a computer. But there's a problem: Most commercially available DVDs are dual-layer, so they fit 9.4 Gigabytes of data, while most recordable DVDs are only single-layer and fit 4.7 Gigs. So you need a program that can re-compress ("shrink") the DVD video files' total size from 9.4 Gigs to 4.7 Gigs (which can be done with minimal loss in quality - you don't really notice it). This program must also be able to create an "image" of the DVD: A file that contains the data structure of the disc, so that it can be reproduced onto a new disc. This is called an .ISO image, or an .ISO file. And finally, once you have that image file, you need a program to burn the .ISO image onto a blank DVD.
What programs can be used to make a compressed image of your DVD? There are two good ones I have found: DVD Shrink, which is free, and SlySoft's CloneDVD, which is not free (but you can use it for 21 days for free). Just put a DVD in the drive, fire up one of these programs, and with the push of one button, they'll read the DVD, re-compress the video, and output a nice 4.7 Gig .ISO image file. (To be honest, the reason why I prefer the paid one to the free ones is that DVD Shrink just refused to work on my computer, but the SlySoft one worked very well. Free rippers like RipIt4Me and DVD Fab Decrypter still rely on DVD Shrink to get the DVD image file down to a size where it can fit in a 4.7 Gig recordable DVD). Remember that these programs won't work unless you have a decrypter (DVD Decrypter or SlySoft AnyDVD) running in the background - except for RipIt4Me, that one actually rips without needing a decrypter running in the background. All these programs allow you to play with the settings so as to remove special features, menus, deleted scenes, subtitles, previews, or any other content you don't really care for. But in general I find that the default settings (just copying everything in the DVD) work best.
Say you've used DVD Shrink, RipIt4Me, or CloneDVD, so now you have an .ISO image file that is small enough to burn on a DVD (typically that's 4.7 Gigs or less). How to burn it to a DVD? If you have CloneDVD, it will do it for you, with the push of one button. Very easy, works well. But it costs money. The popular free alternative is called ImgBurn and can be downloaded here. It actually works very well.
That's it. You now know how to rip the movie from a DVD (or just part of it) into a file you can watch on your computer and on your portable device. You also know how to copy a whole DVD (menus and special features and all) into another DVD that can then be watched on a DVD player. What more could you want?
"FOR DUMMIES": Specific instructions on how to rip and copy DVDs
PART A: INSTALLING A DVD DECRYPTER
so that your computer can have access to the encrypted files on a DVD
0) You can skip Part A if you already have DVD Decrypter, SlySoft AnyDVD, or another such program installed on your computer. These instructions will be for installing SlySoft AnyDVD. If you do not have one of these programs installed on your computer, then Part B and Part C won't work.
1) Go to www.slysoft.com/en/download.html
2) To the right of the AnyDVD logo, click "Download", which is a link to static.slysoft.com/SetupAnyDVD.exe
3) Save that .exe file somewhere on your hard drive, such as in your C: drive, your desktop, the "My Documents" folder, wherever.
4) In Windows, navigate over to where you saved the "SetupAnyDVD" file, so that you can see the icon. Double click on it.
5) Click "I agree", "Next", and "Install". The program will be installed.
6) Reboot your computer when the program tells you to.
7) That's it. When your computer turns back on, AnyDVD will be running in the background, and your DVD drive will ignore the encryption on any DVD you stick into it, thus allowing you to rip and copy DVDs as easily as CDs.
8) When your computer turns back on, a pop-up window will remind you that you can only use AnyDVD for 21 days before you have to pay for it. Just click "continue" and get rid of the window, or press "Order" to pay.
PART B: RIPPING A DVD INTO A VIDEO FILE
to be watched in your computer or in a portable device like an iPod or PSP
0) There are many programs that do this. My favorite is AoA DVD Ripper, so that's the program these instructions will cover. It can only be used three times before you have to pay for it. Unfortunately, unlike the software described in parts A, C, and D, this one does not have good free alternatives.
1) Go to www.aoamedia.com/download.htm
2) Click the "Download Now" to the right of AoA DVD Ripper (top row), which is a link to www.x-kit.com/download/dvdripper.exe
3) Save that .exe file somewhere on your hard drive, such as in your C: drive, your desktop, the "My Documents" folder, wherever.
4) In Windows, navigate over to where you saved the "DvdRipper" file, so that you can see the icon. Double click on it.
5) Click "Next", "I accept the agreement", "Next", "Next", "Next", "Next", and "Install". The program will install. Click on "Finish" when it's installed.
6) The program will start up. (If it doesn't, then double-click on the "AoA DVD Ripper" icon that just appeared on your desktop).
7) Get the DVD you want to rip, and put it into your computer's DVD drive.
8) On AoA DVD Ripper, Click on "+ Load DVD" and "Import From DVD Disk"
9) Under "My Computer" in the window that pops up, click on your DVD drive (it should have the DVD title by the icon), and click OK.
10) (optional - if you don't want to rip the whole video, just one clip): Under "Copy Mode" on the left side, click "Movie Clip". Choose at what time into the video you want the recording to start, and at what time you want it to stop. Click "OK".
11) (optional - if you want to watch the video on a PSP): By default, AoA DVD Ripper will rip the video into an iPod-friendly Mpeg4 (MP4) video, which can be played on QuickTime and iTunes. If you want to get a video file that can be viewed on a PSP, first use AoA DVD Ripper to create a video file in any format, and then follow these instructions (i.e. use PSP Video 9 to convert the file created by AoA DVD Ripper into a file that can be played on a PSP).
12) (optional - if the video will be watched by hearing-impaired viewers or by foreigners): By default, AoA DVD Ripper will rip the video using the english audio track and no subtitles. If your DVD has a foreign-language-dubbed audio-track option or a director's-commentary audio-track option, you can select one of those (if you want) under "Audio Track". If you want your movie to have subtitles (they might make it easier to understand for hearing-impaired viewers or non-native English speakers, but the subtitles are a tad intrusive), choose from the subtitle options under "Subtitle", if your DVD has that option.
13) (optional - if you want to be able to make Divx video files from your DVD, and you should): If you don't have Divx installed on your computer, download this file (right click and "Save Target As" on Internet Explorer or "Save Link As" on FireFox), double-click on it once it is downloaded, Click "OK", "Next", "I accept the terms of the license agreement", "Next", "I accept the terms of the license agreement", "Next", un-check "Divx Player" and "Divx Web Player" and "Divx Content Uploader" (leaving only "Divx Codec" and "Divx Converter"), "Next", "Next", "Cancel", and "Yes". You now have Divx installed on your computer! Feel free to delete the "Divx converter" and "Divx Movies" icons that appear on your desktop. Divx can be run as part of other programs (like Windows Media Player and AoA DVD Ripper), you never need to run it by itself.
14) (optional - if you want to make a Divx video file from your DVD): To rip your DVD into a Divx video file (you must have done step 13 for this to work): on AoA DVD Ripper, click on "Settings" (by the light bulb near the top), click on the "AVI" tab, and under "Avi Video Codec" change it to "Divx 6.5 Codec". (For maximum quality, click on "Configure", drag the slider from "Speed" towards "Quality", and click "OK"). Click OK. Under "Convert To", change it to "AVI / Divx / Xvid".
15) (optional - if you would like to create the video file somewhere other than on your "My Documents" folder): Click on the round dark-blue icon with the folder in it, on the lower right. Choose what folder you want the video file to be saved into. Click "OK".
16) Click "Start", or the button that looks like a circle with the lightning bolt through it. And off it goes!
17) Next time you want to rip a DVD into a video file, just repeat steps 6-10, 12, 14, and 16.
PART C: COPYING A DVD
making a disc that has menus, special features, subtitle options, etc, and that can be played on any DVD player
0.a) If you already have the .ISO file (say, from BitTorrent, or from having previously performed steps 1-12), skip to step 13)
0.b) Theoretically, these tasks could be accomplished with DVD Fab Decrypter, DVD Shrink, RipIt4Me, or ImgBurn, all of which are free. But since I was never able to get DVD Shrink to work on my computer, and since CloneDVD is easier to use anyways, I'll give instructions for how to use CloneDVD. If you already have CloneDVD installed on your computer, skip to step 6. And you must do part A of these instructions (see above), otherwise part C will not work.
1) Go to www.slysoft.com/en/download.html
2) To the right of the CloneDVD logo, click "Download", which is a link to static.slysoft.com/SetupCloneDVD.exe
3) Save that .exe file somewhere on your hard drive, such as in your C: drive, your desktop, the "My Documents" folder, wherever.
4) In Windows, navigate over to where you saved the "SetupCloneDVD" file, so that you can see the icon. Double click on it.
5) Click "I Agree", "Next", "Install", wait for it to install, and click on "Close". A window will pop up to tell you you can use this software for 21 days before paying. Click "Continue". (Or click "Order" to pay).
6) Insert the DVD into your computer's DVD drive.
7) Double-click on the "CloneDVD2" icon on your desktop. It's an orange circle with a sunglass-wearing sheep in the middle. If you haven't paid for the software, a window will pop up to tell you you can use this software for 21 days before paying. Click "Continue". (Or click "Order" to pay).
8) Click "Clone DVD", the middle button on the right side.
9) At the top right, click the downwards-arrow button that's just to the left of the recycling symbol. Click on "Browse". A window will pop up. Under "My Computer", click on your DVD drive (it should have the title of the DVD next to a disc icon). Click on "Video_TS". Click "OK".
10) Click "Next". Wait for the "Scanning" to complete, and click "Next" again.
11) Near the top right, click "ISO/UDF Image" as the output method. Under that and on the right, click on the little recycling icon to find what folder you would like to put the ISO file, which is the file that contains all the information on the DVD. It will be a 4.7 Gig file, so make sure you have room! I myself just put it on my desktop for now and move it later. So, after clicking the recycling icon just click on the Desktop icon on the left of the window that pops up, type the name of the file into the "File name" field, and click on "Save".
12) Click "Go". And that's it. In an hour or so, you'll have an ISO file that contains all the information on the DVD. You will then use CloneDVD to burn that file into a blank DVD!
13) If CloneDVD is already running (like from having just created an ISO file as described in steps 7-12), click on "Restart" on the lower left. If not, then double-click on the "CloneDVD2" icon on your desktop. It's an orange circle with a sunglass-wearing sheep in the middle. If you haven't paid for the software, a window will pop up to tell you you can use this software for 21 days before paying. Click "Continue". (Or click "Order" to pay).
14) Click on "Write existing data", on the lower right.
15) On the left, click on "ISO/UDF Image".
16) Just below that, click on the little recycling icon. On the window that pops up, find the ISO file you want to burn to DVD, and double-click on it.
17) On the right, by "Volume Label", write what you would like the name of the disk to be. Make it short. Only use letters, numbers, and underscores.
18) Click "Go". And that's it! In an hour or so, you will have a DVD you can play in your DVD player, made from that ISO file.
PART D: BURNING A VIDEO FILE TO A DVD
i.e. Taking a digital video file, such as one downloaded from the internet (BitTorrent, YouTube, Google Video, Ted Talks, Red vs Blue, etc), or ripped from a DVD, or shot with a digital camera, and burning that file to a DVD that can be played on any DVD player. This does not involve breaking DRM but is useful and fits in with the rest of these tutorials.
0) There are lots of programs that do this. My personal favorite is Allok DVD Burner. So I will give instructions for that one. Another one I highly recommend is DvdFlick; It can burn an FLV file (and other kinds of video files too) to DVD, and it's free! (Allok DVD burner can only be used for free 3 times). So I do recommend you check out DvdFlick before following my instructions. If it works for you, then you don't need to follow my instructions, and you save some money since the program I use costs money. Unfortunately, I paid for Allok before I heard of DvdFlick. Oh well :(
1) Go to AllokSoft.com/video_to_dvd_burner.htm and click on the grey "Download" button (to the right of the "Screenshot" button), which goes to AllokSoft.com/allok_dvdburner.exe
2) Save that .exe file somewhere on your hard drive, such as in your C: drive, your desktop, the "My Documents" folder, wherever.
3) In Windows, navigate over to where you saved the "allok_dvdburner" file, so that you can see the icon. Double click on it.
4) Click "Next", "I accept the agreement", "Next", "Next", "Next", "Next", "Install", wait for it to install, and click on "Finish".
5) Allok should start. If it doesn't, then double-click on the icon that appeared on your desktop (a golden disk)
6) Click on "Add Files" on the top left. In the window that popped up, browse until you find the video file you want to burn. Click "Open".
7) Repeat step 6 if you want to burn more than one video file into one DVD disc.
8) Click "Settings" by the tools icon at the top. Under "Video Settings"/"Output Quality", change the quality until the time in minutes is as small as it can be while still fitting your videos. This will ensure that the videos are burned into the DVD in as high quality as possible. The highest-quality settings fits 2 hours or less. The lowest-quality setting fits 7 hours! Click "Save".
9) Notice that, on the bottom of the window, there is a ruler with a blue bar and a small red line. The blue bar is the total length of the videos you want to burn. The red line is the maximum time you can take before you have to turn the quality down one notch to allow for more video. If the blue bar goes beyond the red line, repeat step 8 and give your DVD more minutes of video.
10) Click "Start" up at the top near the left.
11) That's it! Now wait for the DVD to burn. When it's done, pop it into your DVD player, and enjoy! Next time you want to burn a video file to DVD, just repeat steps 5-10.
|
For more information with dealing with DVDs and video files:
CD Freak forums, AfterDawn guides, AfterDawn forums
And if you want to be able to do this all using free software (rather than SlySoft products), then try DVD Decrypter for decrypting the DVD (so its .ISO image file can be copied), RipIt4Me or DVD Fab Decrypter (to copy the DVD's .ISO image file to your hard drive), DVD Shrink (for turning that 9.4 Gig dual-layer DVD image file into a 4.7 Gig image file you can burn onto a 4.7 Gig recordable DVD), and ImgBurn (to actually burn the DVD .ISO image file into a recordable DVD disc so you can watch it on your DVD player). And to burn video files (from YouTube, from your digital camera, from BitTorrent, recorded from a DVD, etc) into a DVD you can watch on your DVD player, the free recommendation is DvdFlick.
|
Other DRM
Those are the two big sources of DRM in most of our lives: iTunes and DVDs. What about OTHER sources? Well, for me to write about breaking other DRM (such as the Microsoft DRM found in (supposedly) subspription-only (pay-per-month) music from Yahoo Music or Napster, or in movies purchased from Google Video or from Amazon.com Unbox or from WalMart's movie download service), I would have to do a LOT more research (the research on this page, I did for myself, not for the sake of writing a webpage), and would have to write a lot more, and this would help maybe 5% more people (since almost everyone buys their music from iTunes and their movies on DVD). So if you want to learn how to break the DRM from other sources, then sorry, I can't really help you. Some well-worded Google searches probably could reveal much more than I could.
But while I'm writing about how to use all these methods of working with video and audio, I should probably take the time to explain two other ways of acquiring media. These two techniques are simple, can be used for legal purposes, and give you access to a VAST library of media. One is downloading files from BitTorrent, the other is downloading videos from YouTube, Google Video, MetaCafe, DailyMotion, and other sites that show flash-based videos. Yes, you can download the videos you see on YouTube! (including just about every music video ever made...).
If you have bought some media and are having trouble un-DRMing it, then downloading a non-DRM version from BitTorrent (or, if possible, from YouTube, etc) might not be a bad idea. And yes, it's legal, if you legitimately bought the media in some other form.
Downloading Videos From YouTube, Google Video, DailyMotion, MetaCafe, iFilm, etc
Here's how you can download a video from one of those popular video sites. It surprises me that so many people don't know you can download videos from those sites onto your hard drive, watch them on your iPod, etc. And there are so many videos on those sites! YouTube has just about every music video ever made, Google Video has tons of full-length documentaries, and DailyMotion has a lot of great TV, for example.
Step one is to go to the page ON THAT SITE where the video is displayed. If you see a page on some random website with a YouTube video on it, you need to go to the YOUTUBE page that shows that video. This can usually be accomplished by clicking on the video itself. Not on the big "Play" button (sideways triangle) in the middle, and not in the little buttons (Play, Pause, etc) or the slider along the bottom, but anywhere on the rest of the video. If the video is playing, clicking right on the image will do it. (Except for Google Video. If you see a Google Video video on someone's website, to go to the Google Video page you have to press the "Google Video" button on the lower right, and then click on "Go to Google Video"). So if someone embeds a YouTube video on their blog, you usually need to click on the video (not on the buttons along the bottom, and not on the "Play" button in the middle of the video, but anywhere else, on the video itself) in order to go to the YOUTUBE page that shows that video.
For example, try getting to the YouTube page that shows this video, the Google Video page that shows this video, and/or the DailyMotion page that shows this video. Remember, for Google Video, click on the "Google Video" icon button on the lower right, then on "Go To Google Video". For the others, just click anywhere on the image of the video (just not on the buttons).
Once you're on the page that shows the video ON THE SITE that the video is hosted by (YouTube, Google Video, etc), on your browser's address bar, you see a URL (address). For YouTube, the address you're looking for is something like
"http://www.youtube.com/watch?v=(random letters, numbers, and symbols)"
e.g. http://www.youtube.com/watch?v=Ldxg87pDlI8
For Google Video, it's something like
"http://video.google.com/videoplay?docid=(long number, possibly starting with a dash)"
e.g. http://video.google.com/videoplay?docid=-2456134362500154297
For MetaCafe, it's something like
"http://www.metacafe.com/watch/(number)/video_title/"
e.g. http://www.metacafe.com/watch/328891/the_best_clip_of_fighter_jet_ever/
For Daily Motion, it's something like
"http://www.dailymotion.com/video/(random letters and numbers)_title-of-video"
e.g. http://www.dailymotion.com/visited/search/accord/video/x1wjn_pub-honda-accord
For iFilm, it's something like
"http://www.ifilm.com/video/(numbers)"
e.g. http://www.ifilm.com/video/2811296
Highlight that URL with your mouse (click at one end and drag the mouse to the other end so that the URL is in white with a black background), and copy it (Ctrl + C on Windows computers). Go to KeepVid.com and paste (Ctrl + V) the URL into the long text field near the top. Press the "Download" button to the right of the field where you pasted the URL. Wait a couple of seconds, and a box will appear below that text field, that says "Download" in a grey bar. Below that grey bar there wil be a bold grey ">>Download Link<<" link. Right click on that link, and choose "Save Target As" (Internet Explorer) or "Save Link As" (FireFox). Choose what folder you want to download the video to, but don't press "Save" yet! The name of the file will show up as "get_video" or "videodownload" or something like that. Change the name to something.FLV - the "something" can include spaces, dashes, underscores, etc (e.g. Mythbusters - Season 2, Episode 9.FLV), but it's very important that the filename end with "dot FLV". Now you can click "Save".
The video will download to your hard drive! (To whatever folder you specified). That could take a couple minutes.
But that file probably won't open when you go and double-click on it. That's because it's an .FLV file. You need an FLV player in order to be able to watch it. You can download a good one for free here.
Once you have downloaded and installed this FLV-player program, just use Windows to go over to that .FLV file you downloaded, right-click on it, and hover your mouse cursor over "Open with", and choose "Choose program...". Check the "Always use the selected program to open this kind of file" box. Now, on tha list, find flvplayer (to its left is a shiny blue square icon with white diagonal dashes in the middle of it), and double-click on it. Now you can watch your video. And any time that you double-click on an FLV file in the future, the FLV player program will allow you to watch it.
What if you want to add this video to your iTunes library, play it on your iPod, or play it on your PSP? You then need to convert it to Mpeg4 format. To do this, I highly recommend PSP Video 9, a great free program that converts video so that it plays on the PSP (but the video files it outputs will also play on iPods and other devices). PSP Video 9 has pretty good instructions, and plenty of information online. It will convert FLV videos (and pretty much any other kind of video file) into Mpeg 4 easily. You just have to download and install PSP Video 9, run it, click on "Convert" near the top left, click on the "One-Click Transcode" button, find your FLV file in the folder, and double-click on it. Transcoding will start. By default, the file will be placed in C:\Program Files\pspvideo9\MP_ROOT\100MNV01 and will be called something like M4V10001.mp4. You can view it with Quicktime. If you want, just copy that file into whatever folder you want to, and feel free to rename it (unless you want to play it in your PSP, in which case you should NOT rename it). Notice that, along with M4V10001.mp4 (or whatever), PSP Video 9 also created a file called M4V10001.THM.
To play your video in your PSP, there must be a folder in the root directory of your Memory Stick called MP_ROOT, and inside it there must be a folder called 100MNV01. Place the video file (M4V10001.mp4) as well as the other file (M4V10001.THM) into that folder in the Memory Stick. When the PSP looks at that memory stick, it should be able to play the video.
To play the video in your iPod, copy the video file to the "iTunes music" folder in the "iTunes" folder in the "My Music" folder in "My Documents". Then rename it to something more useful than "M4V10001". Then right click on it, choose "Open With / Choose Program...", and double click on "iTunes". (Or drag the file onto the iTunes desktop icon if you have one. Or, open up iTunes and drag the file into the iTunes window once iTunes is open. Or open iTunes, press Ctrl + O, find the file, click on it, and press "Open"). The file is now in iTunes and can be moved into your iPod just like a music file.
"FOR DUMMIES":
How to download, view, and convert videos from YouTube, Google Video, etc
PART A: DOWNLOAD THE VIDEO
1) Go to a page that has a video from one of these services (YouTube, Google Video, MetaCafe, DailyMotion, etc) embedded on it. For example, try going to
a) A page with a Mythbusters episode (DailyMotion movie) embedded in it
b) A page with the "Best of Borat" compilation (Google Video) embedded in it
c) A page with some funny in-cockpit video footage of the Thunderbirds practicing in their F-16s (YouTube video)
2) Click on the video's image. Do not click on the play button that is right in the middle, and do not click on the buttons along the bottom (play, pause, etc), but click anywhere else. (Or, if it's a Google Video video, click on the "Google Video" icon on the lower right, and then on "Go to Google Video"). That should take you to a page on the site where the video is hosted:
a) Page on DailyMotion.com that shows that Mythbusters episode
b) Page on Video.Google.com that shows that Borat com
c) Page on YouTube that shows that Thunderbirds in-cockpit video
|
| |
3) See the URL (address) at the top of that page? If you went to the pages I linked to above, they should be
a) http://www.dailymotion.com/video/xk0c5_mythbusters-1x10
b) http://video.google.com/videoplay?docid=-2317213640248588776
c) http://www.youtube.com/watch?v=vfNrD0sBzUw
Highlight the address, or URL (click on one end of the URL and drag your mouse to the other end) that you see in your browser's Address Bar at the top of the page where the video is (the URL that starts with http://www.dailymotion.com, http://www.youtube.com/, or http://video.google.com/ - pick one), and press Ctrl+C (i.e. "Copy").
4) Go to KeepVid.com
5) Click once in the text field (long thin white rectangle) inside the green box near the top of the page)
6) Press Ctrl+V. That should make the URL of that page (the URL that starts with http://www.dailymotion.com, http://www.youtube.com/, or http://video.google.com/) appear in that text field.
7) Click the "Download" button (it's darker green, and to the right of that text field where you pasted the URL).
8) A box appears that says "Download" in a grey bar. Below that grey bar there wil be a bold grey ">>Download Link<<" link. Right click on that link, and choose "Save Target As" (Internet Explorer) or "Save Link As" (FireFox).
9) Specify where in your computer you want to put that video (the "My Videos" folder inside "My Documents" might be a good place, or just your desktop). Change the "File Name" to something.FLV, like for example
Best of Borat.flv
or
Thunderbirds - Pilot flips, stuff falls up.flv
and click on "Save".
10) That's it! The video will be downloaded to your hard drive.
PART B: WATCH THE VIDEO
0) If you already have an FLV player installed on your computer, skip to step 6
1) Go to www.martijndevisser.com/blog/article/flv-player-updated
2) Follow the links to download FLV player, which eventually lead here.
3) Click on Save File. Save it somewhere on your computer (like your desktop, your C drive, My Documents, wherever).
4) When the download is finished, use your windows to navigate your way until you can see the "download-flvplayer_setup" file's icon. Double-click on it.
5) Click on "Next", "Install", wait for it to install, and click on "Close"
6) If you now double-click on one of the .FLV files you downloaded from YouTube or Google Video or wherever, this should cause FLV Player to start up and play your file, automatically! If it does not:
7) Right-click on one of the .FLV files. Hover your mouse cursor over "Open With..." and click on "Choose Program". On the window that pops up, check the "Always use the selected program to open this kind of file", click on "flvplayer", and click on "OK". That should be it.
PART C: CONVERT TO iPOD / PSP
0) If you already have PSP Video 9 installed on your computer, skip to step 5.
1) Go to pspvideo9.com/Download - A window will pop up asking if you want to save a file.
2) Click on "Save File". Save it somewhere on your computer (like your desktop, your C drive, My Documents, wherever).
3) When the download is finished, use your windows to navigate your way until you can see the "pspVideo9_Install" file's icon. Double-click on it.
4) Click "OK", "Next", "I agree", un-check "Launch on Startup", click "Next", and "Install". It will install. Click "Finish" when it's done.
5) Start PSP Video 9. (A PSP icon is probably on your desktop. Double-click on it.)
6) A large window will pop up. If a small window pops up as well: Click "Manually Specify PSP Directory", choose "C:\MP_ROOT\100MNV01", click Done.
7) On the top left of the larger window, click "Setup".
8) Change the "One-Click Profile" to "SP/320x240/29.97fps/768kbps Stereo/128kbps" which will allow about one minute of video per six megs of memory stick (a little under three hours per gigabyte of memory stick), or, for slightly higher quality, "SP/320x240/29.97fps/768kbps Stereo/128kbps", which will take up twice the space (about an hour and a half of video per gigabyte of memory stick). Click "Save", on the lower right.
9) On the top left of the larger window, click "Convert".
8) Click "One-Click Transcode"
9) In the window that pops up, find a video to convert, be it an .FLV file, a Divx video, whatever. When you find it, double-click on it, and it will start being converted. PSP Video 9 will create an MP4 version of that video in C:\MP_ROOT\100MNV01
10) If you want to add more videos to the queue, click on "Transcode New Video" and repeat step 9. This new video will start being converted as soon as the previous video is done. During your first time, though, let's just convert one single video. When it's done, close PSP Video 9.
11) To put the video into your iTunes Library so it can go in an iPod: Go to C:\Program Files\pspvideo9MP_ROOT\100MNV01 and click once on the video file (the video file will be called something like M4V12345.MP4). Press Ctrl+C to copy the file. Now go to My Documents, My Music, iTunes, iTunes Music. You should be looking at a bunch of folders with musicians' names on them - your iTunes library. Now press Ctrl+V to paste a copy of the video file that PSP Video 9 made. Rename it something more useful. Now right-click on it, hover your mouse cursor over "Open With" and click on "Choose Program...". Double-click on iTunes. iTunes will open and play the video. Now that video is in your iTunes library. Deal with it like you would any file in iTunes: Put it in playlists, drag it into your iPod, etc.
12) To put the video into a Memory Stick so that you can watch it on your PSP: Plug your memory stick into your computer (via a card reader, special slot, or by plugging the PSP via its USB cable). In your memory stick, create a folder called MP_ROOT (make it in the root directory, i.e. not inside another folder). Inside this MP_ROOT folder, make a 100MNV01 folder. Now, go to C:\Program Files\pspvideo9MP_ROOT\100MNV01 which is where PSP Video 9 has created two files for each converted video. One is the video file - say, M4V12345.MP4 - and the other is M4V12345.THM (same thing but ends in THM). Copy those two files into the 100MNV01 folder in your memory stick. Now if you turn yout PSP on and go to Video and to Memory Stick, it should see the video. The name of the video (as shown on the PSP, not the weird M4V12345 filename) will be the name of the file that you converted (e.g. the name of the .FLV file or Divx that PSP Video 9 used to make this Mpeg4 video file).
|
Using BitTorrent
Believe it or not, some people still believe that using BitTorrent is "too complicated". Here I will explain, in simple language and straightforward steps, how to use BitTorrent. (And remember, downloading media on BitTorrent is illegal, unless you have purchased the media in some other format or will be using the media in some way that is considered "fair use", such as using a small excerpt for non-commercial purposes in such a way that does not detract from the market of the product).
The program that downloads files from BitTorrent is referred to as a BitTorrent client. So, if you want to use BitTorrent, you need to install a BitTorrent client (i.e. program) on your computer. The most popular are BitTorrent (the original and "official" client, available for many operating systems), Transmission (which is for Mac OS X), ABC, Azureus, BitComet, BitTornado, and muTorrent.
The first step is to install one of these programs. I personally like BitComet. It's very easy to use and very fast. It does hog system resources (makes your computer run real slow), and a bug in a previous version (0.60) got it banned from many trackers (servers that connect BitTorrent users with the files they seek), but it downloads stuff really fast and, again, is dead-simple to use. So just download this file and run it to install the client (i.e. the program).
Good, you have now installed a BitTorrent client on your computer!
Ok, so how do you tell it to find and download a file for you? Most of these clients do not have search boxes in them the way Limewire and Napster did. What you need to do it open a Torrent file (referred to simply as "a Torrent") with the program, so that the program can find what you're looking for. A Torrent is a link to a certain file you can download. For example, a few different people have probably made video files out of, say, "Revenge of the Sith". Each time someone puts their version of "Revenge of the Sith" online for BitTorrent users to download, a new Torrent is created that links to that specific version of the movie. Get your hands on a Torrent, and your BitTorrent client will then be able to use it to download the version of "Revenge of the Sith" that corresponds to that Torrent.
So how do you get the Torrent? Well, typically, you go to Torrent search engines, which are basically huge databases of Torrents. They are not illegal since they only collect Torrents, which are LINKS to movies and songs and so on, rather than collecting the movies and songs themselves. Popular examples include MiniNova, ISO Hunt, TorrentSpy, and the infamous Pirate Bay. I'm personally a big fan of MiniNova. The Pirate Bay supposedly has more stuff but their search can be buggy sometimes (and, y'know, they occasionally have their computers confiscated by the police and whatnot).
You may also find torrents that can be downloaded from websites (like this great catalogue of TV-show torrents), you can receive a torrent as an email attachment, etc. For example, here is a Torrent for a popular (i.e. lots of Seeds, so it will download quickly and completely) and good-quality version of the excellent documentary Who Killed The Electric Car. You can right-click the link that takes you to the torrent file (here it is again), and "Save Target As" (Internet Explorer) or "Save Link As" (FireFox). Then just open the file with your BitTorrent client (just double-click on the file's icon) and it will ask you if you want to download the movie. Note: Once you download the video file that this torrent points to, you'll need to install the Xvid codec in order to be able to play that video file on your media players such as Windows Media Player. Many video files you'll find on BitTorrent are encoded in Xvid, as it allows for great video quality despite the small file size: An Xvid file is usually around 700 megs (0.7 Gigs) but looks almost as good as a DVD, which is usually around 9.4 Gigs. So install the Xvid codec, you only have to do it once, and from then on Windows Media Player will be able to play the Xvid video files you get on BitTorrent. One other codec you'll encounter often on BitTorrent, since it too allows for near-DVD-quality 700-meg files, is Divx, so install Divx too while you're at it. One thing that is particularly cool about video files that use the Divx codec (other than the fact that they look almost as good as a DVD but only take up 700 megs instead of 9.4 Gigs) is that many DVD players today will play Divx video files. This means that even if you don't have a DVD burner, you can take a Divx video file and burn onto a data CD (using Windows XP or whatever) and watch on your DVD player (which is nicer than watching it on your computer). I think this is really really awesome.
So say you go to one of those sites and search for, I dunno, The Empire Strikes Back. Many of those sites allow you to check a box so that only video Torrents will be searched (that way you do not get the novel or the soundtrack among your results). Your results page will look like this.
To the right you see a number of Seeds and Leechers for each Torrent. A "Seed" is a user who has the whole file and is sharing it. A "Leecher" is someone who, like you, is in the process of downloading the file. So you want to pick a version of the file that has lots of Seeds and Leechers, so that the download is faster and more certain to be successful. (One interesting note is that BitTorrent can see which parts of the file are most "rare" - i.e. which parts of the file have been downloaded by the fewest Leechers - and make sure those parts get uploaded from the Seeds right away, that way the Leechers will have more of the file between them). I usually click on the "Seeds" at the top of that column, so that the search results are arranged with the files with the most Seeds on top. The link at the end of the previous paragraph leads to a page where that was done. Also, most BitTorrent search sites allow you to browse their entire index of torrent files, organizing them alphabetically, by date, by type, or by number of Seeds, so you can see what files have the most Seeds (and thus download faster, and are probably pretty good). For example, to see what movie torrents on BitTorrent currently have the most seeds, click here or here.
Of course, you should also choose based on the size (do you want a 4-Gig DVD image file or a 700-Meg Divx/Xvid video file?). Once you have chosen which version(s) to try and download, just click on "Download Torrent". If you associated .Torrent files with the BitTorrent client when you installed it, then the BitTorrent client should start up, ask you if you want to download that file, and then start downloading it, and putting it in some folder that I'm sure can be found and changed if you poke around the settings and preferences.
So to recap, you want (say) a movie file. A bunch of people out there have it. There is this thing called a Torrent file (or just "a Torrent") which will tell BitTorrent clients (programs) how to download that particular movie file. So you install a BitTorrent client on your computer, use it to open a Torrent that correstponds to the movie file you want to download, and the BitTorrent client can then start talking to the Peers and Seeds who can send you bits of that movie file. After a while, your BitTorrent client will have accumulated the entire movie file, and will dump it into some folder in your hard drive. Not too complicated, is it?
If it was, then here it is again, as abbreviated as I can make it:
"FOR DUMMIES": How to use BitTorrent
PART A: DOWNLOAD AND INSTALL A BITTORRENT CLIENT
1) Download BitComet. You can do so by right-clicking here and choosing "Save Target As" (Internet Explorer) or "Save Link As" (Firefox).
2) Click on "Save File". Save it somewhere on your computer (like your desktop, your C drive, My Documents, wherever).
3) When the download is finished, use your windows to navigate your way until you can see the "BitComet_0.81_setup" file's icon. Double-click on it.
4) Click "OK", "Next", "I Agree", "I Agree", "Next", and "Install". The program will install. Click "Finish". The program will start up.
PART B: FIND AND DOWNLOAD A FILE
like a movie or an album
1) Go to a BitTorrent search engine... Say, ISOhunt.com
2) Click on the text field (long thin white rectangle) near the top left of the page, and type in your desired movie/album. Say, An Inconvenient Truth. Click "Search".
3) You will be taken to a search-results page. Click on "S", on the top of the second rightmost column of the table of search results.
4) You probably see a page like this, with a mix of files that are around 700 megs (Divx/Xvid movies that fit on one CD) and files that are around 4 Gigs (files to be burned on DVDs).
5) Click on the name (widest column) of a torrent that sounds good. That row will expand to display some ads, a "Download .torrent" link, and information about the files that the torrent links to. Click on the "Download .torrent" link.
6) If you have never downloaded a torrent before, a window will pop up, asking what you want to do with this file. Choose "Open with BitComet", check "Do this automatically for files like this from now on" or "Always use this program to open similar files" or whatever. If you have done this in the past, then... (see Step 7).
7) BitComet should open automatically and ask you if you want to download this file. Click OK.
8) Wait patiently for the file to download. If it's large, it might take a couple of days. When it's done, the file will be in the C:\Downloads folder.
9) If the file is a .AVi, .MP4, etc, then it is a movie file you can watch on your computer or transfer to a DVD, iPod, PSP, etc, by following the instructions you can find eslewhere on this page. If the file ends with .RAR, then it's basically a kind of ZIP file, and you need to decompress it using WinRAR. If the file ends with VOB, ISO, CUE/BIN, or if it's a VIDEO_TS folder, then it can be burned onto a DVD for viewing on a DVD player. I am not going to go into the intricacies of dealing with all these different file formats, but a few quick Google searches should deliver useful tutorials about working with those files (and who knows, maybe I'll add some to this page in the future). In my opinion, .ISO files are easiest to deal with (just burn them onto a DVD and they work).
|
In Conclusion,
I hope this guide has been helpful to you. Please please please tell your friends about this page! Remember, piracy is wrong, and illegal. Please do not use these techniques to steal media for which you have not paid. And if you do want to send me (or the host, iG) a legal threat or takedown notice, please keep in mind that this page is hosted in Brazil, where we are still free to talk about how to lawfully transcode media for lawful purposes, about how to stop over-zealous DRM from infringing on our legal right to enjoy media on multiple platforms and to back it up. This page is not breaking any laws.
If you still think that managing video on your computer is significantly more complicated than managing audio, maybe this image will help.
|
|
